7 okt. 2025
Hoe stel je de Meta Conversions API Gateway in met Stape
Geschreven door
Ira Holubovska
Bijgewerkt 4 aug. 2025 reacties
Step 1. Stape account
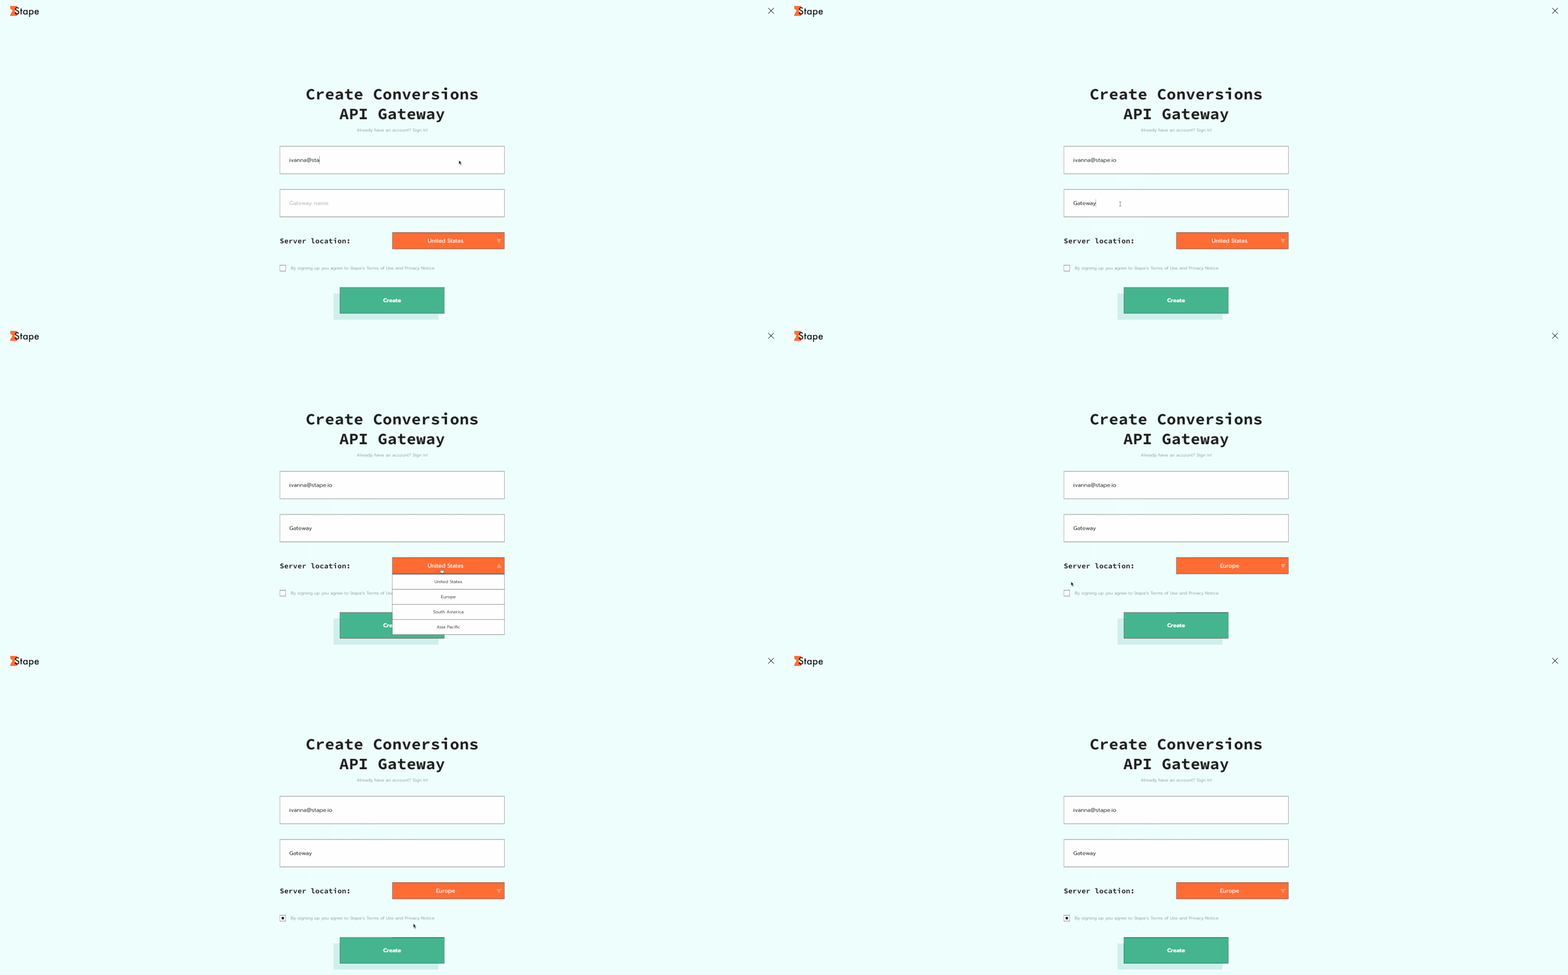
1. Create an account at Stape:
- Visit our registration page.
- Enter your email and Conversions API Gateway name.
- Choose Conversions API Gateway server location. We offer several server locations: the United States, Europe, South America, and Asia Pacific, Asia Northeast.
- Click the button Create.
2. But, if you already have an account at Stape:
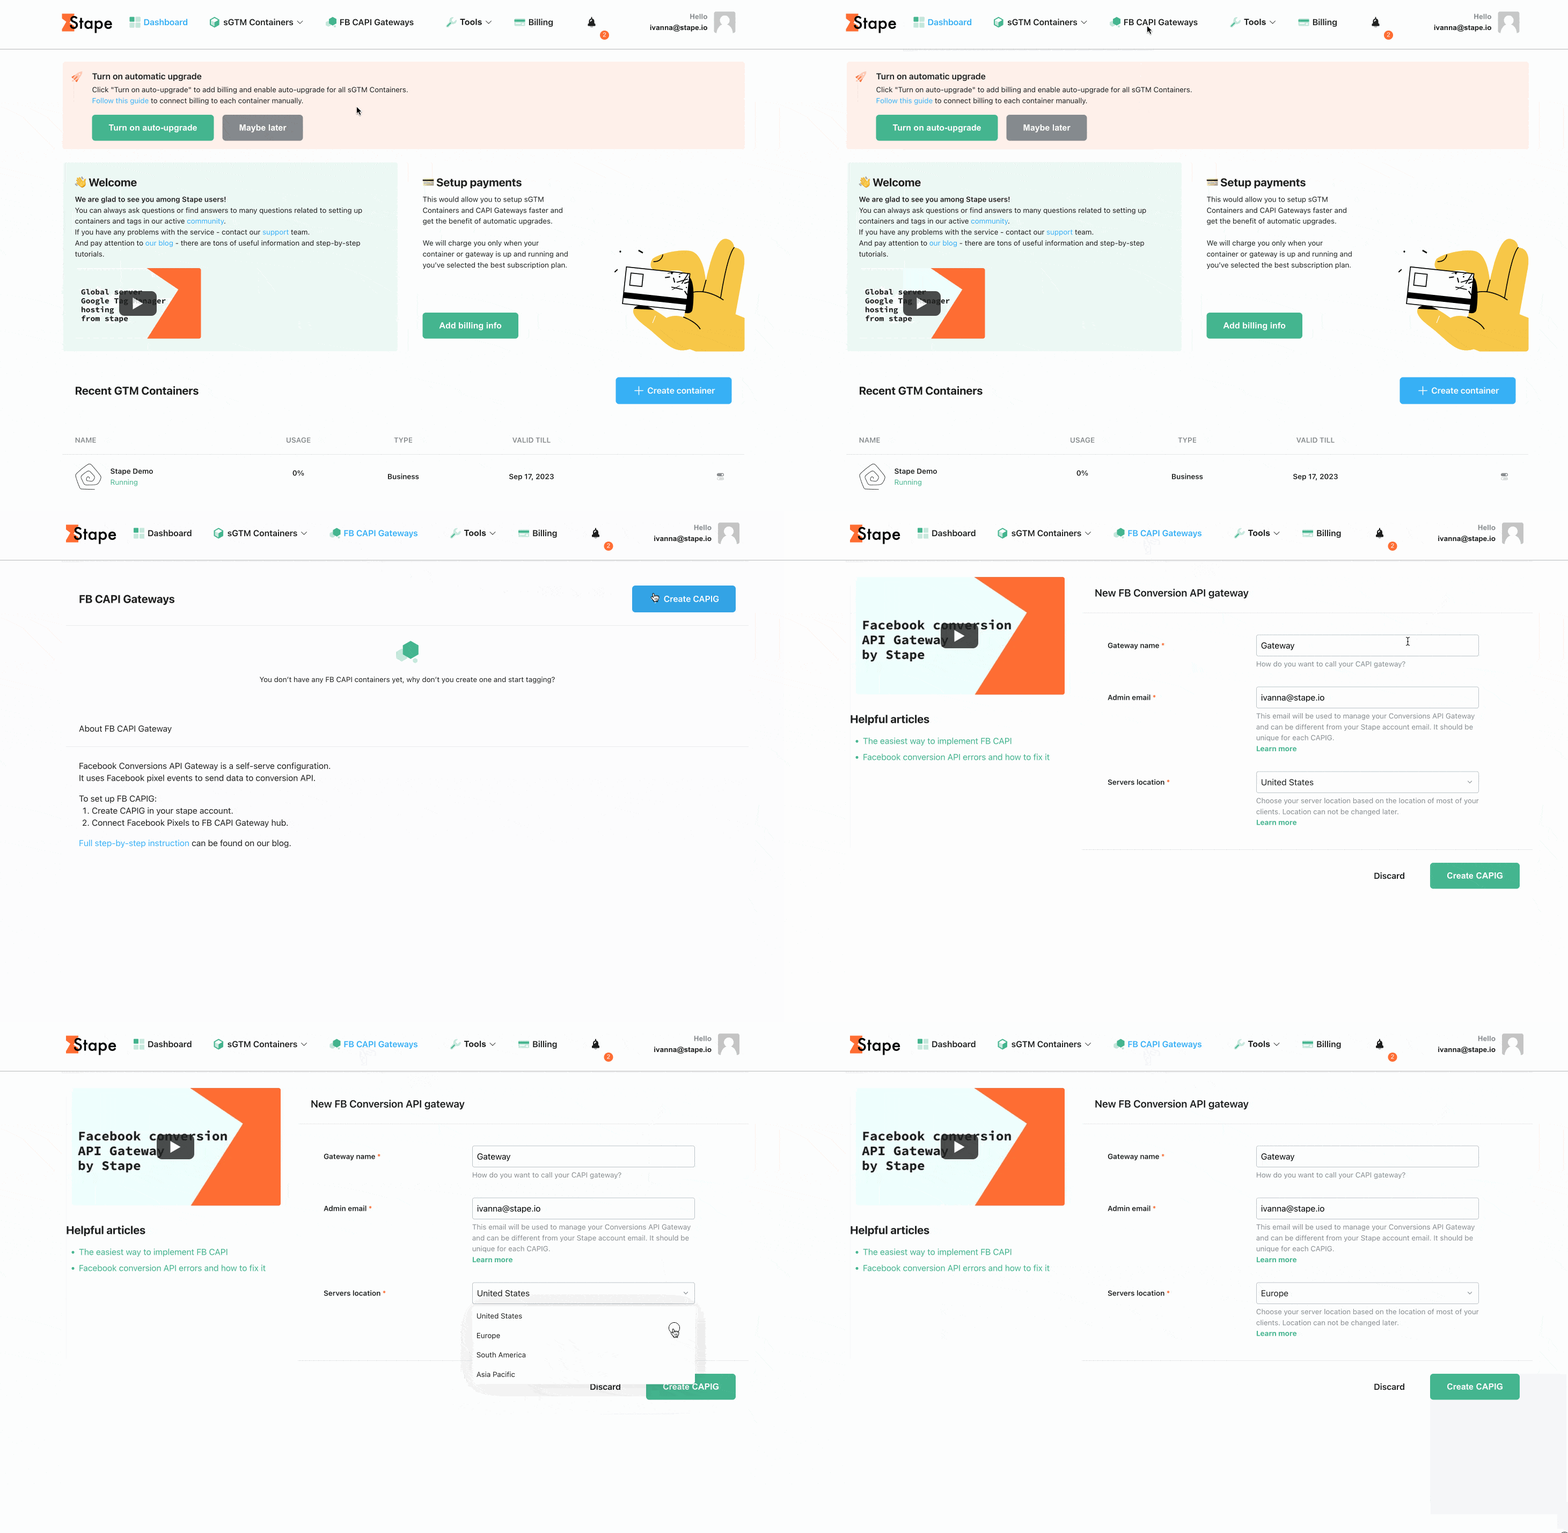
- Click FB CAPI Gateways in the main menu and Create CAPIG on the top right.
- Add the Conversions API Gateway name and the email address you'd like to use for managing the Conversions API Gateway environment.
- Select the server location.
Step 2. Subscription plan
Choose the Conversions API Gateway subscription you’d like:
- Pay as you go. $10 per month per pixel.
- Unlimited. $100 per month for 100 pixels.
You can also start with a 7-day free trial for both subscription plans.
Step 3. Finish registration
- 1.Add Billing details.
- 2.You should have been sent an email invitation to create an account in the CAPIG hub to the email address you provided during registration on stape. If you haven't received the email, please log in to your stape account, access CAPIG, and click on "Finish CAPIG Setup" located in the top right corner.
- 3.Create an account in the Meta Conversions API Gateway hub by adding an email address and password.
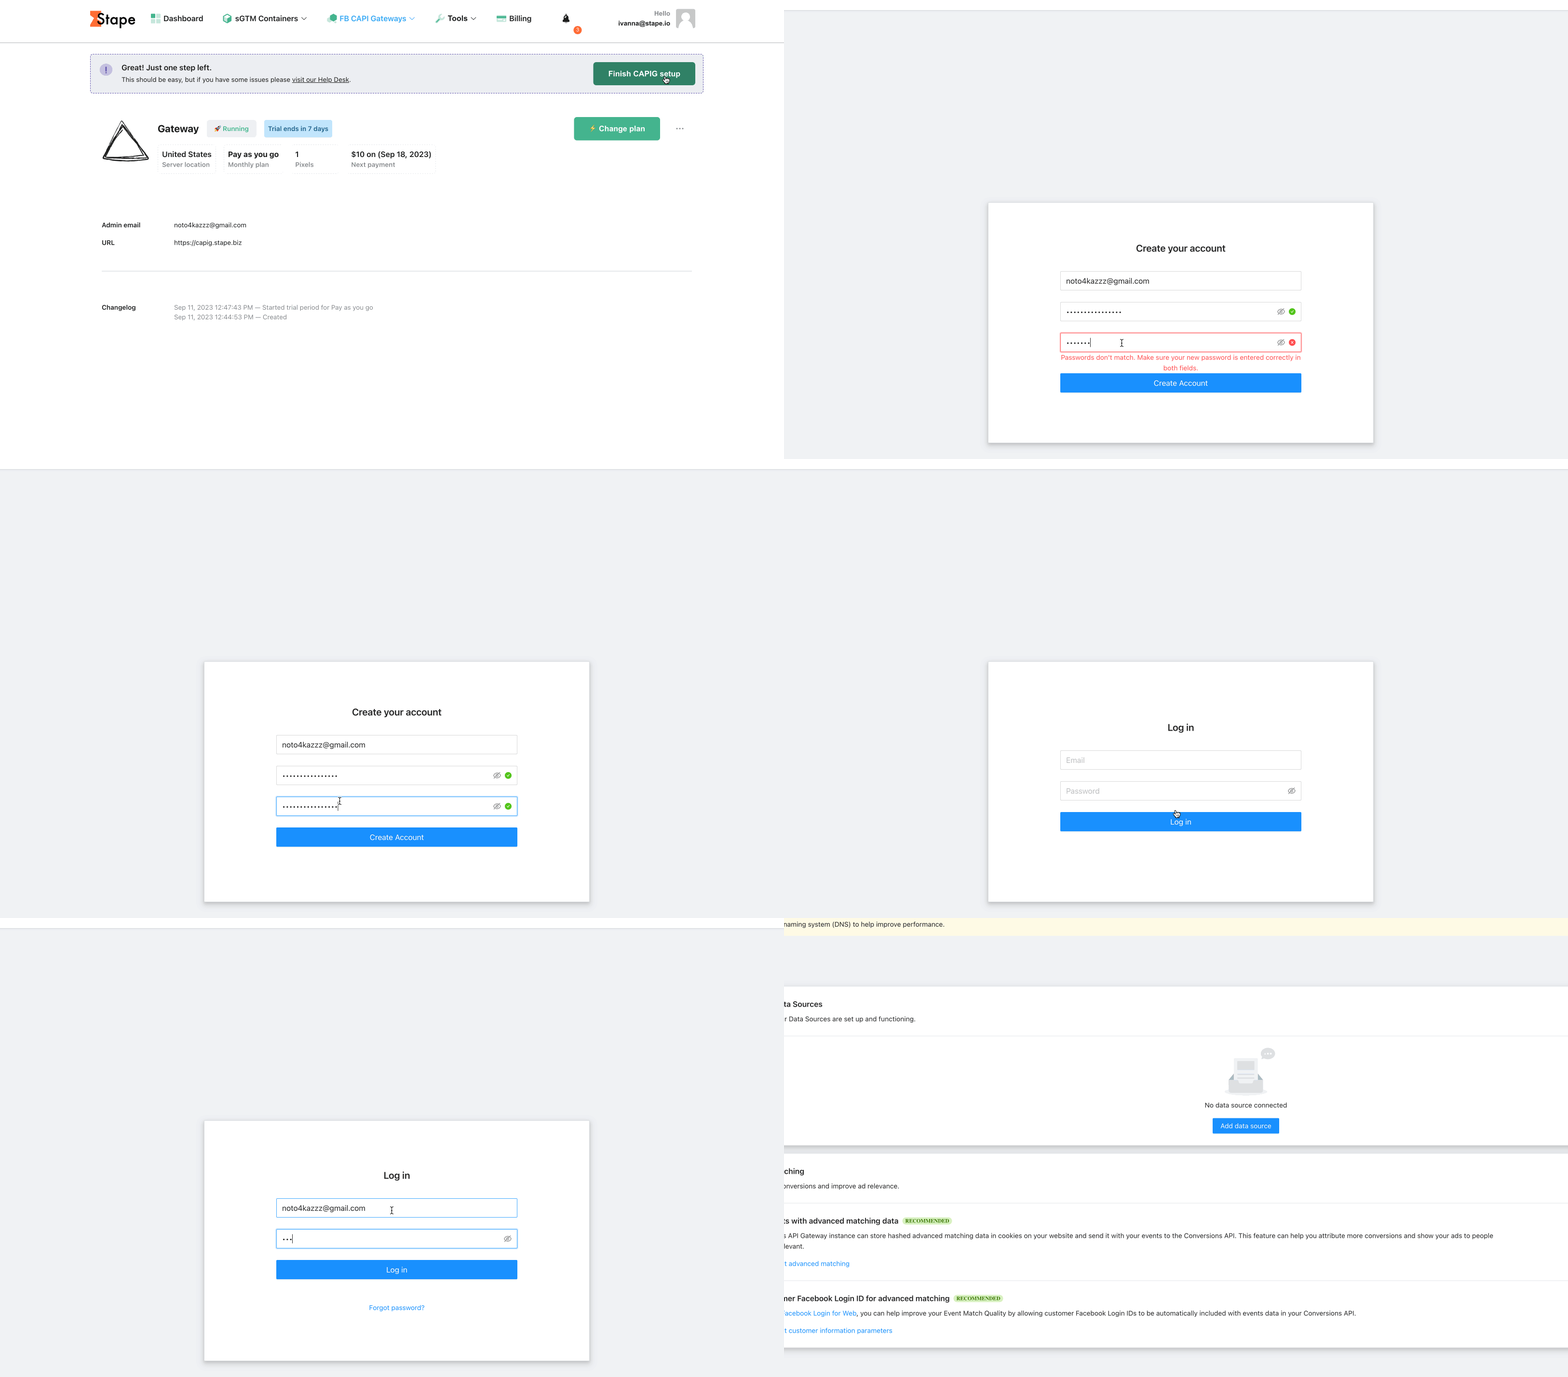
You will see your own Conversions API Gateway environment, where you can manage Conversions API for your pixels and domains.
Step 4. Connect your Pixel
1. All you have to do is click a button that says "Add data source".
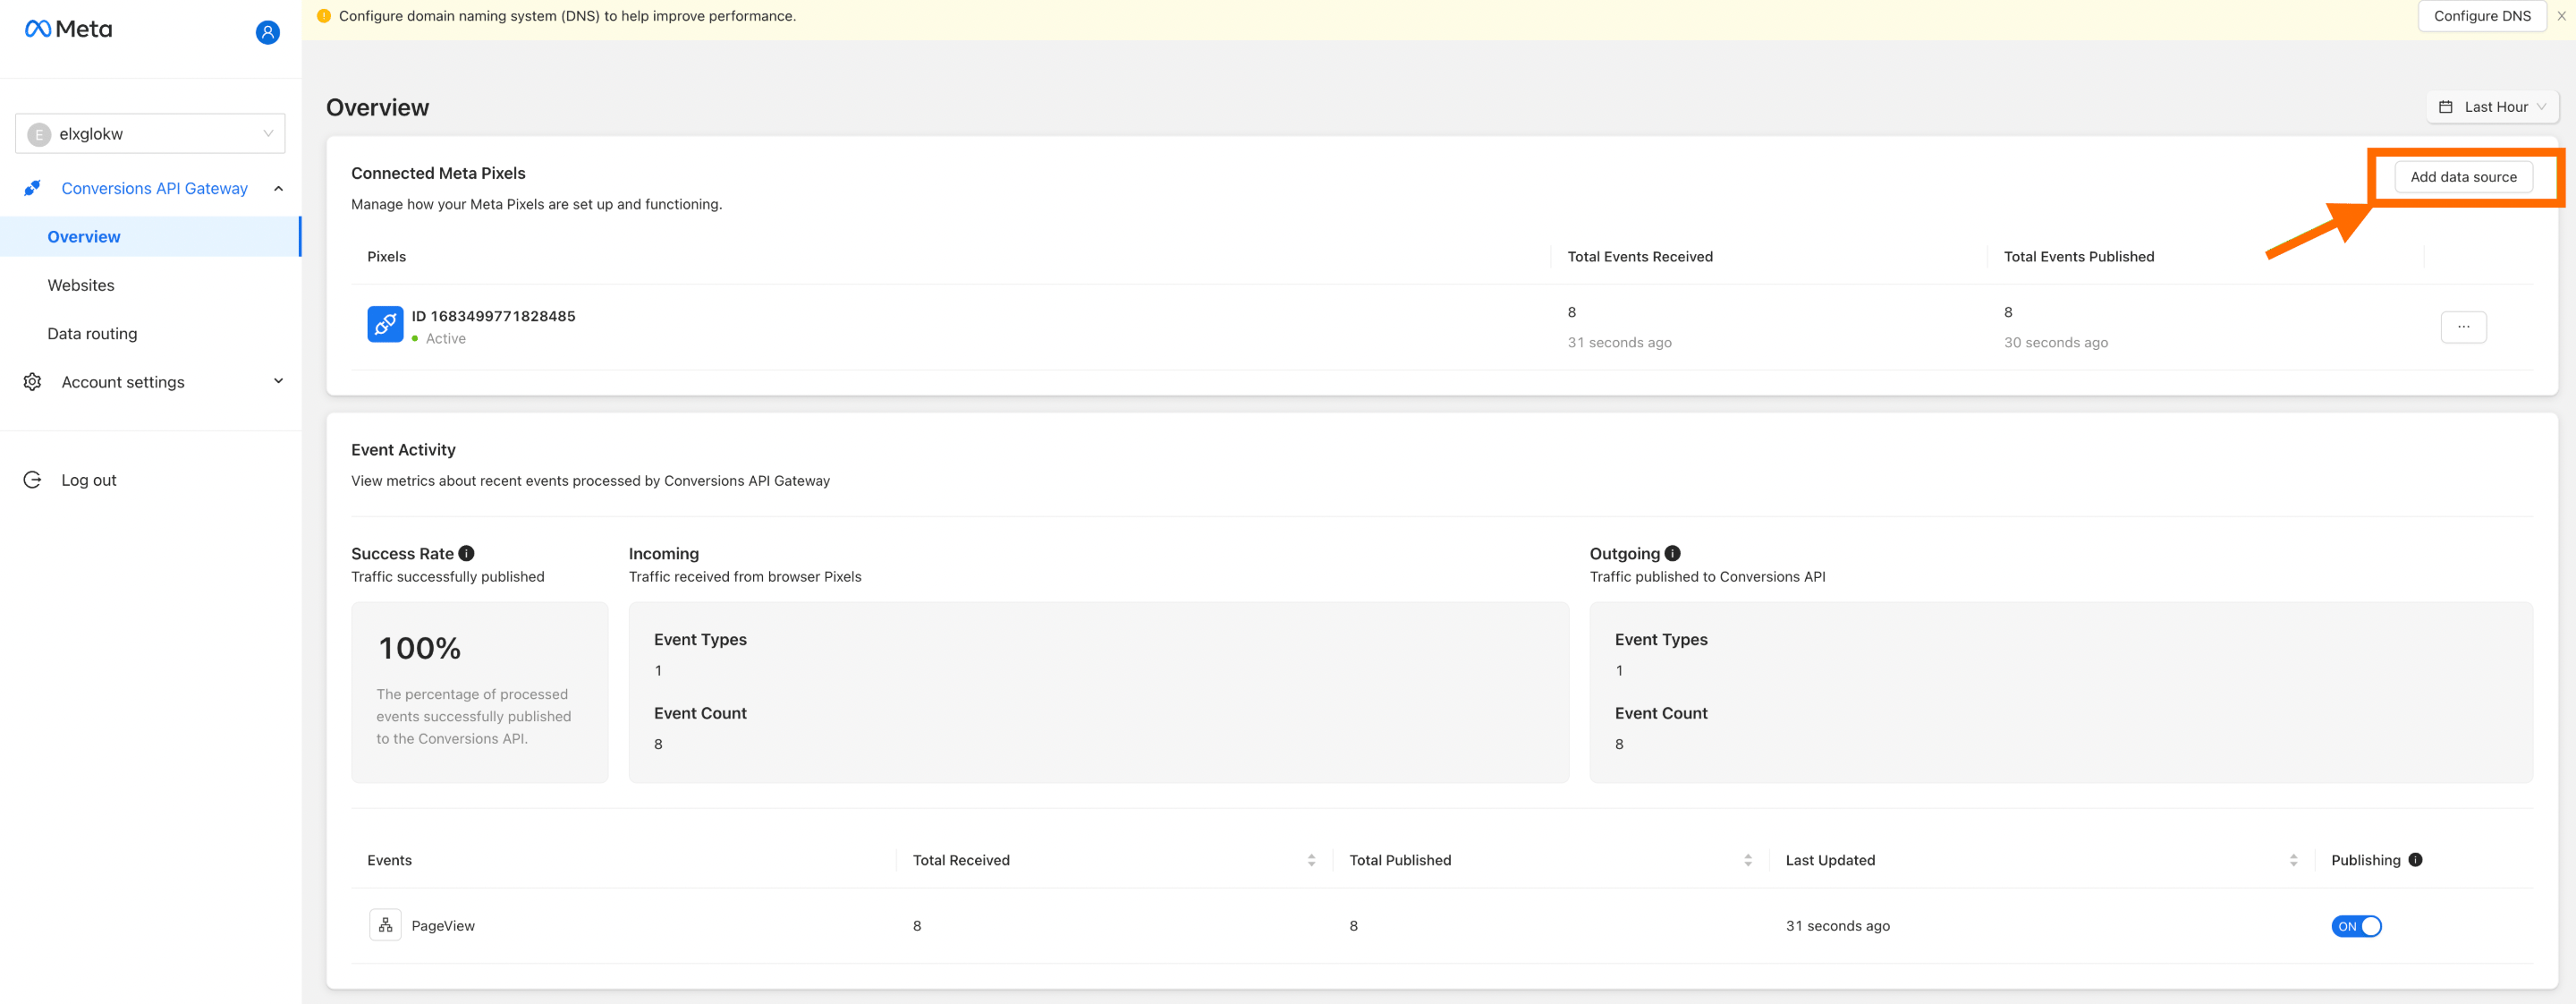
2. You have two options to add a data source to your Gateway Hub:
- Use Facebook Login (long)
- Manual connection (fast)
Use Facebook Login (long)
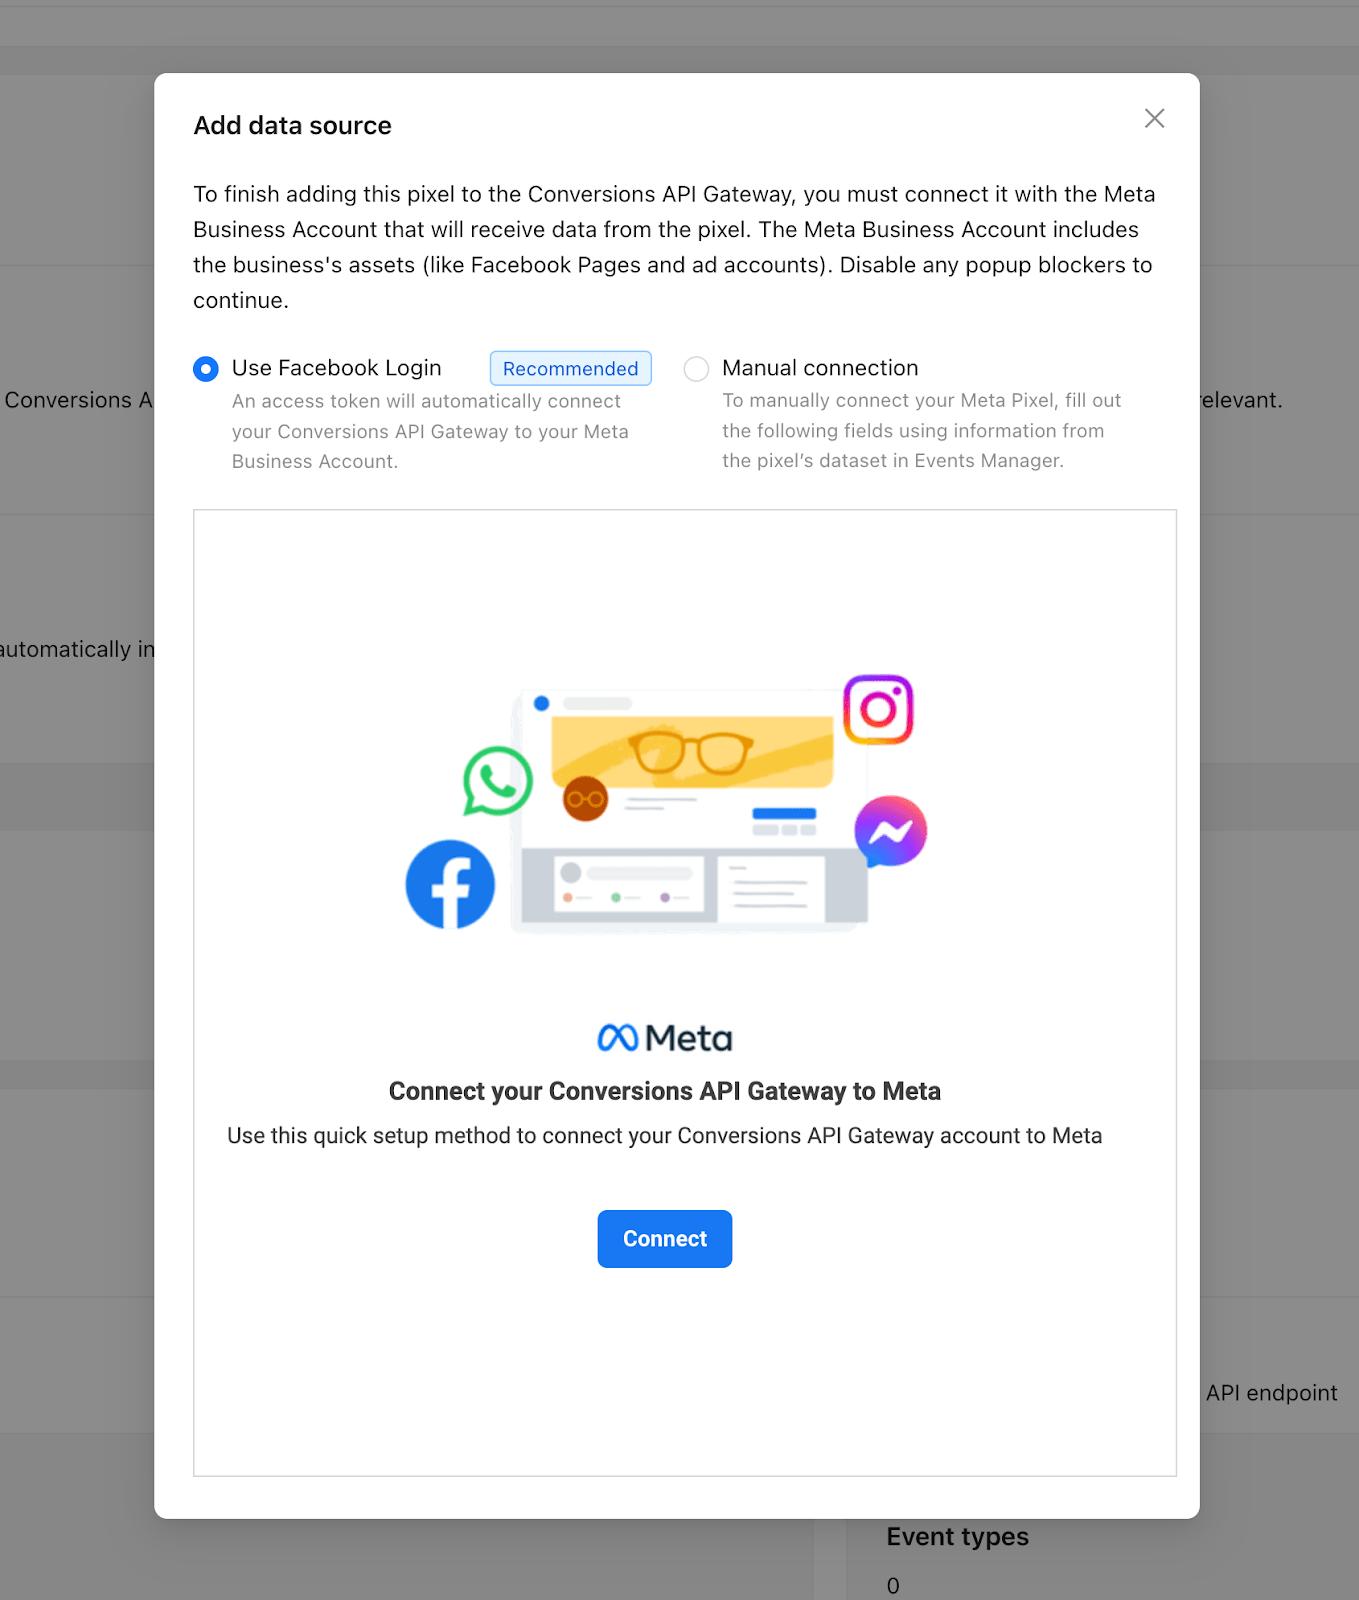
Follow the steps:
- Click Connect. There will be a pop-up window where you need to proceed with the connection.
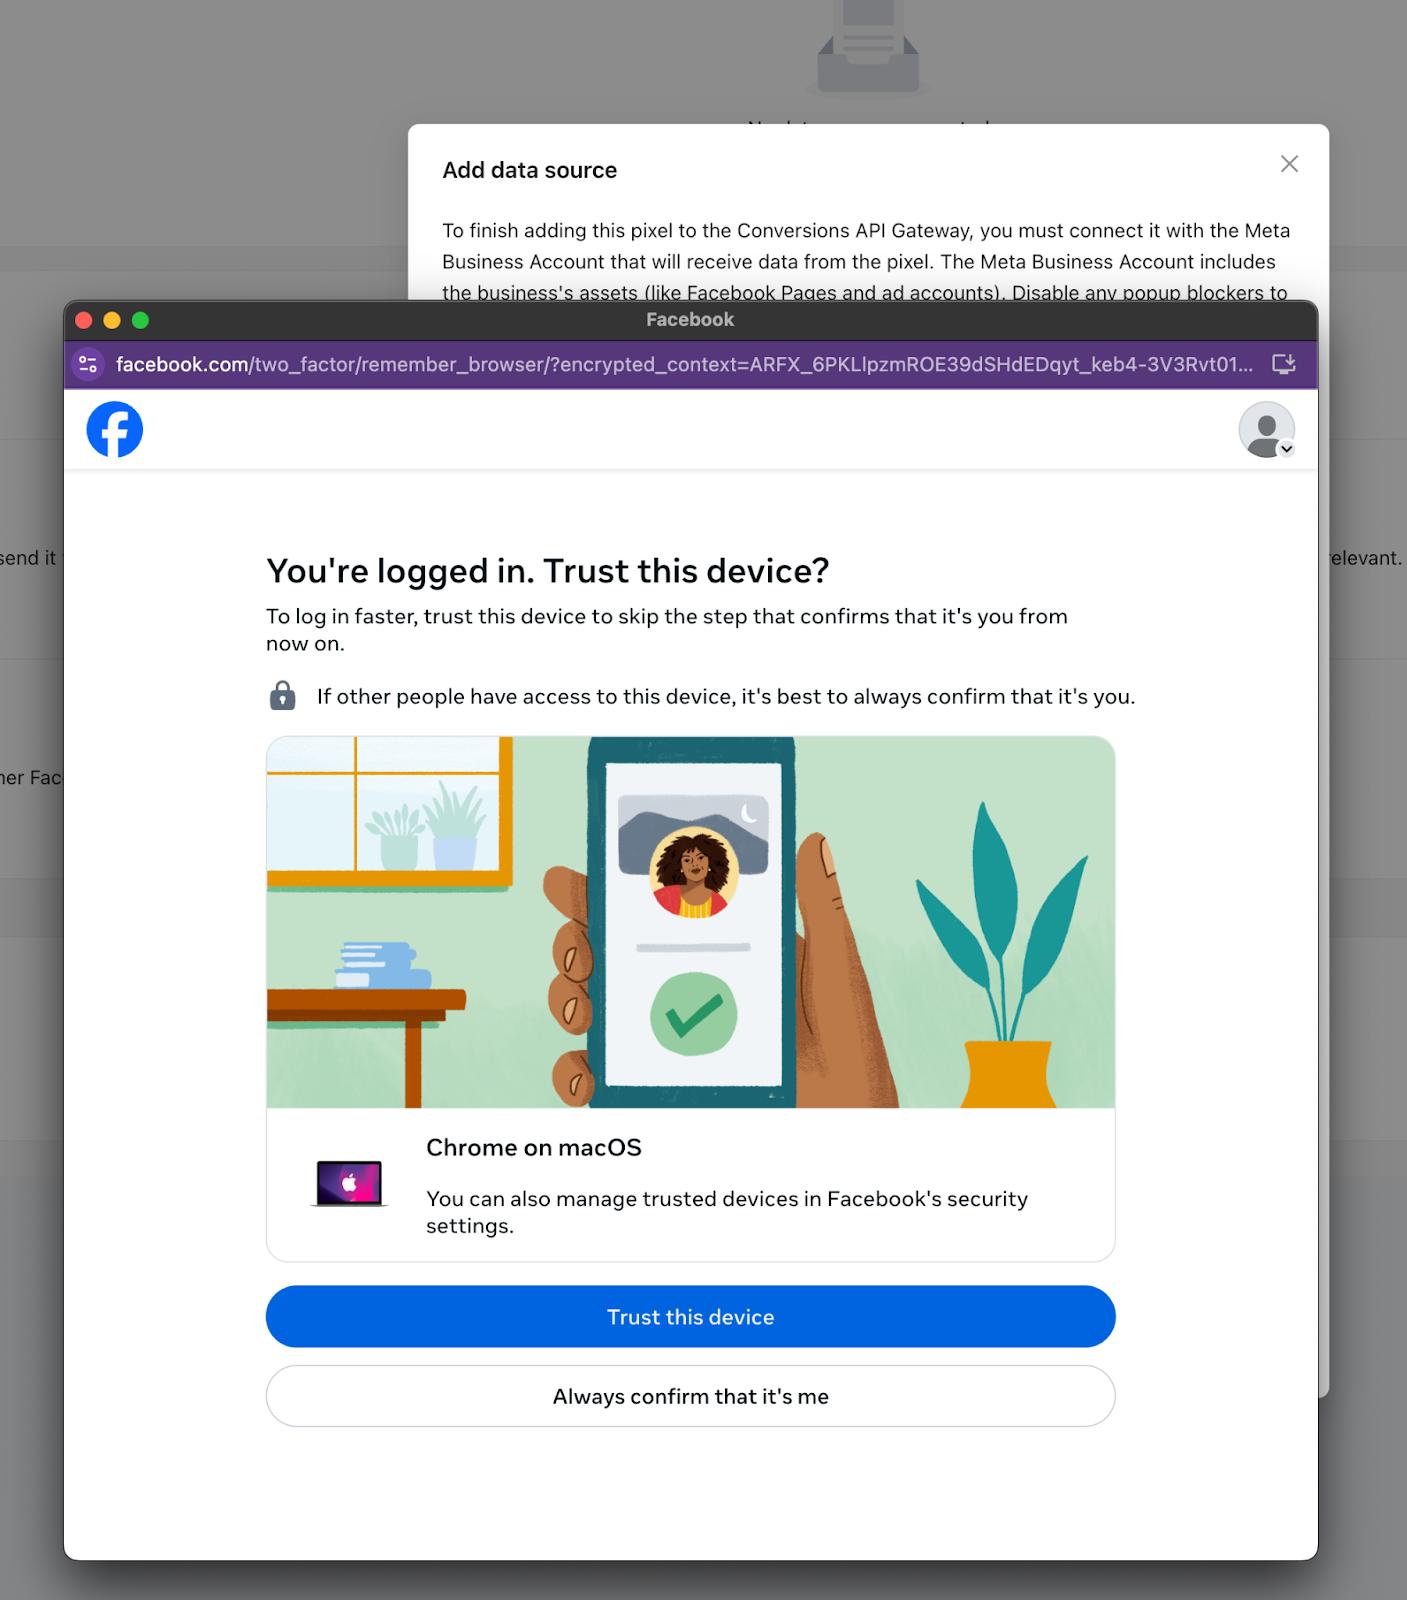
- Log in to your Facebook account
- Select “Trust this device”
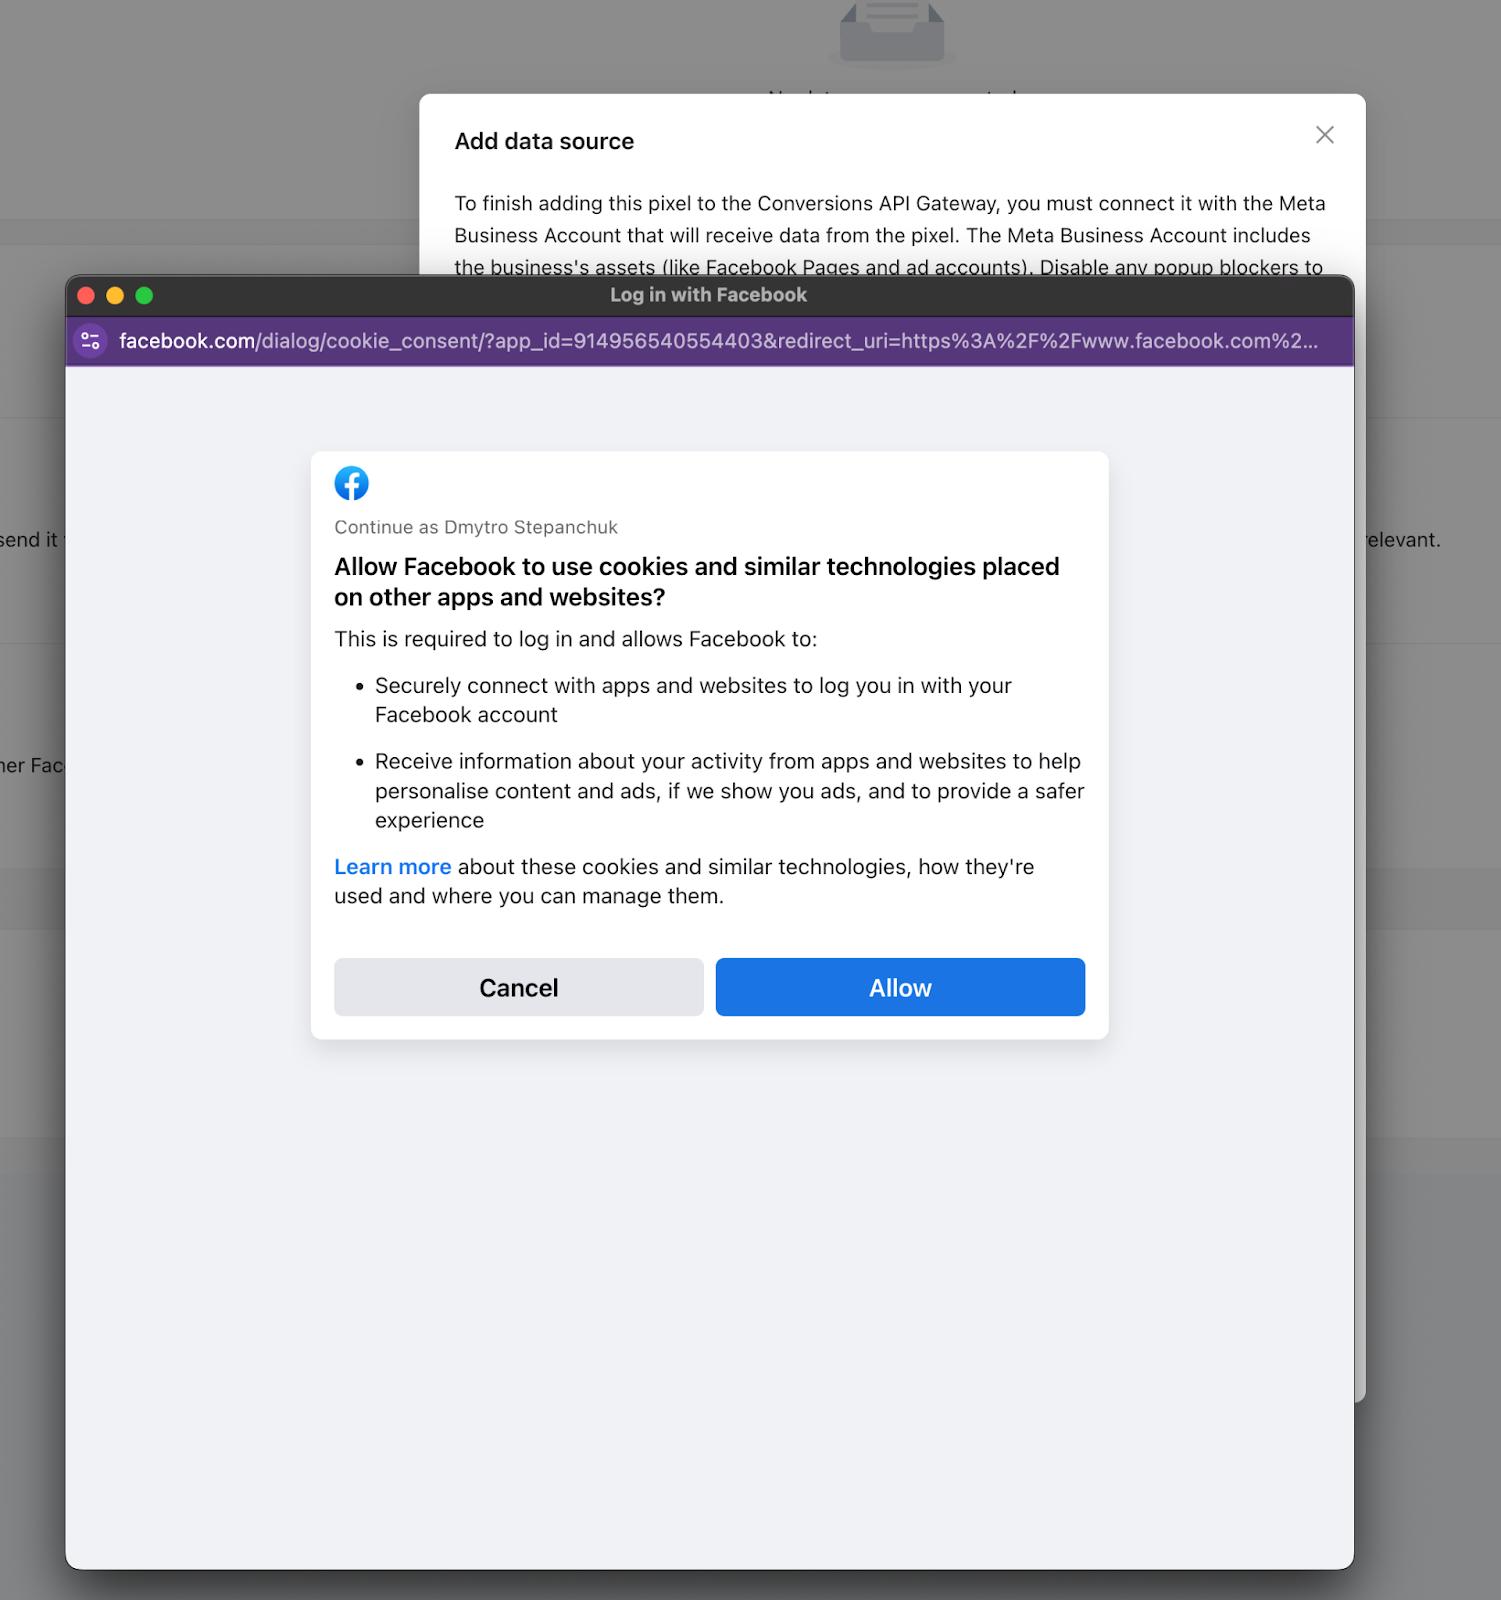
- Allow Facebook to use cookies and other technologies.
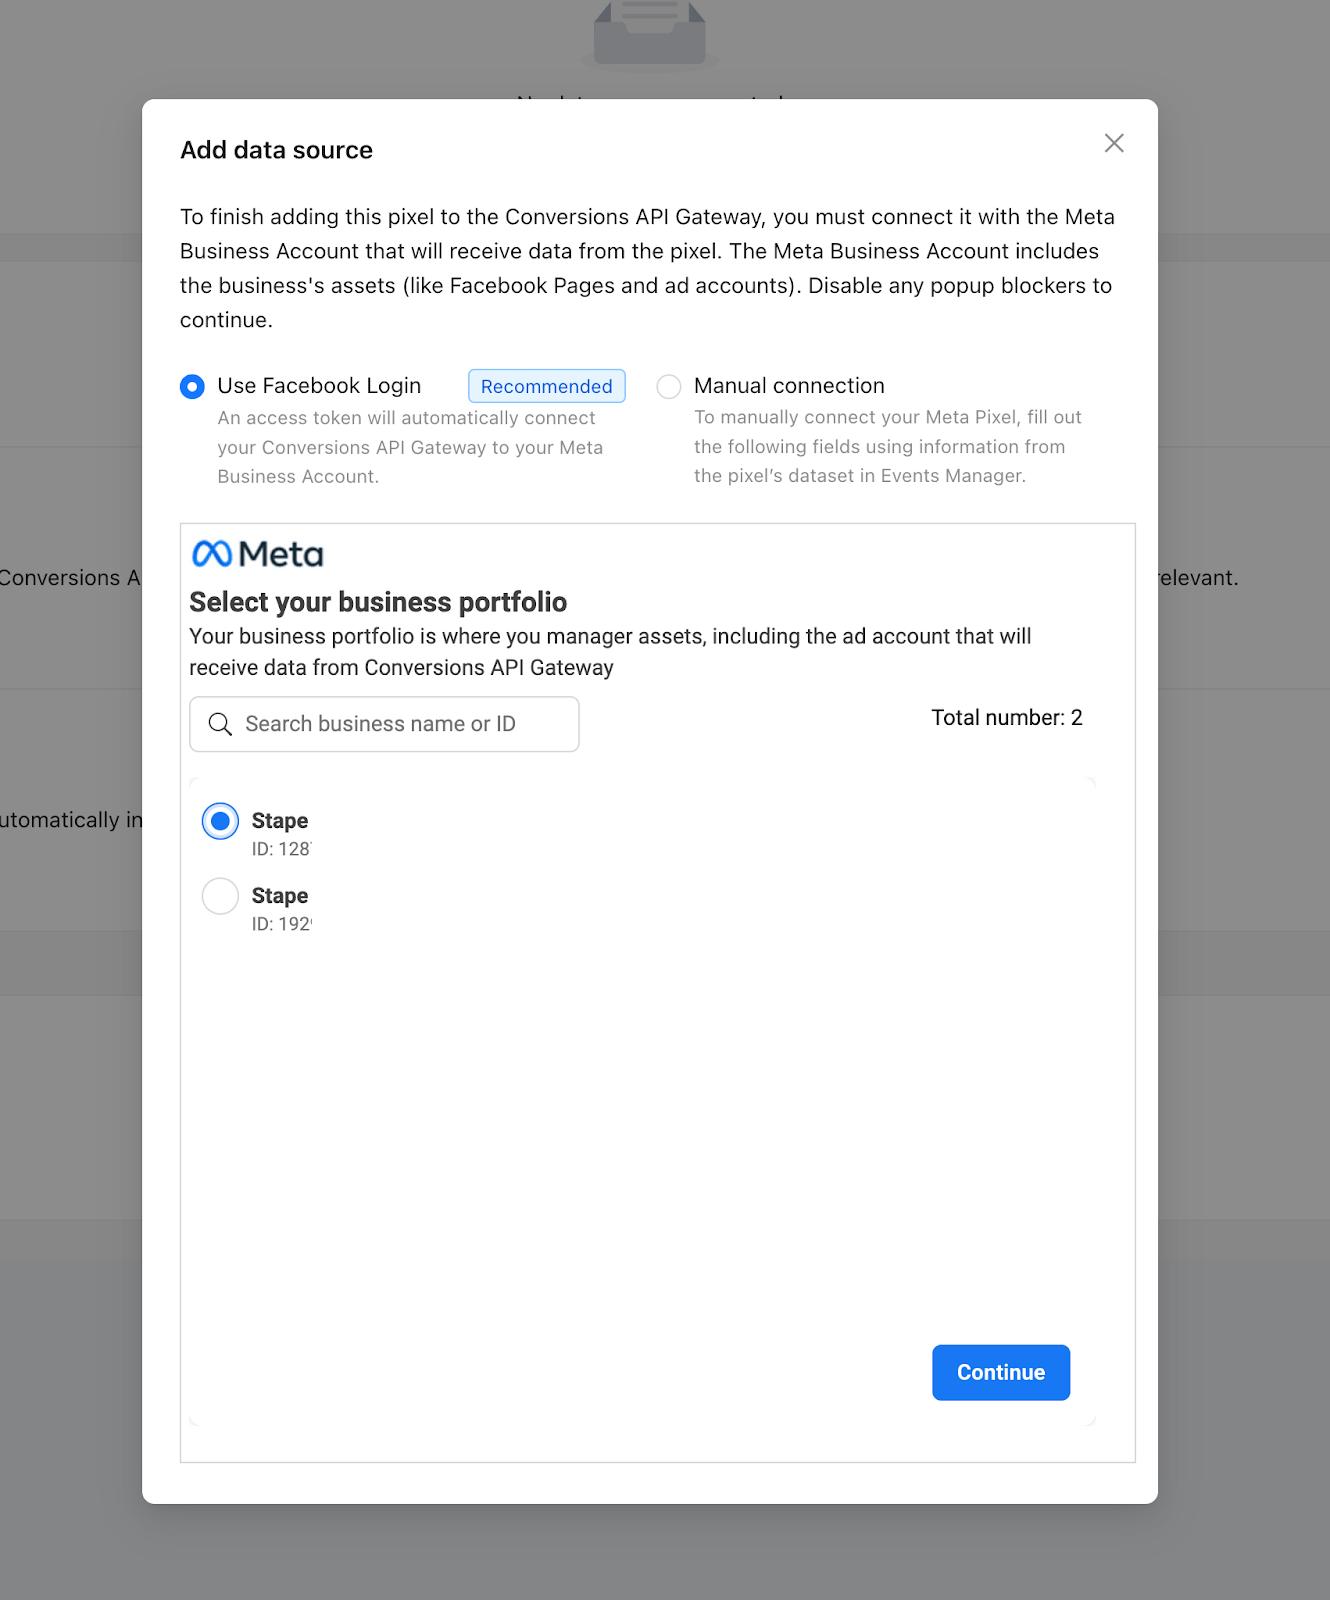
- Select your business account or the business account you have access to.
- Select the pixel you want to add.
Data source is added. Give the integration up to an hour, and you will see the first events the Gateway Hub will receive.
Manual connection (fast)
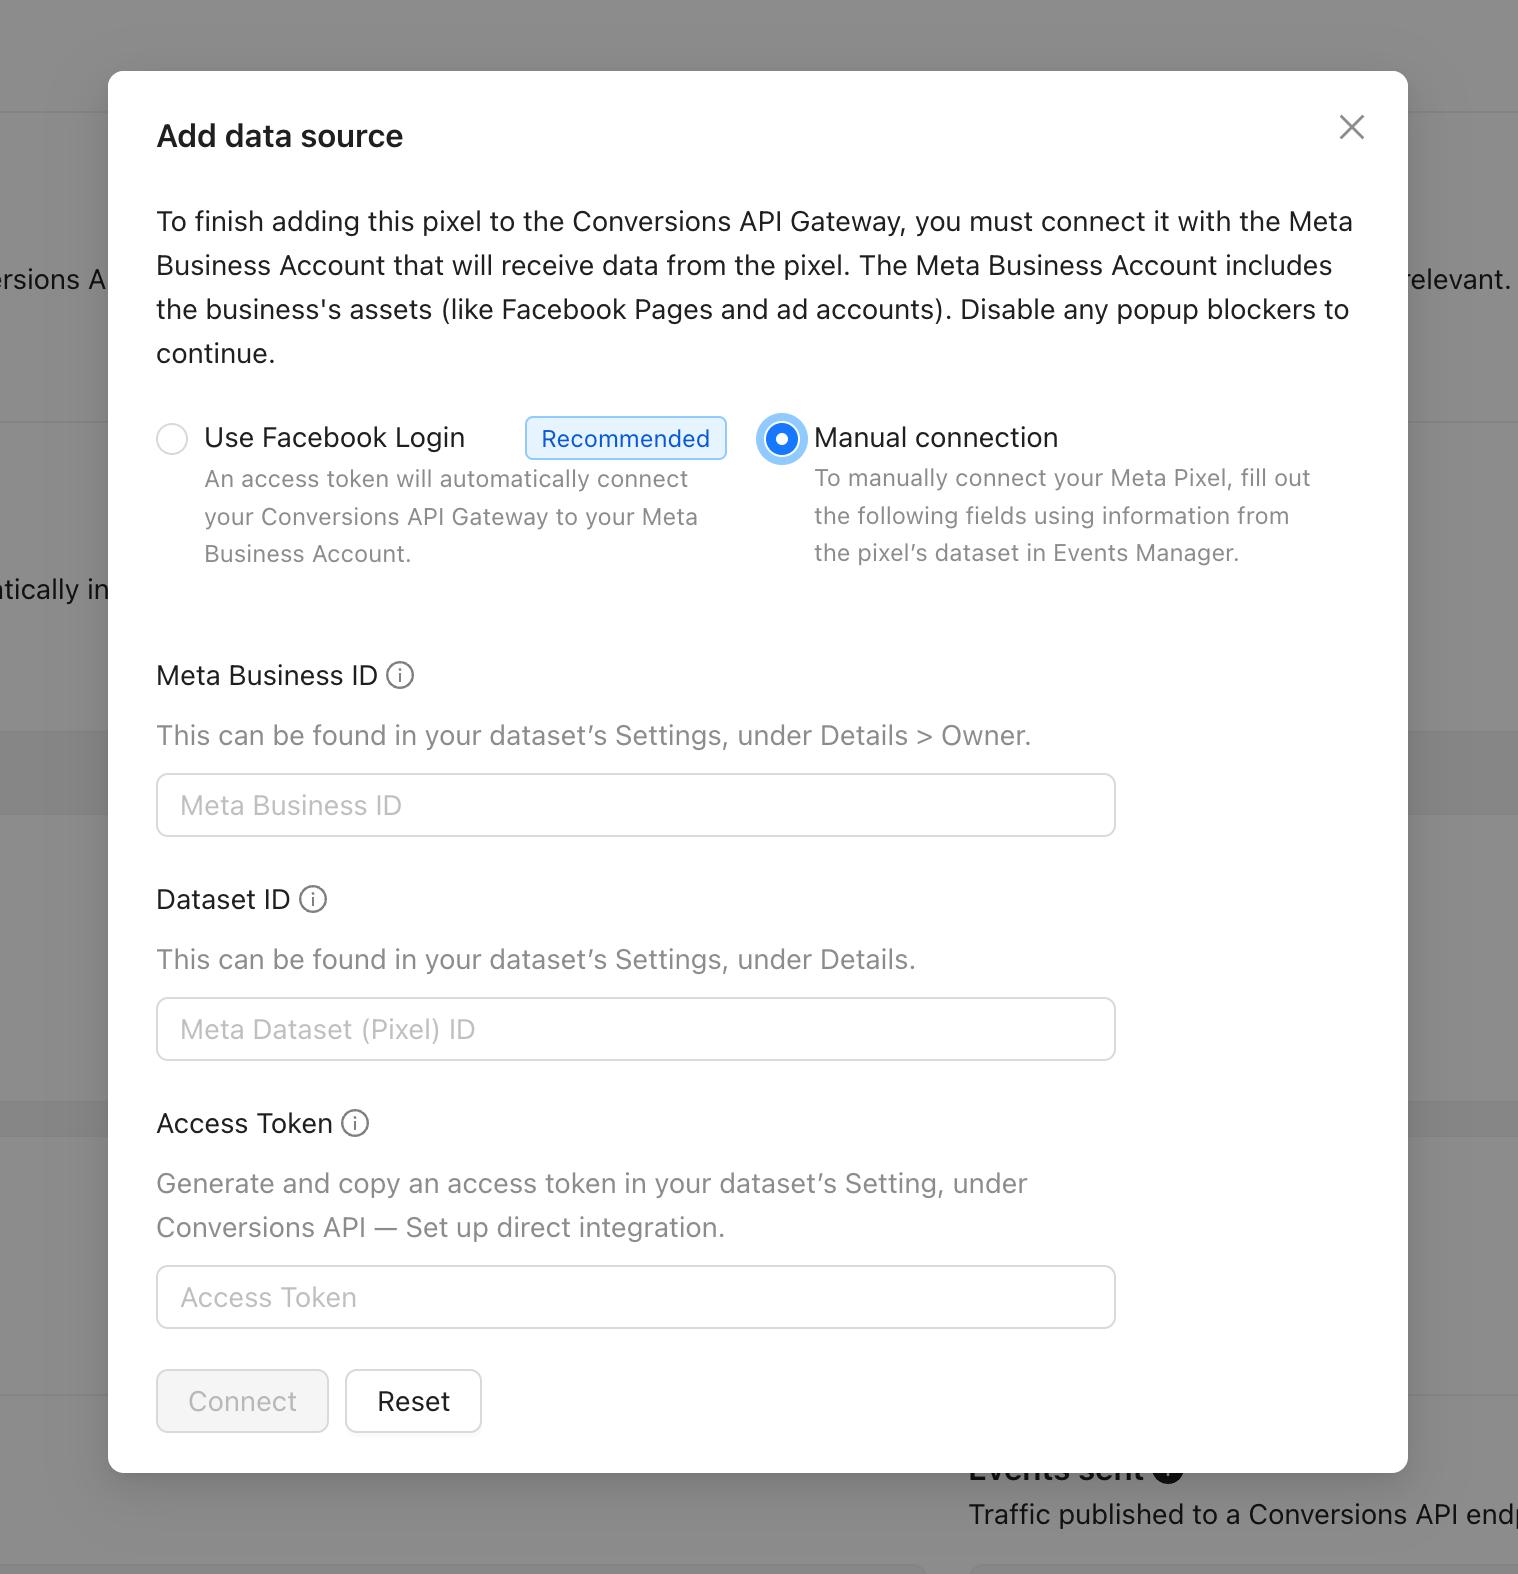
- Fill in all the fields shown in the screenshot (use the hints if you are not sure where to get all the values).
- Click Connect.
The data source has been added. Wait up to an hour for integration; after this, you see the first events received by the Gateway Hub.
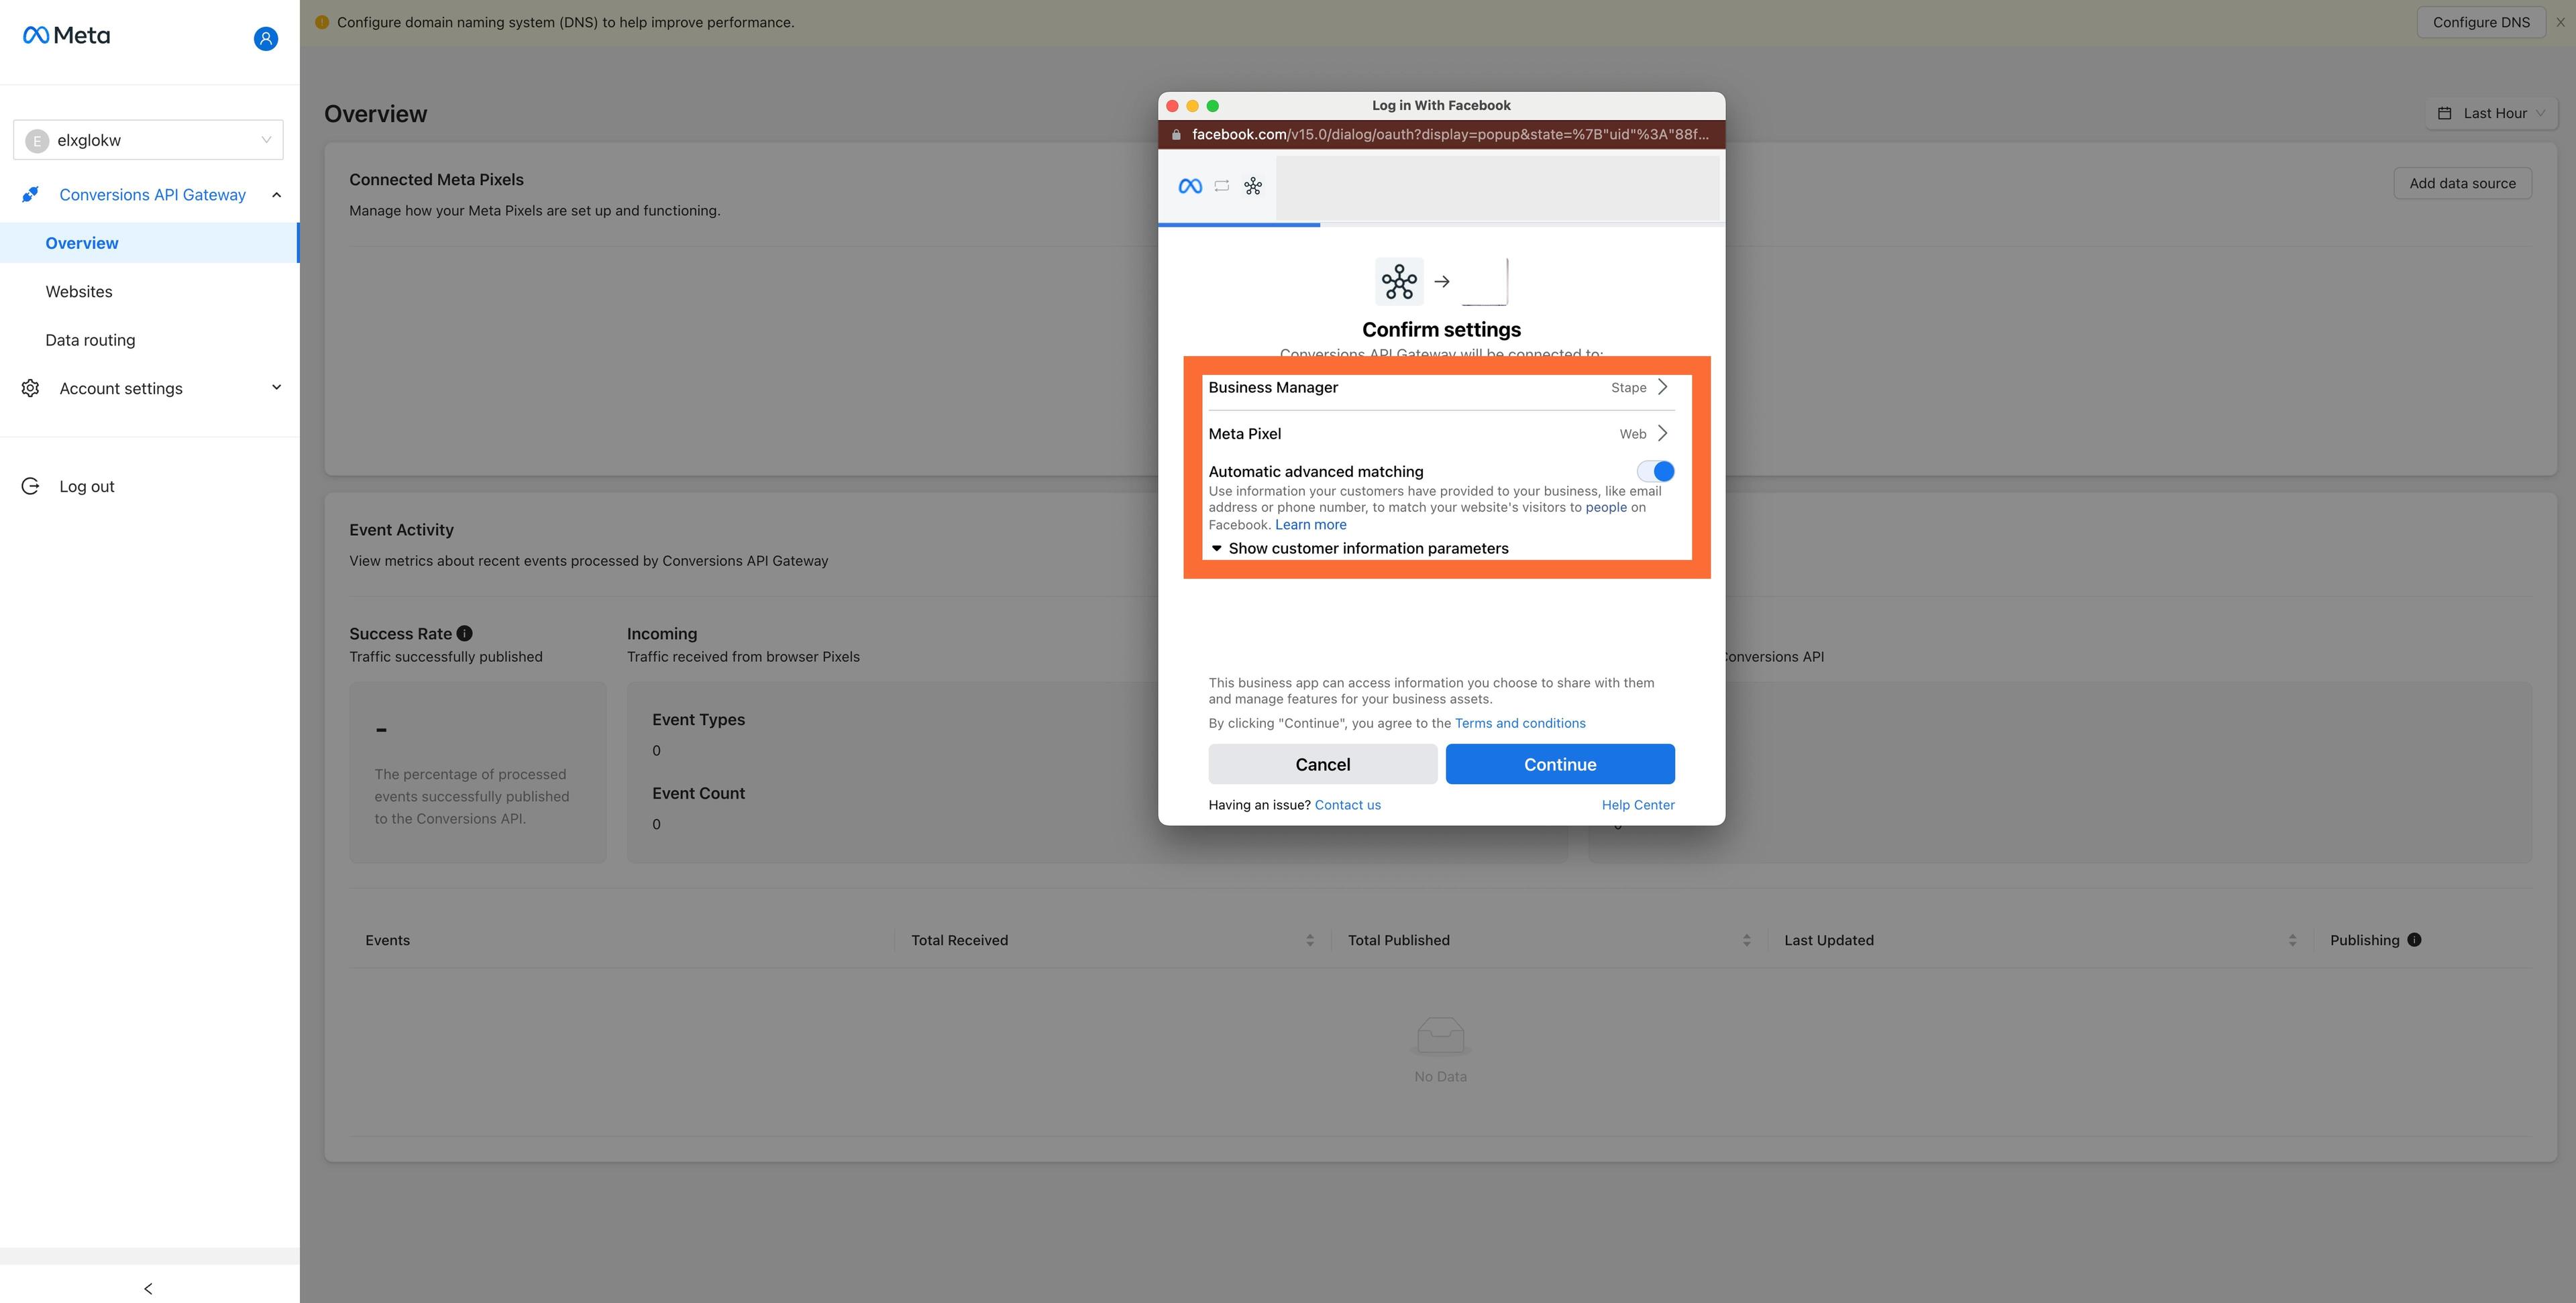
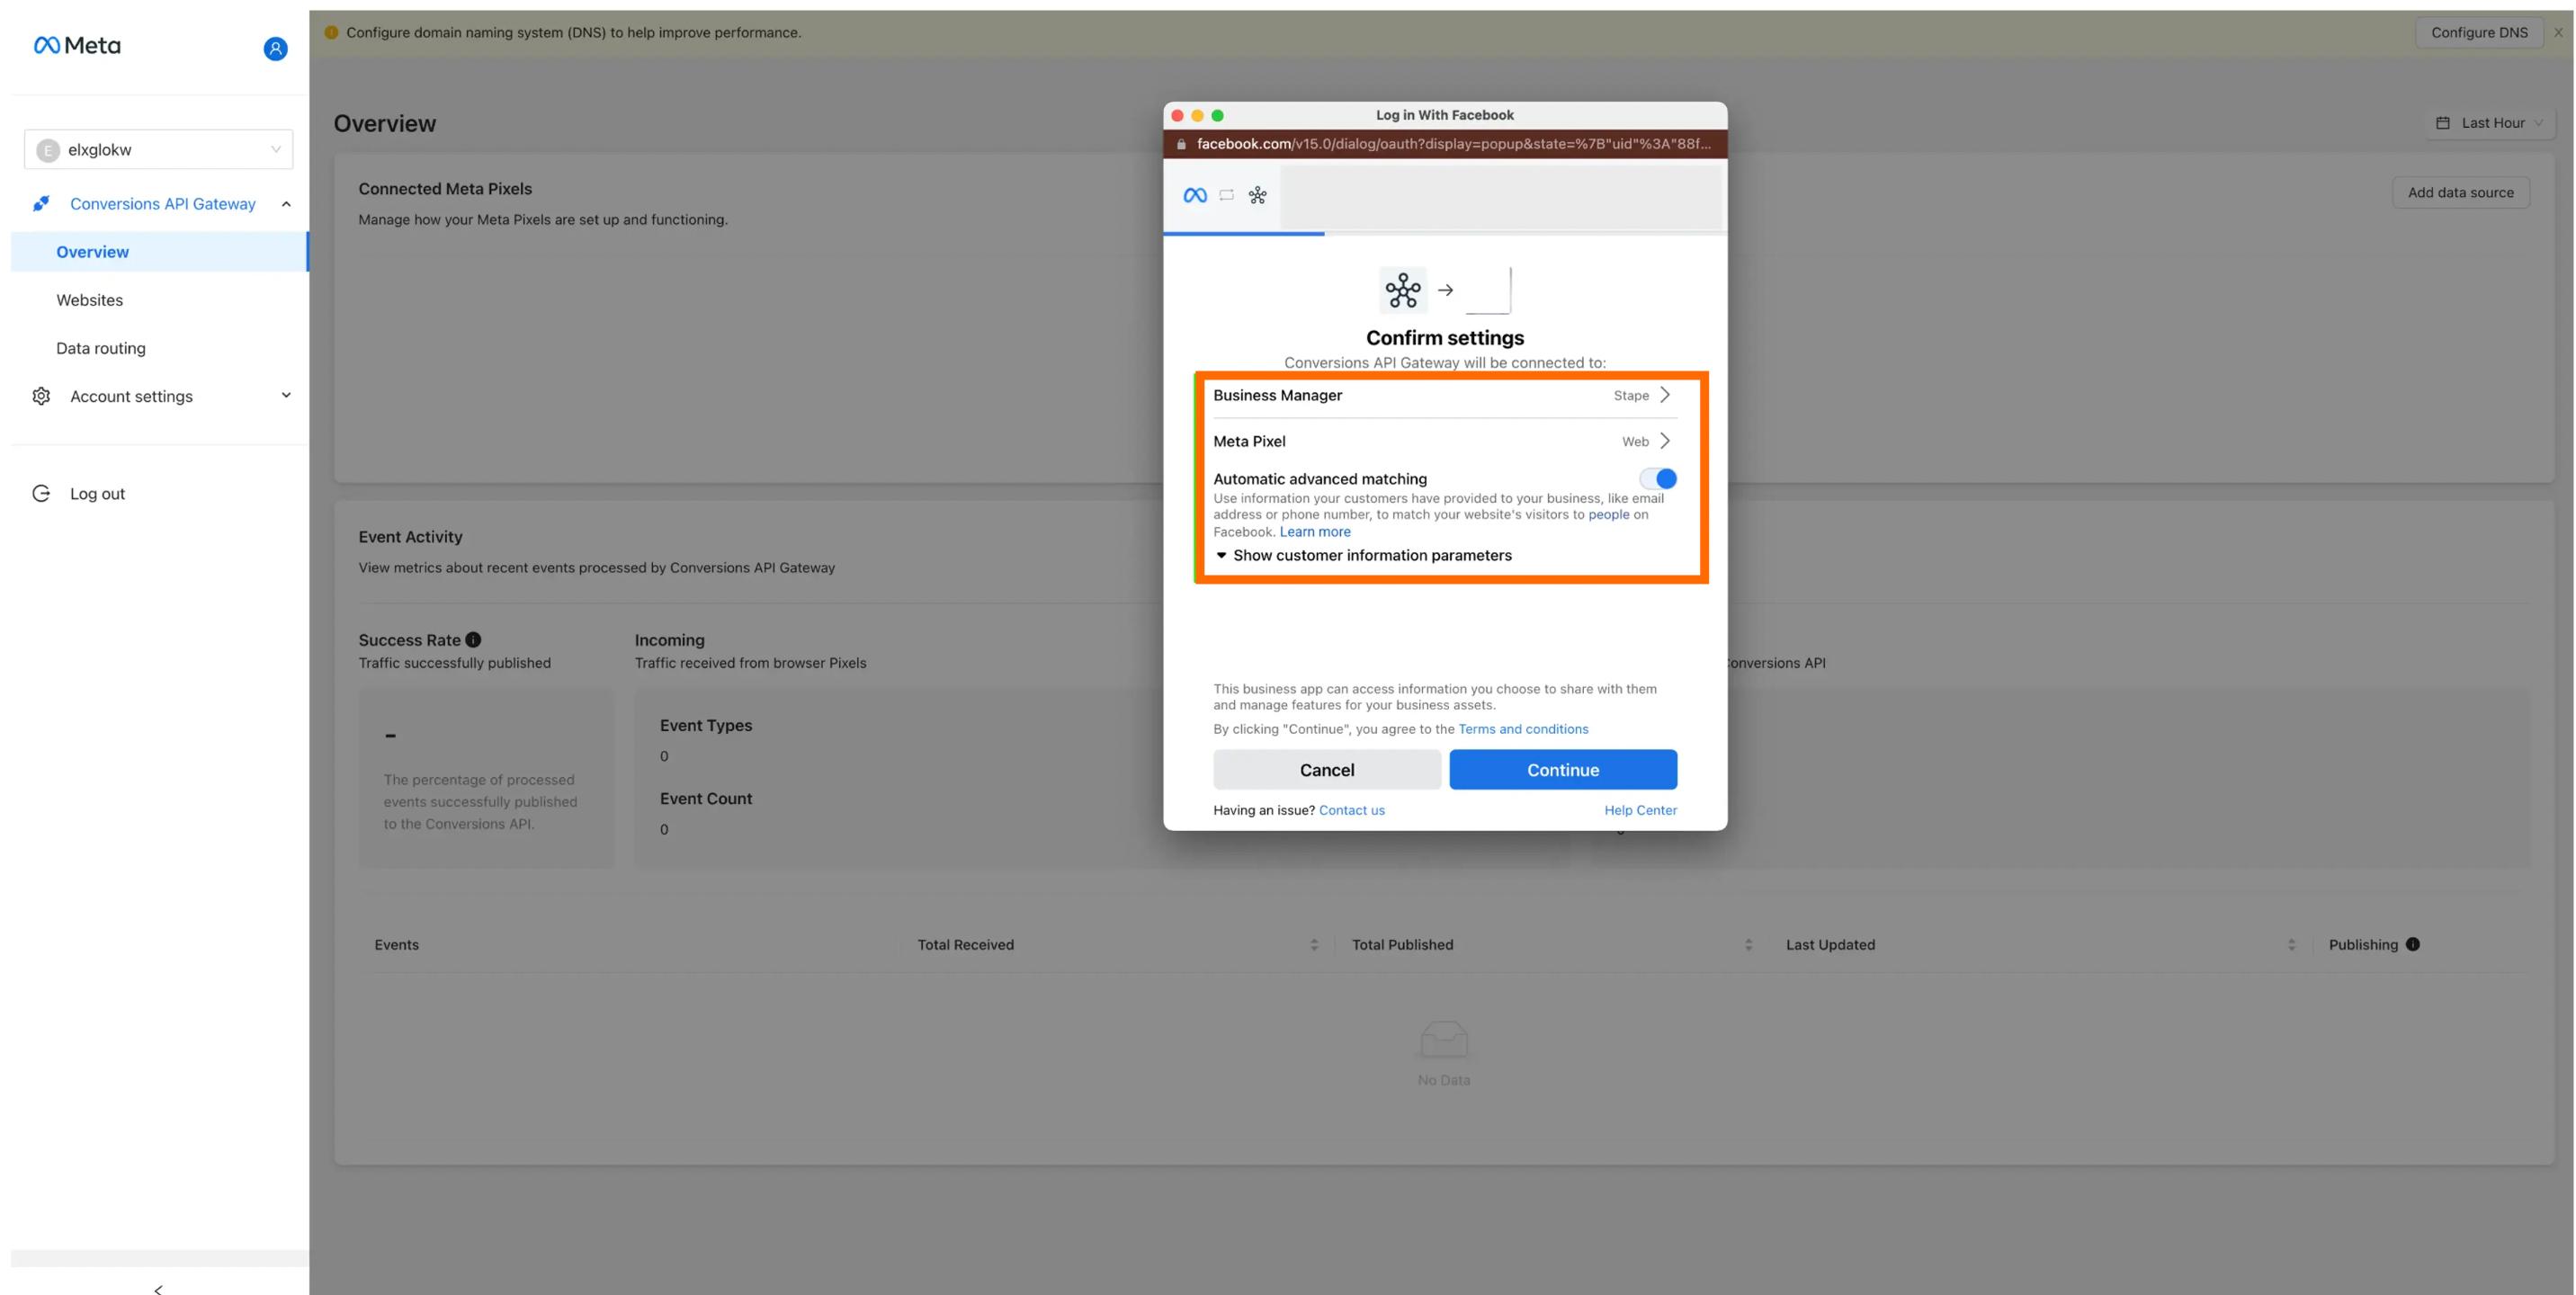
Please consider enabling Automatic advanced matching. It will increase the match quality of events. If you enable Automatic advanced matching, click Show customer information parameters and select the parameters you want to share.
Step 5. Optional: add custom domain
Using a custom domain or data routing within your CAPI Gateway hub can boost measurement performance. The data routing feature lets you specify the subdomain through which the pixel communicates with the Conversions API Gateway. Your custom domain should mirror the subdomain of the primary domain used for firing the Facebook pixel. For instance, if your website is example.com, then your CAPI Gateway custom domain should be capig.example.com.
1. Click Data Routing on the left menu.
2. Click Optimize.
3. Write down the subdomain and domain names. Click Continue.
4. Next step will require you to define DNS settings for the custom domain. Ensure you can make changes through the DNS provider before proceeding.
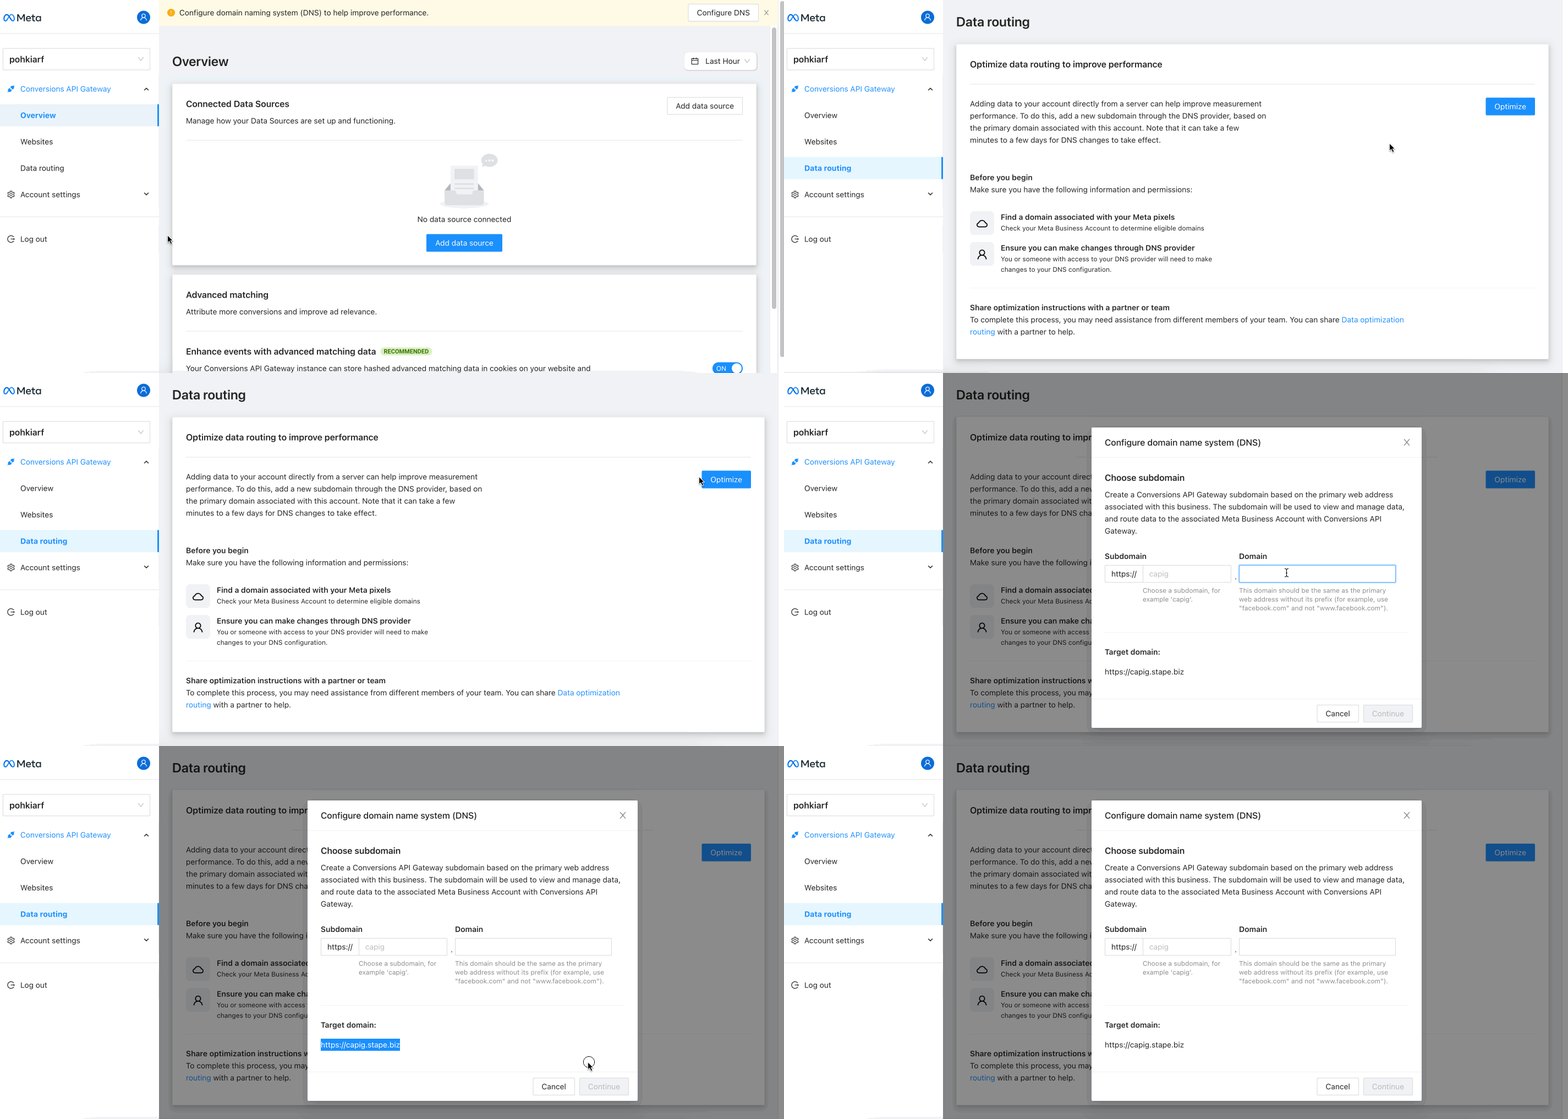
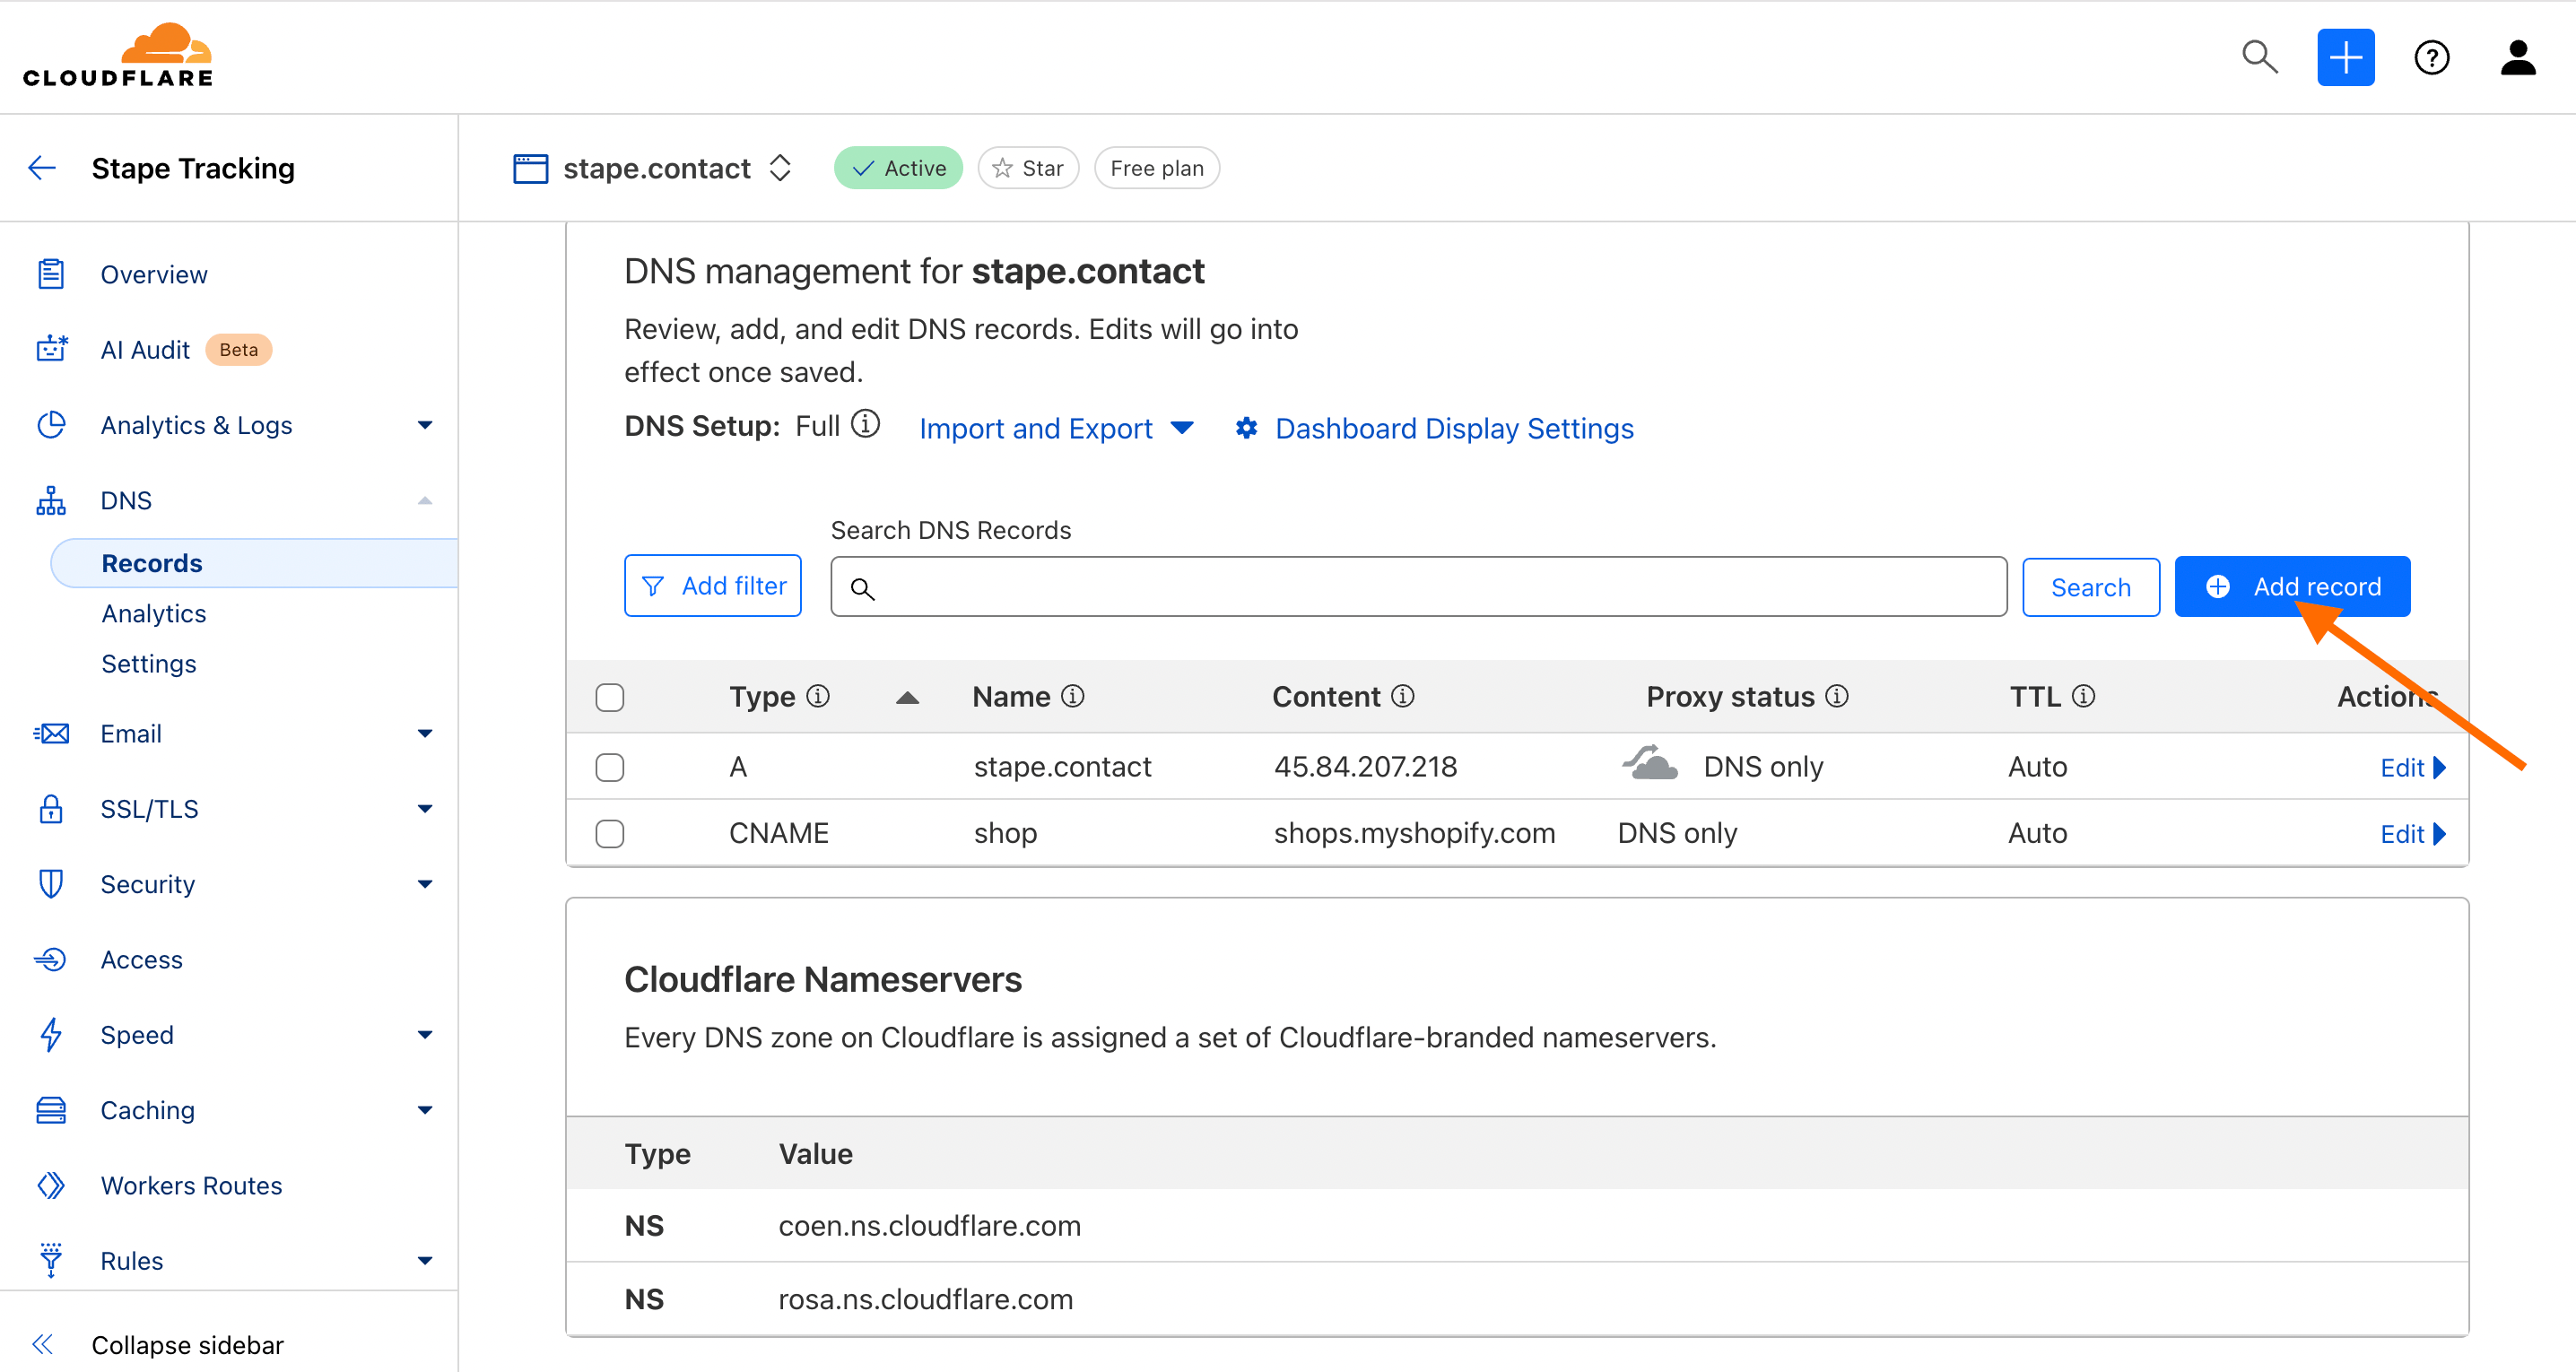
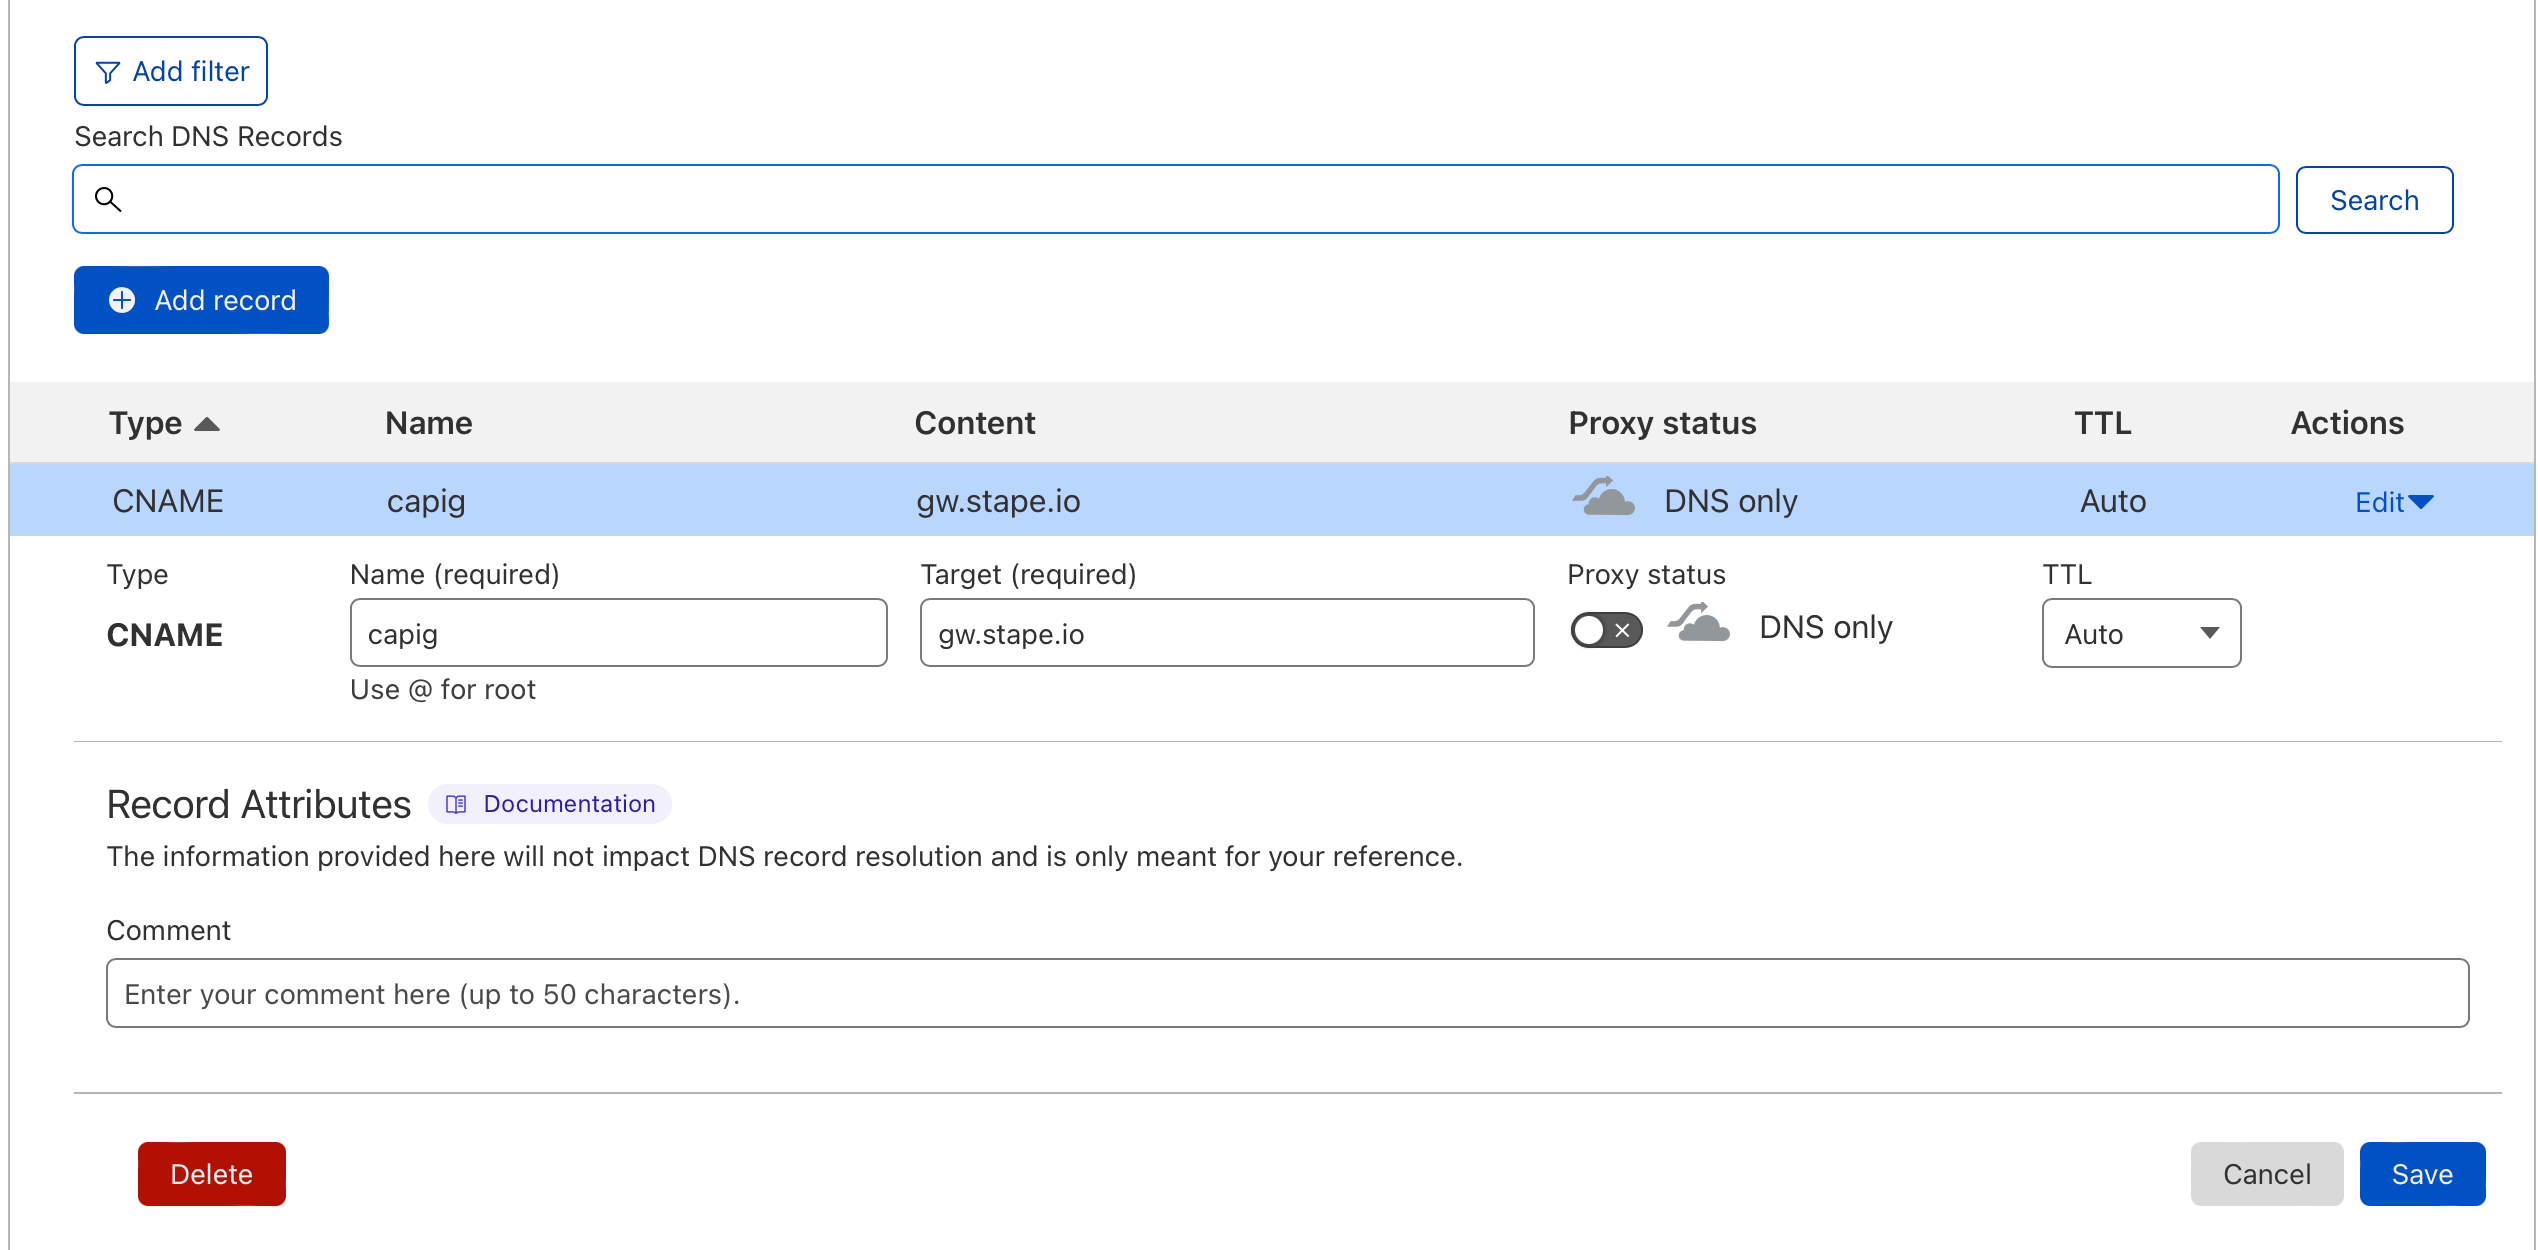
5. Log in to your DNS provider and set records. Below is an example of DNS setup for CloudFlare. On the account home page next to your domain name click three dots and choose “Configure DNS”.
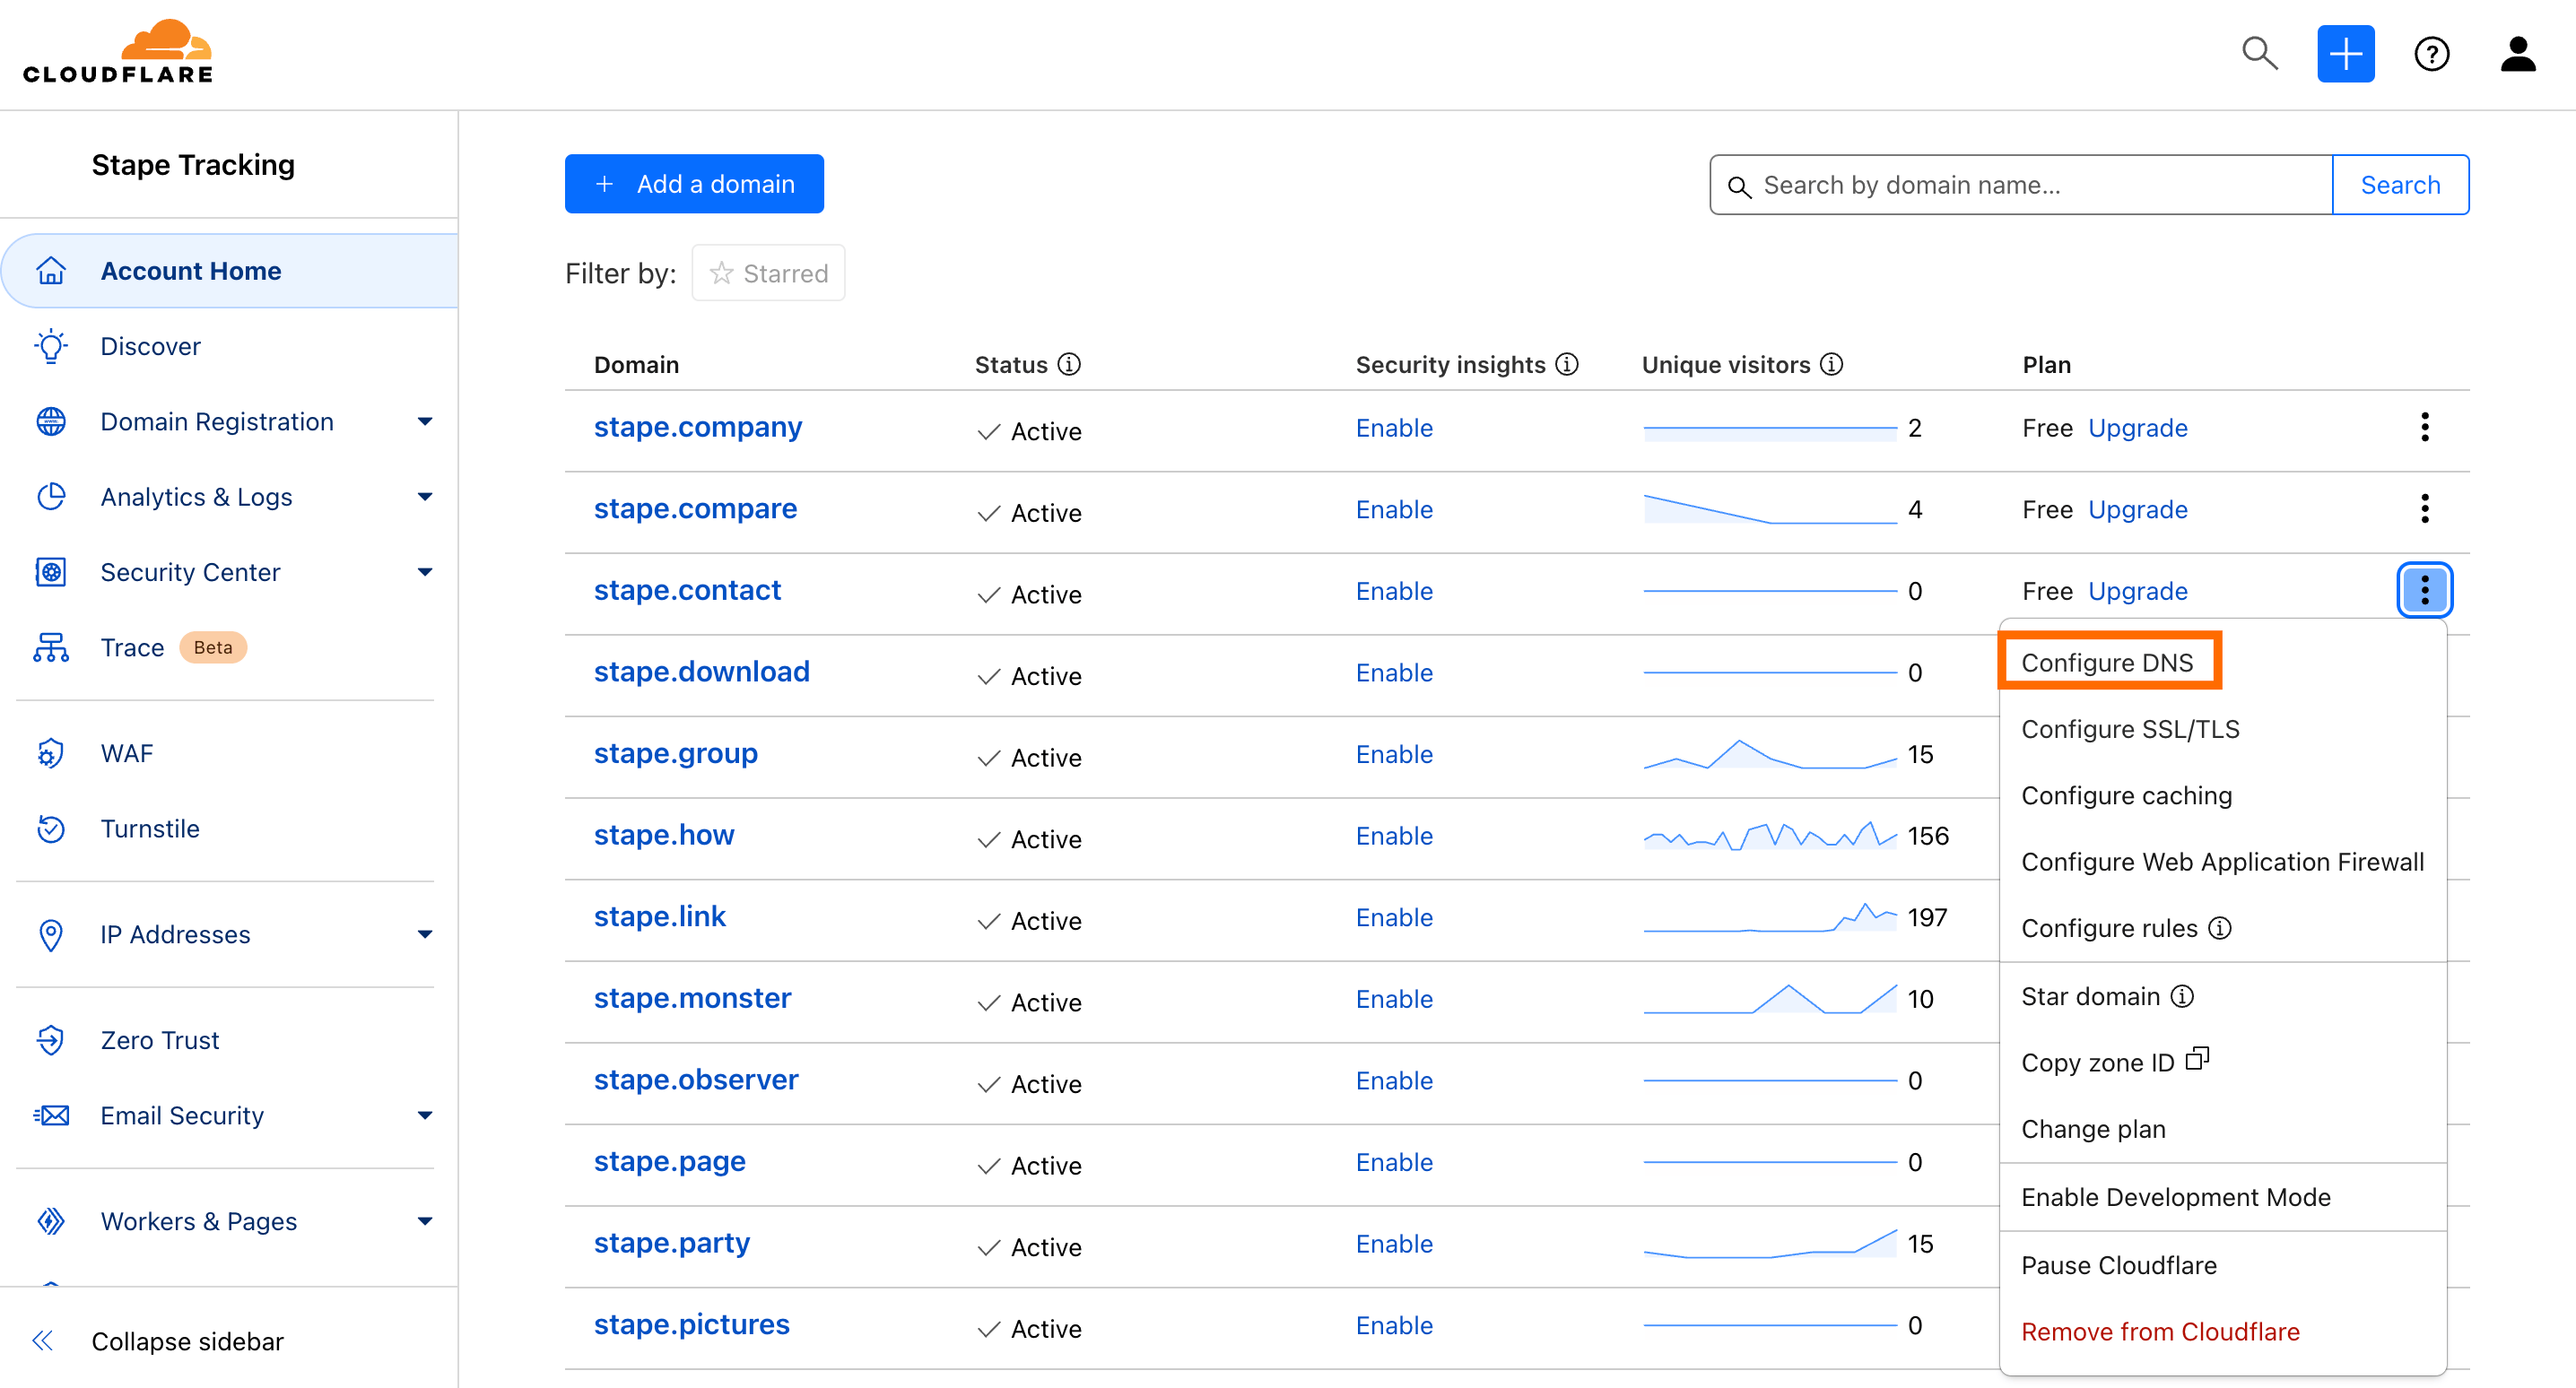
Click "Add record".
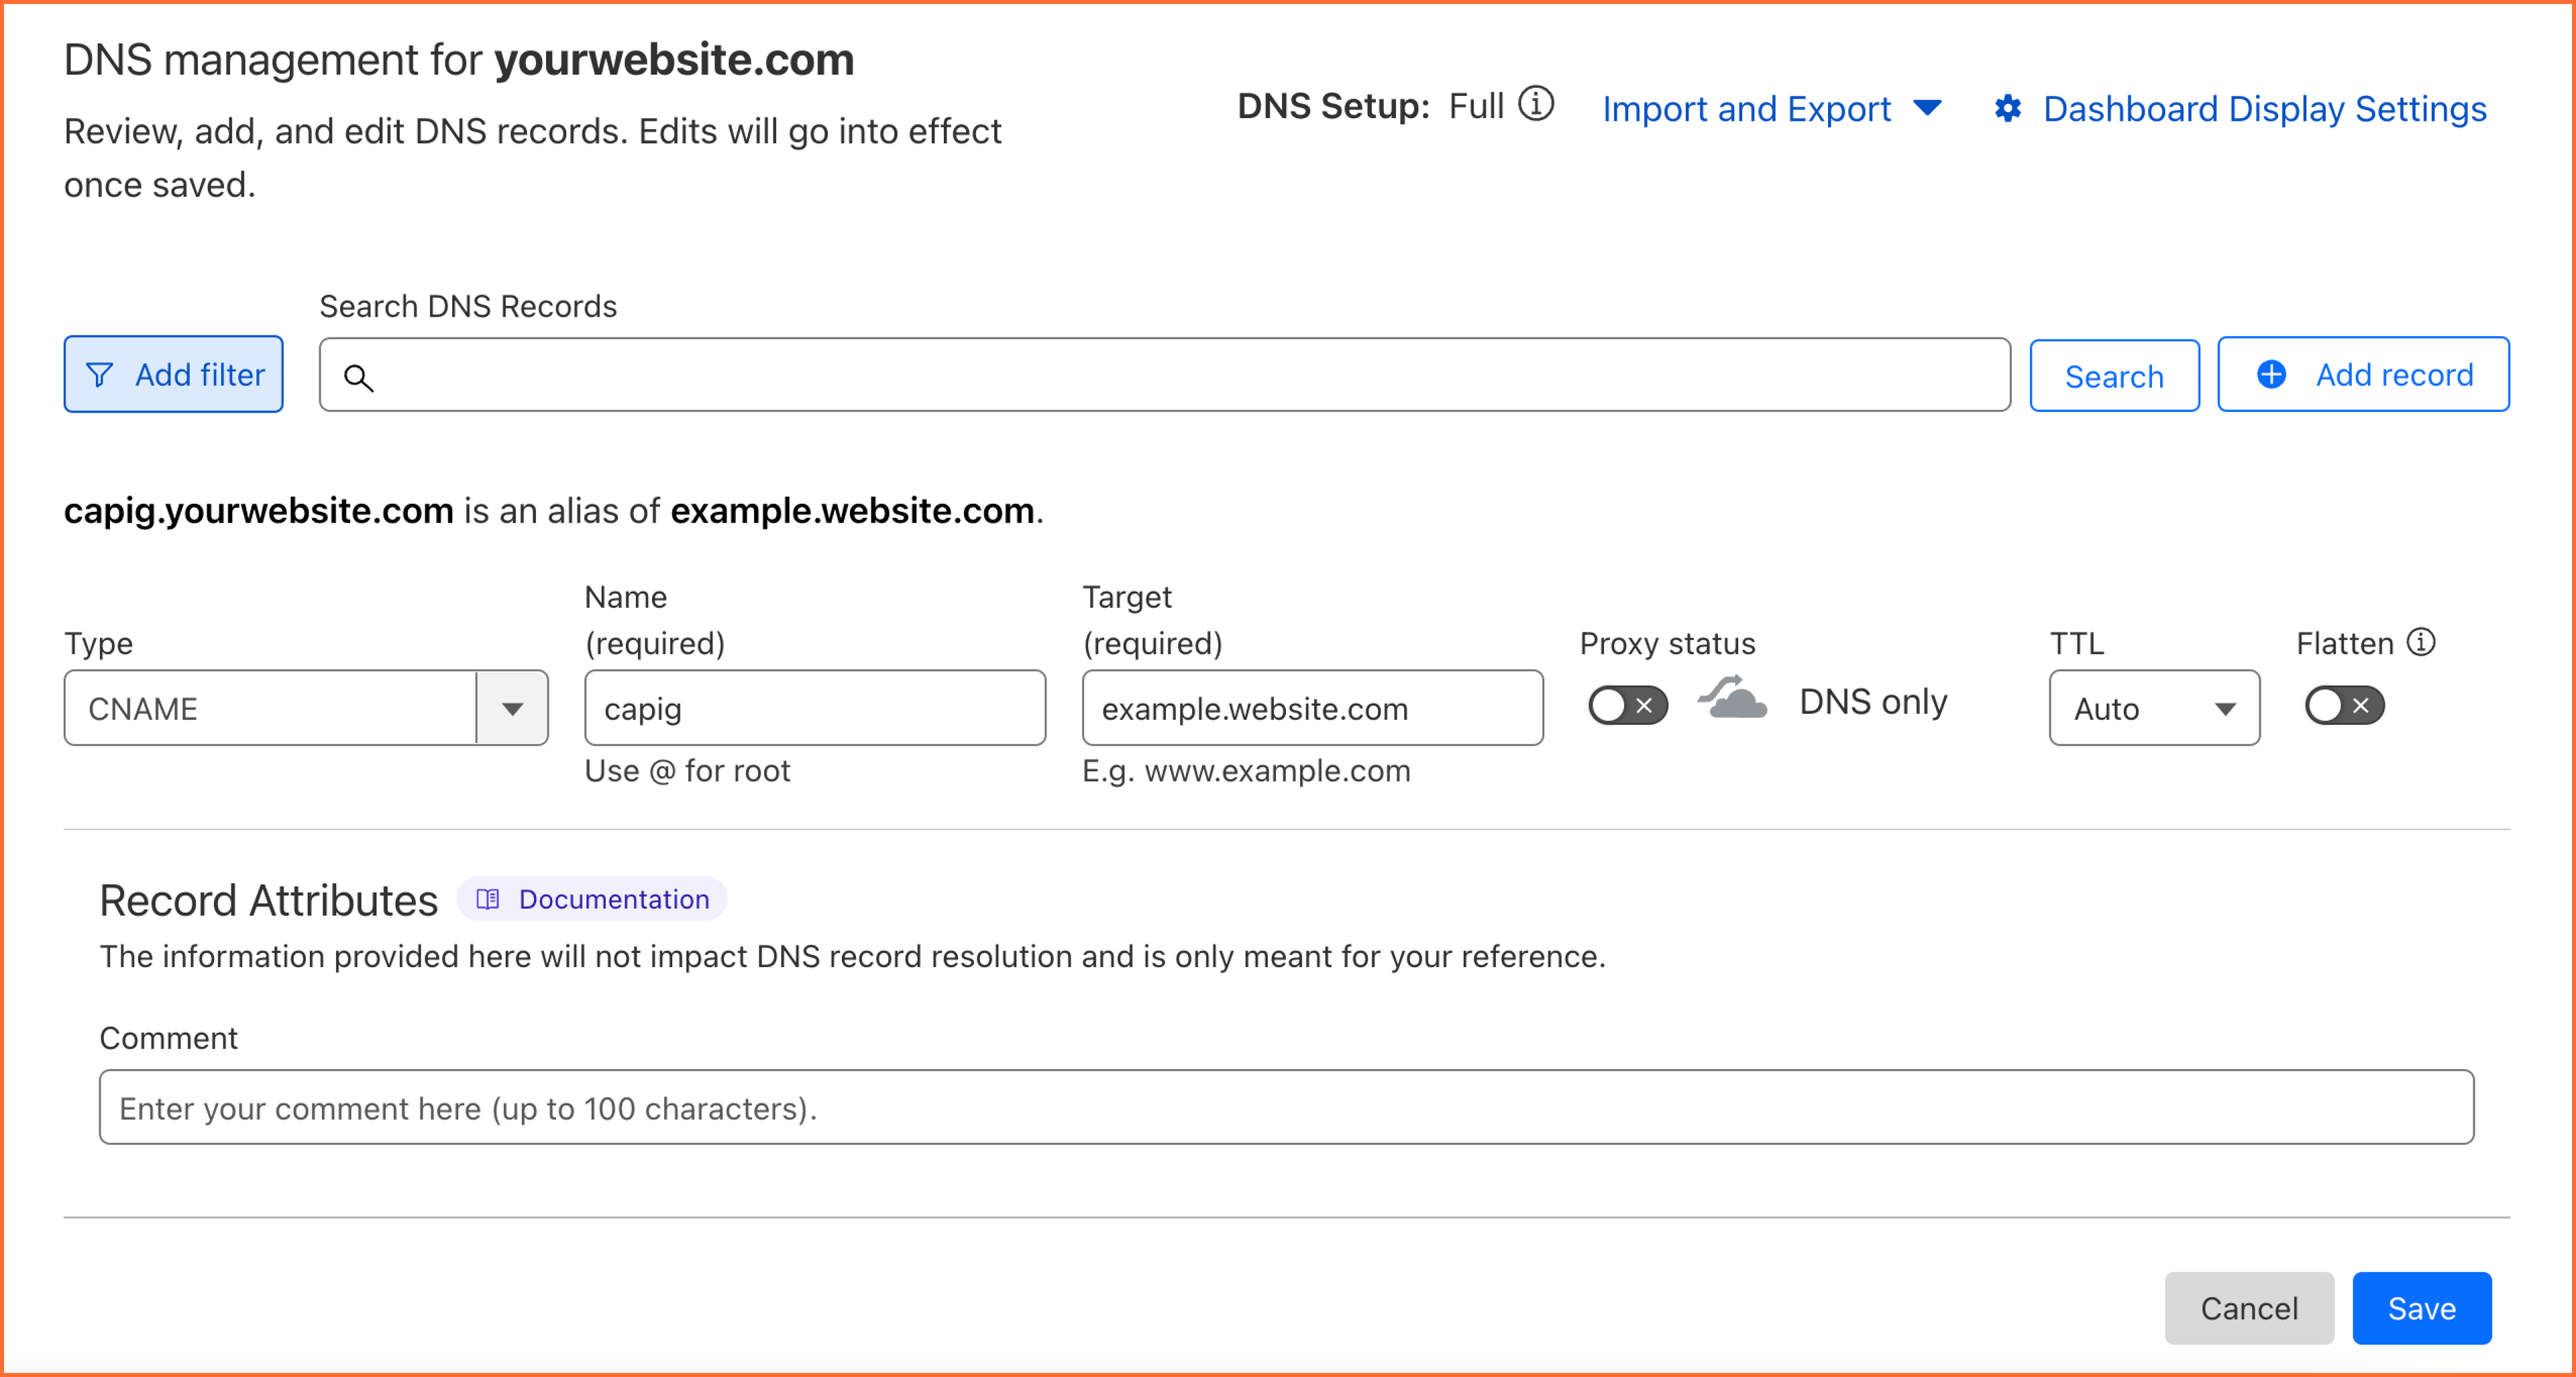
If you use Cloudflare, the settings should look like on the screenshot.
Step 6. Optional: Add new pixels.
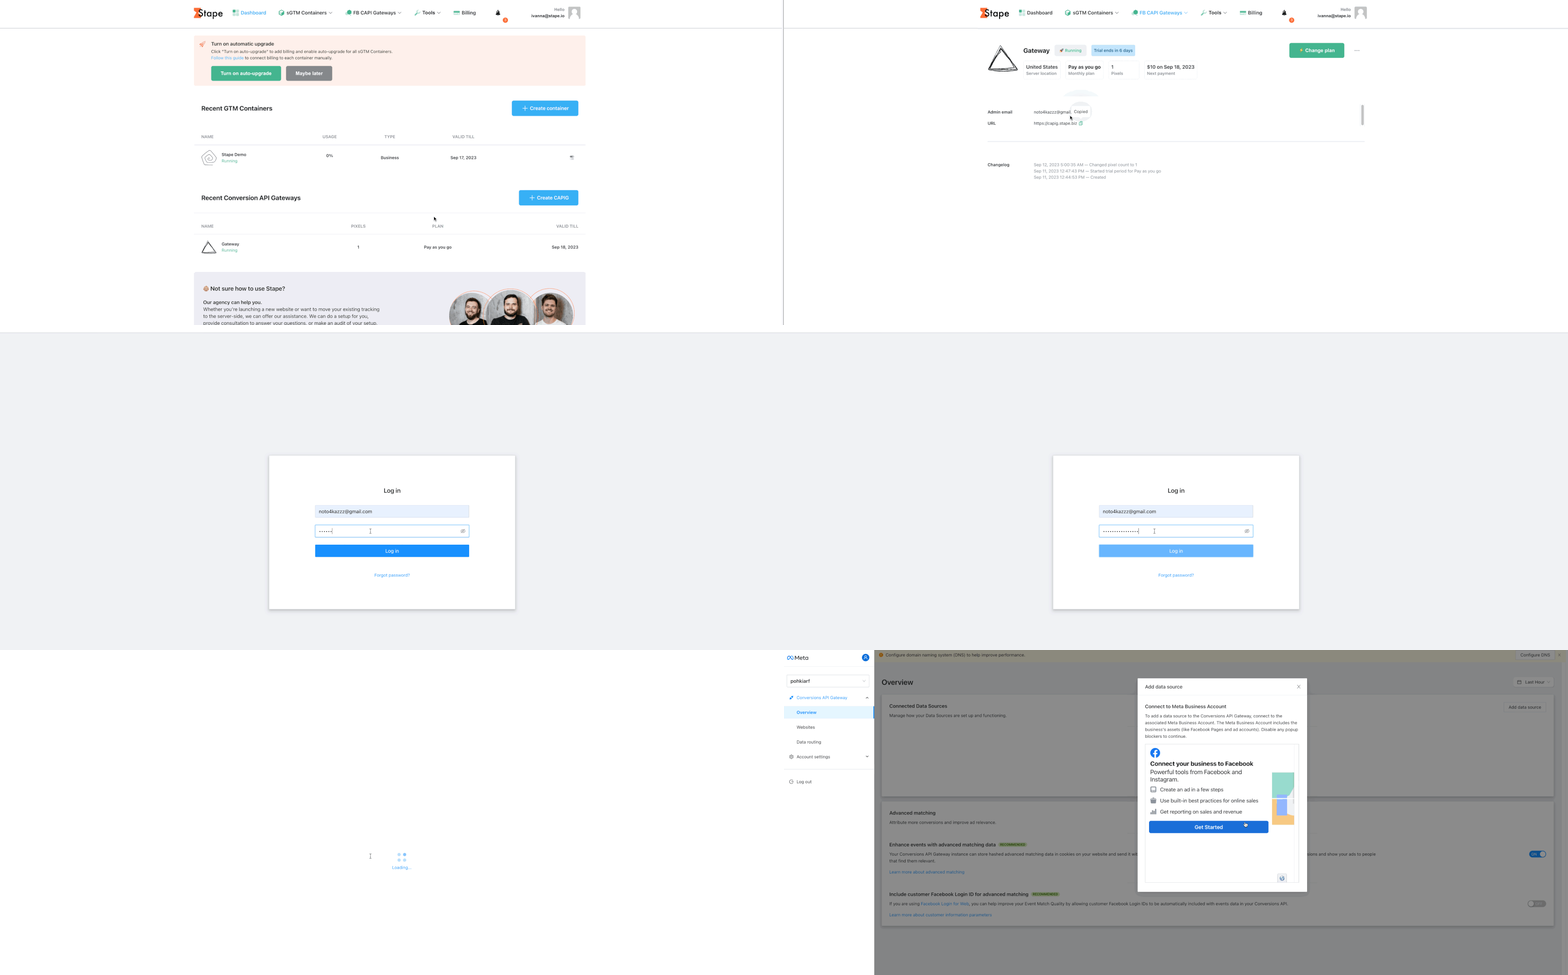
- 1.Log in to your Stape account.
- 2.Choose your Gateway container.
- 3.Find your Conversions API Gateway URL and log in.
- 4.Click Add data source and select the pixel.
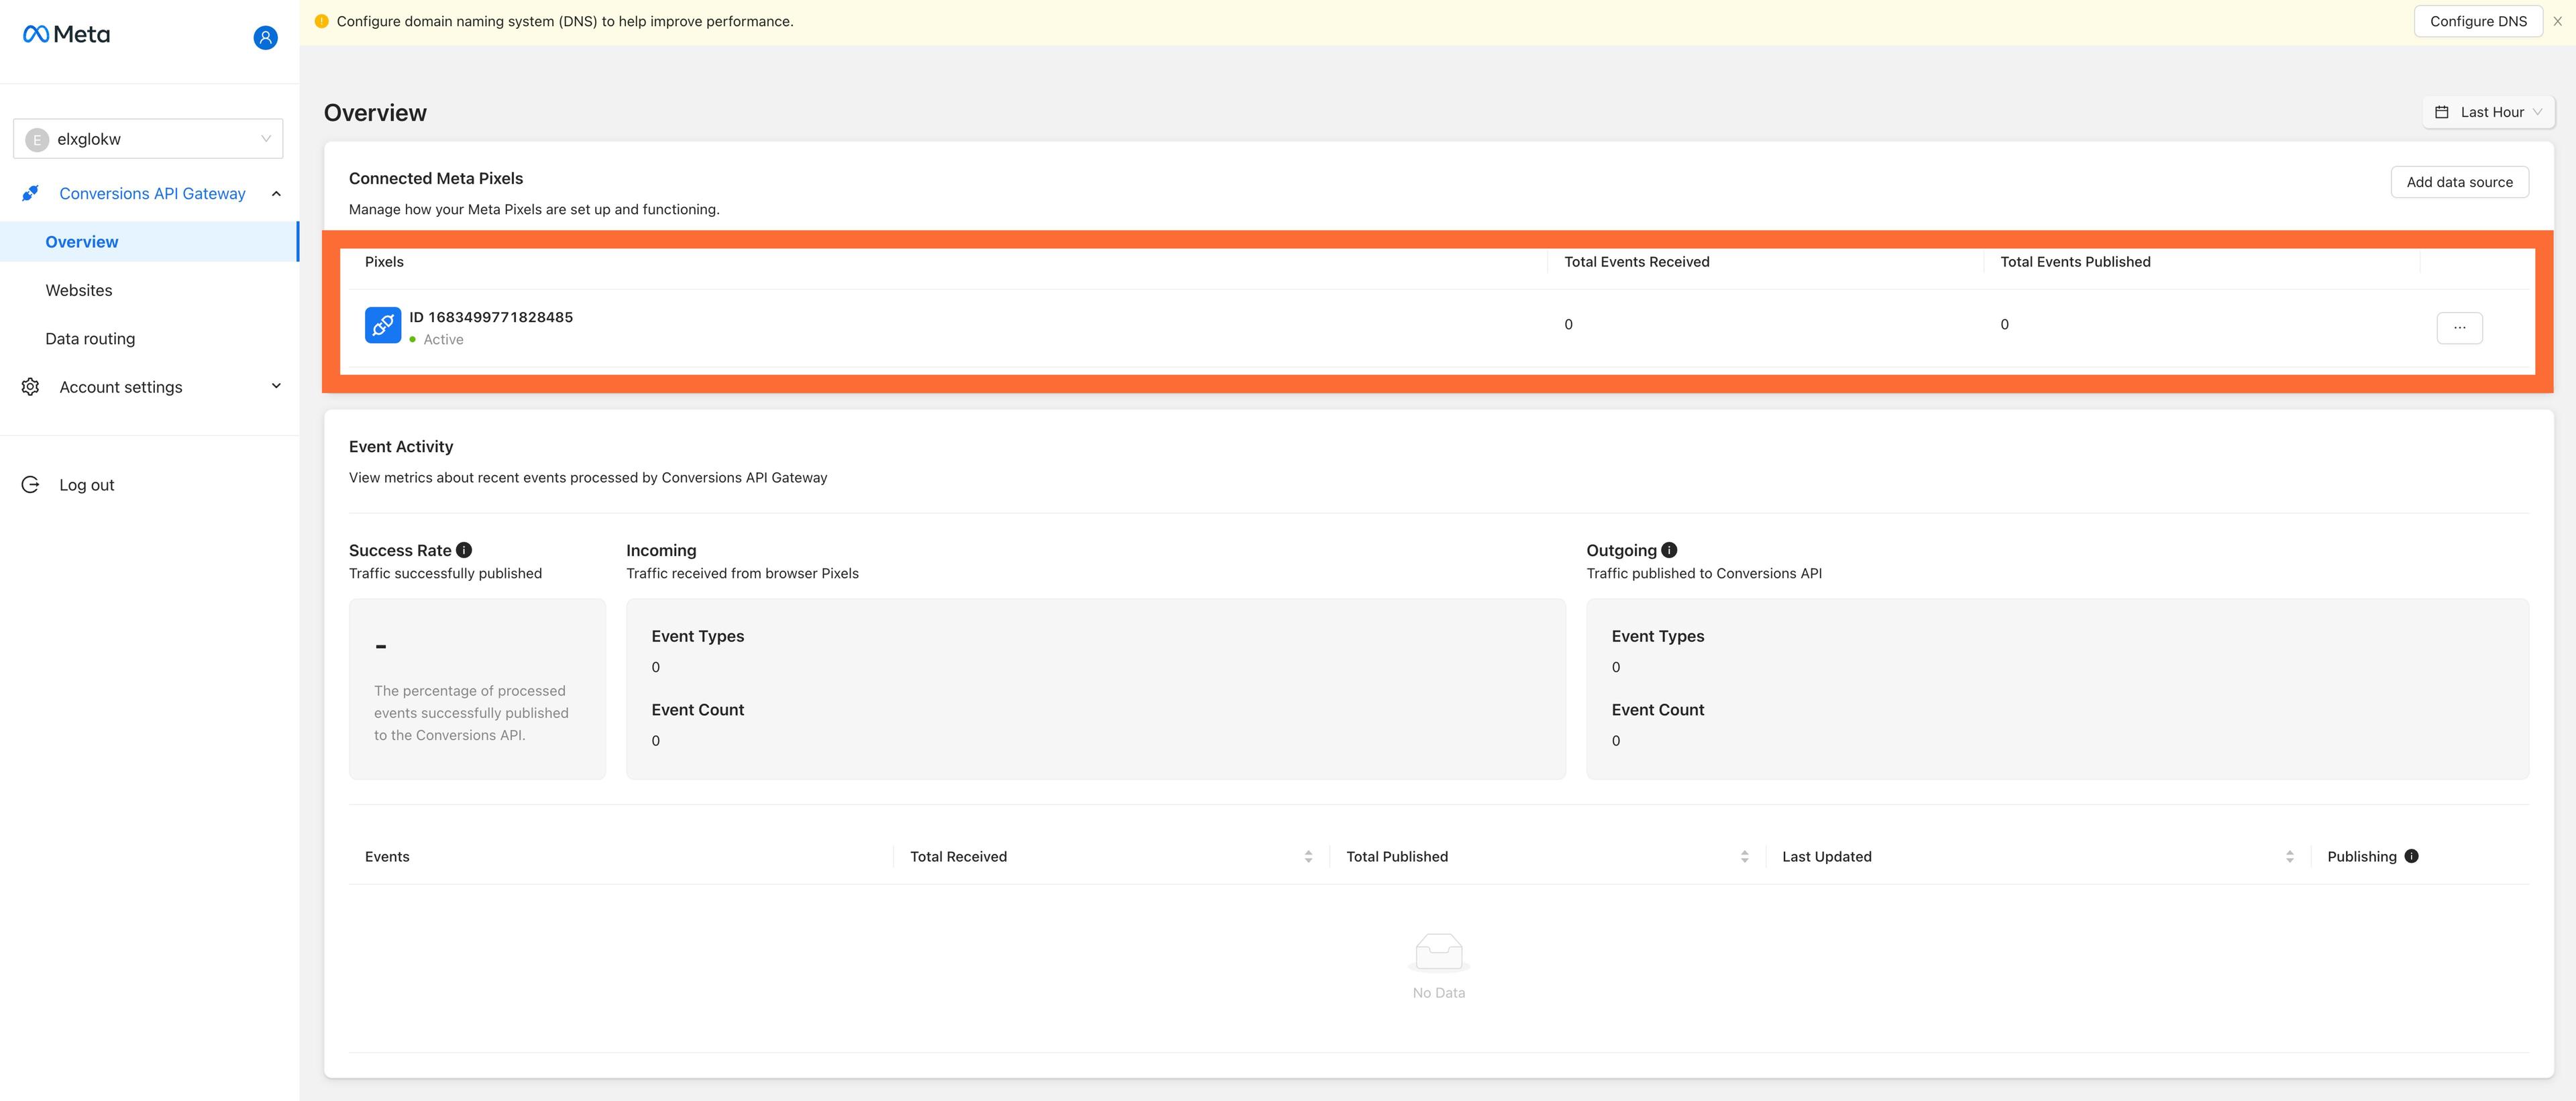
Step 7. How the finished setup looks like.
You will see your Meta Pixel in the Conversions API Gateway interface.
Step 8. Test your setup.
Within 30 minutes of connecting your pixel to the CAPIG hub, you should notice that the event count is no longer zero, and you should also see the names of the events that have been received.
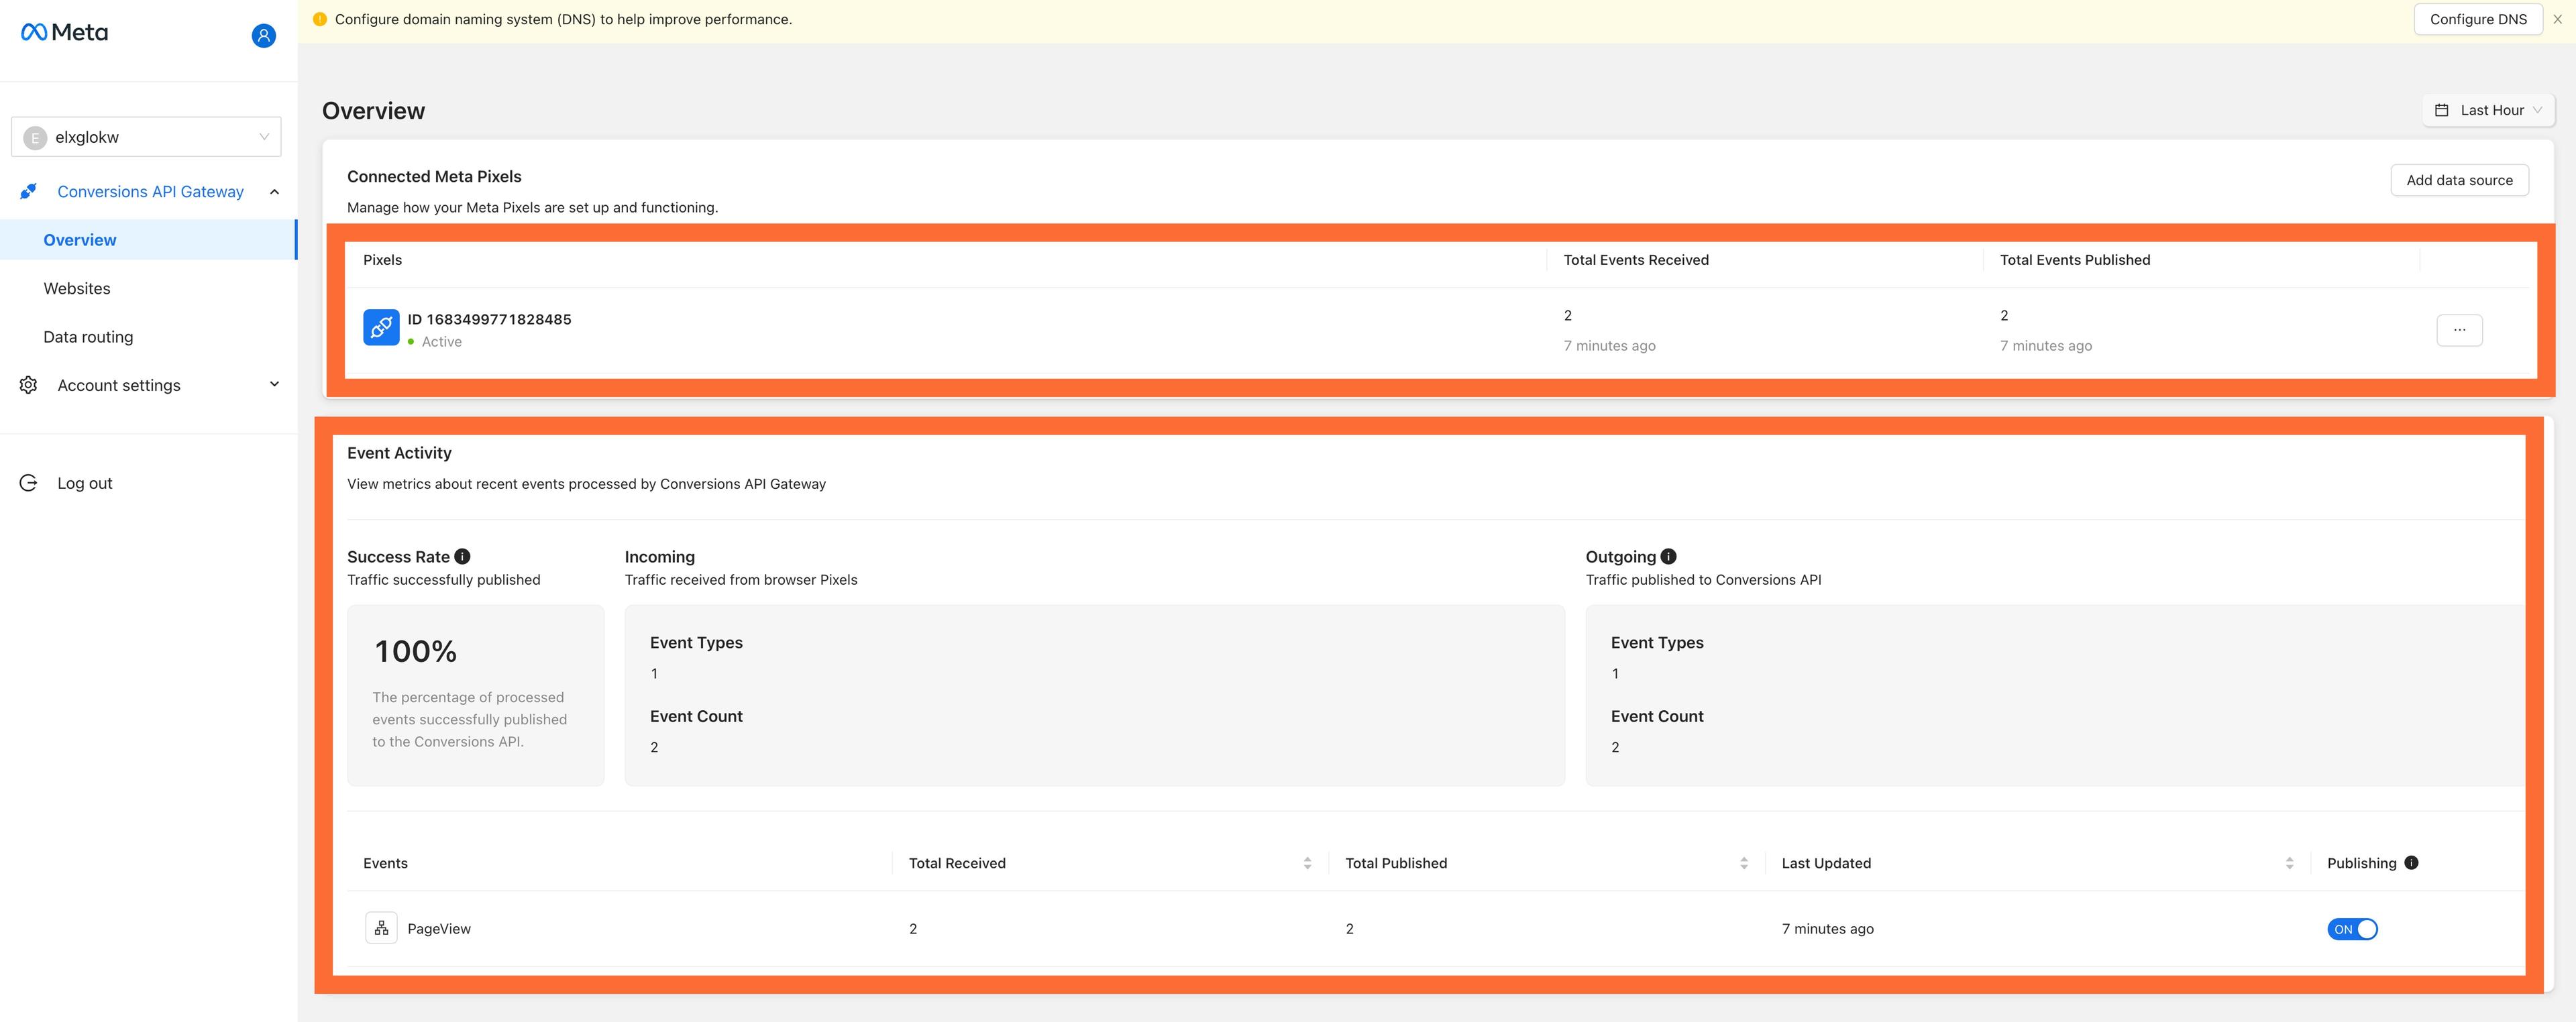
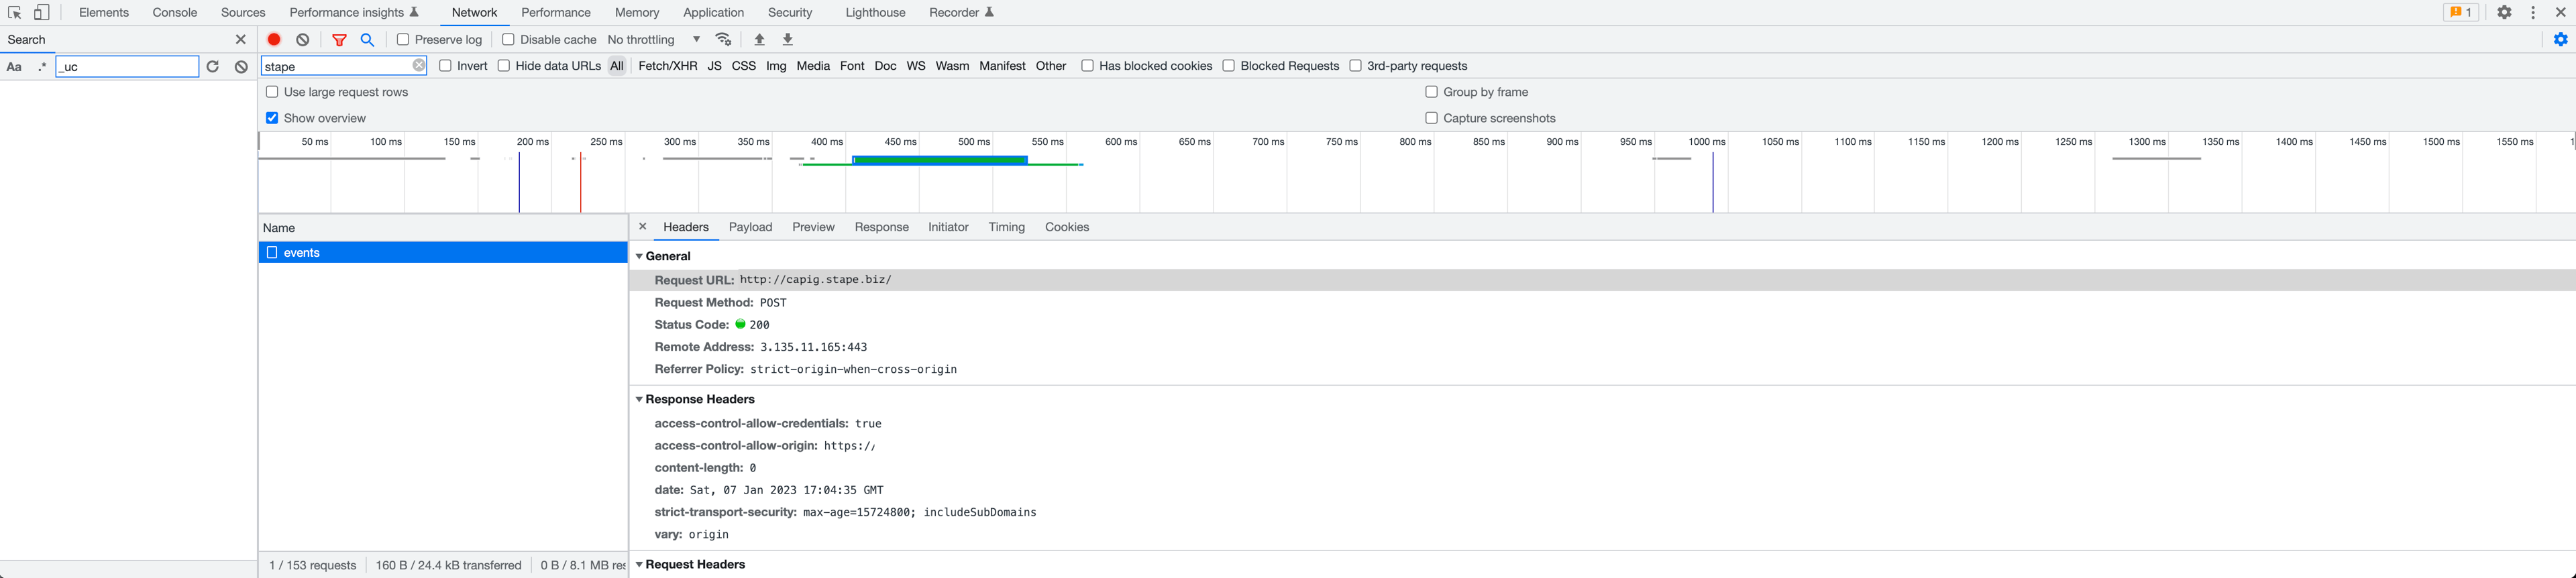
You can also verify that events are sent correctly to the CAPIG hub by checking the website console:
- 1.Open your website’s console.
- 2.Check that events were sent to your Conversions API Gateway URL (look at the screenshot below).
- 3.If you use the default Conversions API Gateway URL, then it will be the url of CAPI GW, for example, http://capig.stape.biz/.
[Video guide] How to create Meta CAPIG from scratch!
Create Meta Conversions API Gateway from scratch
| Related: Facebook Ads conversion tracking. |
| Alternatively, you can set up your tracking with a server GTM container. Check out the difference between the sGTM container and a gateway setup in our blog article. |
Frequently Asked Questions
1. Why isn't the Conversions API Gateway seeing my events?
Stape's Conversions API Gateway hosting is a server instance in the GCP cloud environment, which sends web events through a reliable server-to-server connection to Meta. Every time the Meta Pixel is fired from the browser, the events will be sent to Meta Pixel and Conversions API through a secure connection.
If you see the inconsistency of web and server events, ensure no additional integration might send data to either Meta Pixel or Conversions API, such as third-party apps, plugins, integration through the Google Tag Manager, etc.
2. Are there any limits for the subscription plans you offer?
You get up to 10 million events for $10/month and up to 200 million events on a $100/month plan.
3. Why am I seeing a 404 error in the console after configuring the data routing subdomain?
It might take up to 30 minutes to process new DNS settings. First, please ensure that the DNS settings you've set up are correct. You can use this tool to verify DNS settings. For example, if you use Cloudflare, the settings should look like the screenshot below.
4. Should I configure event deduplication when using Meta Conversions API Gateway?
Event deduplication is set up automatically. Event_id deduplication key is automatically generated and propagated to help ensure deduplication between both channels (web and server).
5. Why does gtm-msr.appspot.com send data to my Conversions API Gateway?
gtm-msr.appspot.com is a default domain of the Google Cloud Platform. After you've linked pixel to Conversions API Gateway, please make sure to stop Conversions API integration that was set up via server Google Tag Manager.
6. How to increase event match quality for Meta Conversions API Gateway?
To increase the Event Match Quality score for Meta Conversions API Gateway, you should enable Automatic Advanced Matching while connecting the pixel to the CAPIG hub. To define which user parameters you want to share with Meta, click Show customer information parameters and enable those you want to share.
7. What CAPIG server locations do you have?
We offer several server locations: the United States, Europe, South America and Asia Pacific.
8. How can I structure CAPIG?
1. Use one email for all of your clients. In this case, you must connect multiple pixels for one CAPIG hub and use one custom domain.
2. You can make an agency account and create accounts for each of your clients with its own CAPIG with their email. This way, you will have a custom domain for each website or pixel.
We also offer an option of private multiuser Meta Conversions API Gateway hub:
- With an isolated multi-account cluster, you can ensure optimal data routing for each website, enable advanced matching, attribute more conversions, and improve ad relevance.
- Predictable price. Pay flat a fee of $500 each month for up to 1 billion requests.
- Select from up to 25 server locations.
- Connect an unlimited number of pixels located in the different Facebook Business Managers.
- Manage access for each account/website individually.
| Alternatively, you can set up your tracking with a server GTM container. Check out the difference between the sGTM container and a gateway setup in our blog article. |
Conclusion
The Meta Conversions API Gateway offers a simple solution for establishing server-side tracking through Meta. Say goodbye to the hassle and expense of complicated configurations. With CAPI Gateway, you can have it up and running in under a minute, even if you're not tech-savvy. Ready to give CAPIG a try? Start a 7-day free trial today!
Gerelateerd aan dit bericht
Blog
Conversions API Gateway: Veelgemaakte fouten en veelgestelde vragen
Leer veelvoorkomende problemen met Meta Conversions API Gateway oplossen: ontbrekende events, 404-fouten, DNS-problemen en beheer van pixels en domeinen.
12 sep. 2025

Opmerkingen