How to use same origin through AWS CloudFront
Updated Jun 25, 2026
Google recommends mapping a server-side Google Tag Manager (sGTM) container to the same origin (example.com/sgtm) instead of a subdomain (sgtm.example.com). Using the same origin makes first-party cookie setup easier and avoids extra cookie-lifetime configuration, but the implementation is more complex than a subdomain setup. In this guide, you’ll learn how to configure the same origin through AWS CloudFront.
Before you begin
Make sure that your website traffic is already proxied through AWS CloudFront. You should already have:
- DNS pointing your website domain to CloudFront.
- An active TLS certificate for the domain.
- At least one working route for normal site traffic.
If you’re unsure how to configure any of those, please refer to the official AWS CloudFront documentation.
Also, this guide assumes that you already have a Stape account with a connected server GTM container and a configured custom domain. If you don’t have any of those yet, check out our guides on getting started with sGTM hosting with Stape.
Setup overview
This setup uses:
- CloudFront Function at Viewer Request.
- Lambda@Edge at Origin Request.
- Stape sGTM as the origin.
The goal is to:
- Preserve the original viewer hostname.
- Preserve the real client IP.
- Rewrite requests correctly for sGTM.
- Support dynamic domains (this is only necessary if you are proxying requests to the standard Stape subdomain, rather than to your own connected subdomain).
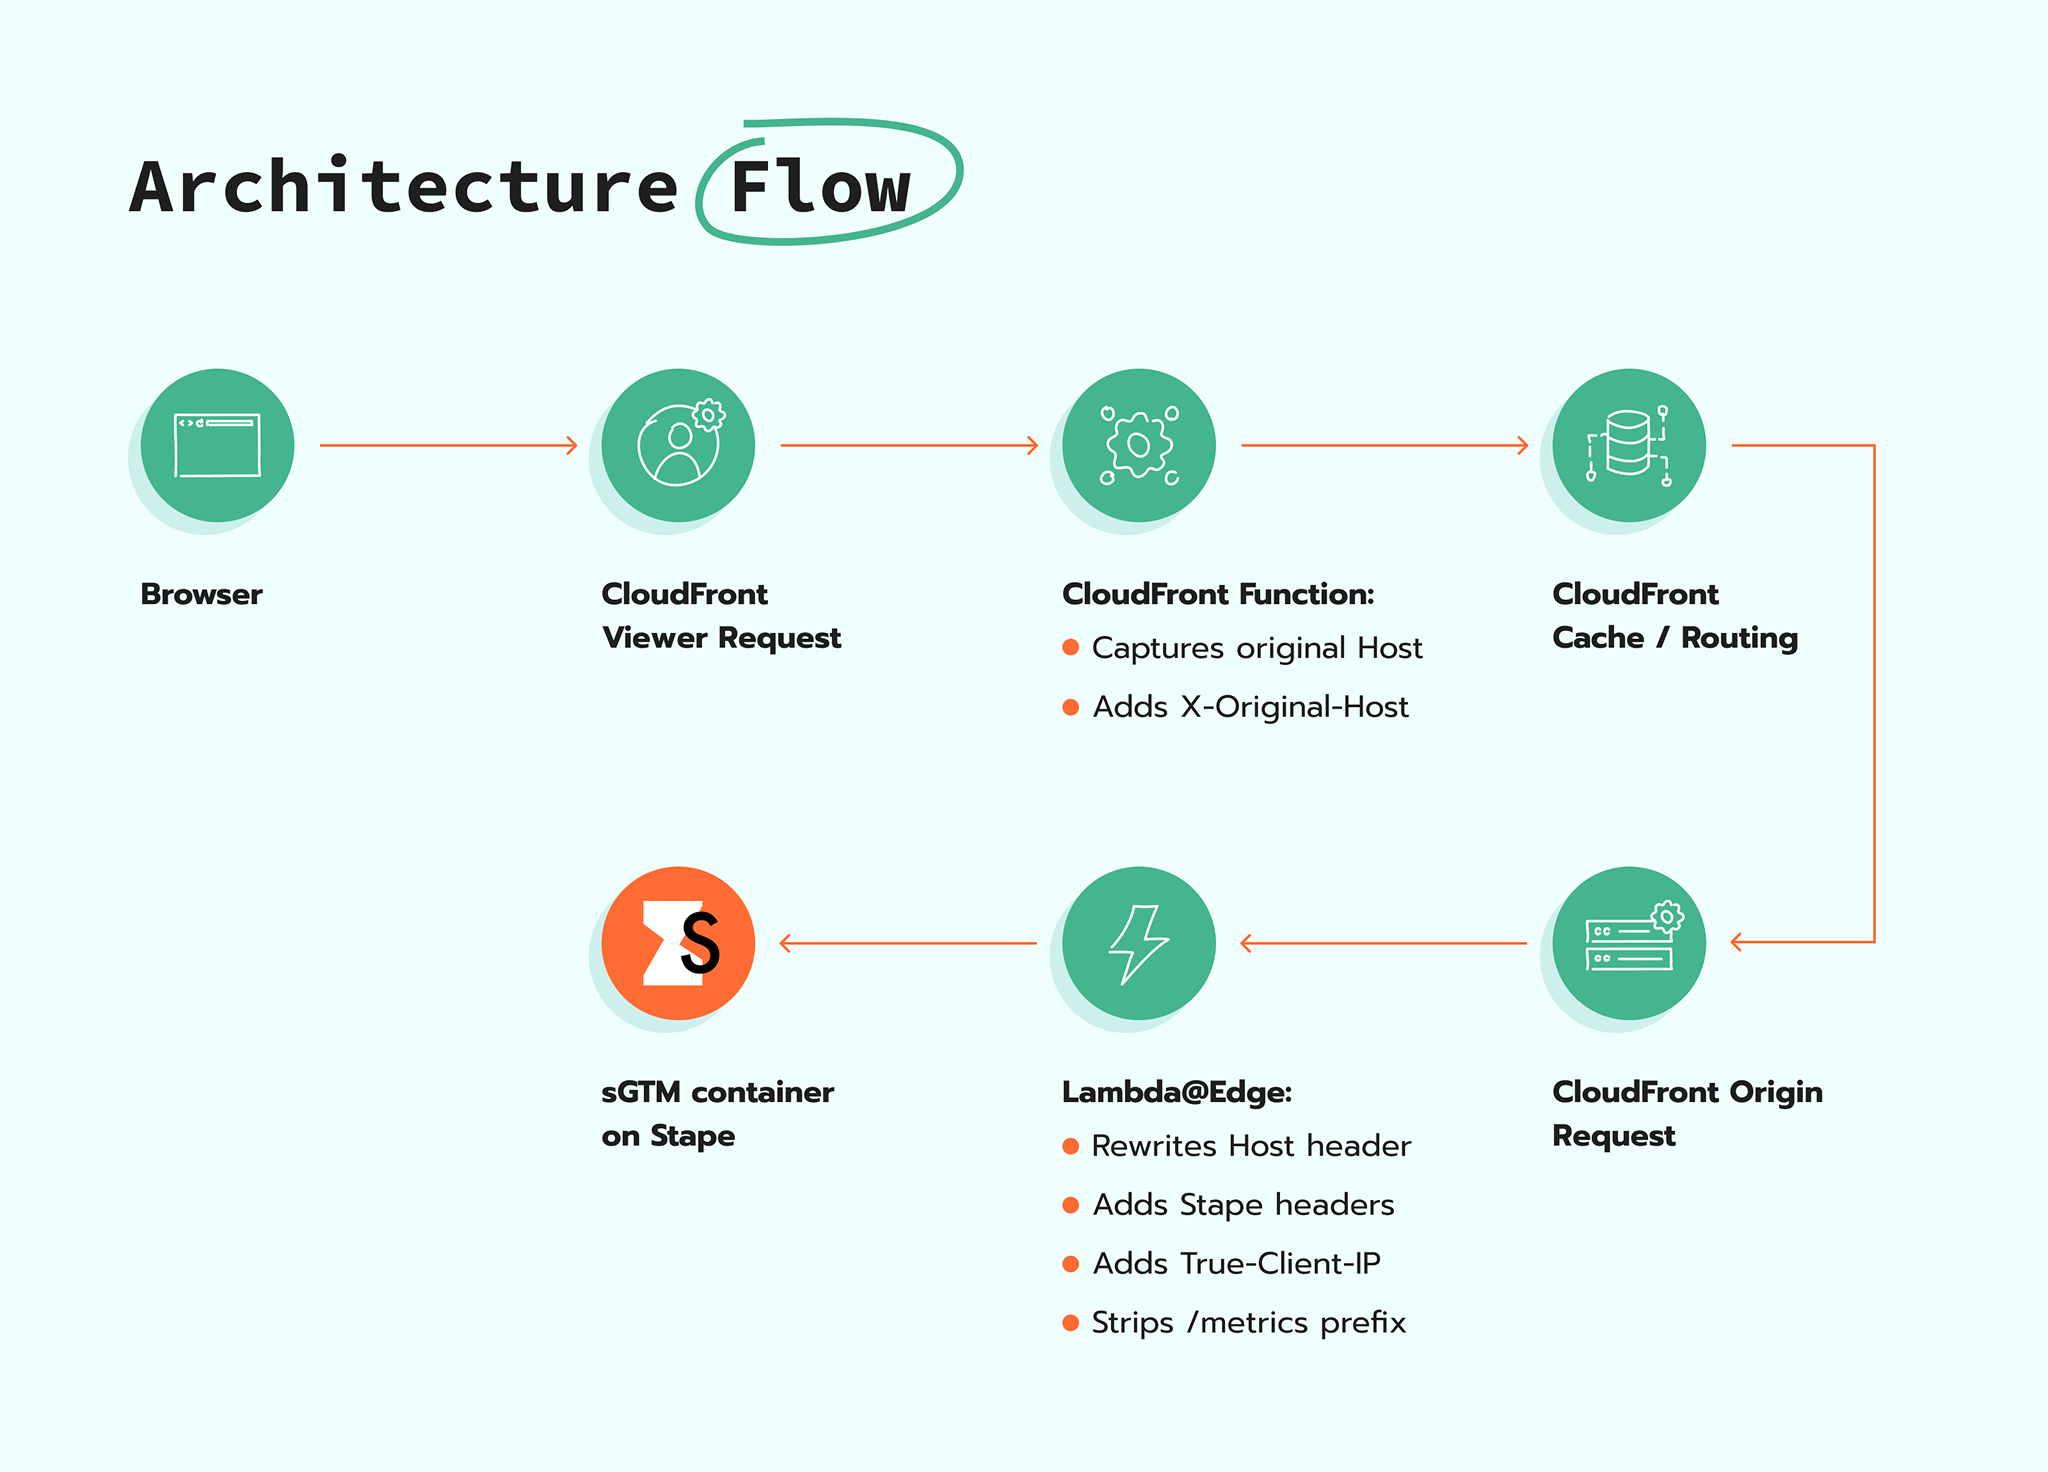
CloudFront Function (Viewer Request)
A lightweight CloudFront Function captures the original viewer Host header before CloudFront rewrites it.
Lambda@Edge (Origin Request)
Lambda@Edge performs:
- Host rewrite.
- Client IP forwarding.
- Stape header injection.
- URI rewrite.
This keeps:
- Dynamic domain support.
- Correct Stape routing.
- Low latency.
- Lower cost compared to Viewer Request Lambda@Edge.
CloudFront Function
Trigger: Viewer Request.
Function Code:
function handler(event) {
    var request = event.request;

    // Capture original viewer host
    if (request.headers.host) {
        request.headers['x-original-host'] = {
            value: request.headers.host.value
        };
    }

    return request;
}
Lambda@Edge Function
Trigger: Origin Request.
Function Code:
export const handler = async (event) => {
    const request = event.Records[0].cf.request;

    const viewerIp = request.clientIp;

    // Read original viewer host captured by CloudFront Function
    const originalHost =
        request.headers['x-original-host']?.[0]?.value || '';

    // Convert www.example.com → example.com
    const originalHost = originalHost.replace(/^www\./i, '');

    // Rewrite Host header to the Stape origin domain
    request.headers.host = [
        { key: 'Host', value: request.origin.custom.domainName }
    ];

    // Tell Stape traffic came through CloudFront
    request.headers['x-from-cdn'] = [
        { key: 'X-From-CDN', value: 'cft-stape' }
    ];

    // Pass real viewer IP
    request.headers['true-client-ip'] = [
        { key: 'True-Client-IP', value: viewerIp }
    ];

    // Pass original domain to custom header. This is only necessary if you are proxying requests to the standard Stape subdomain, rather than to your own connected subdomain.
    request.headers['x-stape-host'] = [
        { key: 'X-Stape-Host', value: originalHost }
    ];

    // Strip /metrics prefix
    if (request.uri.startsWith('/metrics')) {
        request.uri = request.uri.replace(/^\/metrics/, '') || '/';
    }

    return request;
};
Required CloudFront Settings
- Cache Behavior:
- Path Pattern: /metrics/*
- Viewer Request:
- CloudFront Function
- Origin Request:
- Lambda@Edge
- Origin Request Policy:
- Use Managed Origin Request Policy: Managed-AllViewerExceptHostHeader
- Cache policy:
- Headers - include the following headers:
- Referer
- user-agent
- Cookies - None
- Query strings - None
This is required so the header added by the CloudFront Function is available to Lambda@Edge.
Include Body
Disabled - the Lambda does not need request body access.
Keeping it disabled improves:
- Performance.
- Latency.
- Cost.
Origin Custom Headers
Remove:
- X-Stape-Host
- X-From-CDN
These are now dynamically generated inside Lambda@Edge.
Testing and troubleshooting
Deploy changes and verify the proxy is working by opening your proxy path in the browser (e.g., https://sgtm.example.com/metrics). If you see error 400, then everything is working correctly. You can also run a preview of the server container on your /metrics path.
After following these steps, add your /path for the same origin to the Custom Loader's settings. Check the article on Same Origin Path to do this.
Was this article helpful?
Comments