How to export Logs to AWS bucket and connect BigQuery
Updated Jul 1, 2026
This guide describes the process of setting up an AWS S3 bucket and integrating it with Stape for automated log exports. It also explains how to connect the bucket to BigQuery using external tables, so as to get close to real-time access to your logs without requiring manual imports.
How to create an AWS S3 Bucket and set up an export to it from Stape
Step 1. Create the AWS S3 Bucket
Create an empty bucket to store your logs.
1.1 Log in to your AWS Management Console.
1.2 At the top of the screen, use the search bar to find S3 and click on it.
1.3 Click the Create bucket button. Specify the following:
- Bucket name - choose a globally unique name (e.g.,
your-company-stape-logs). Save this name - you will need it for configuration within Stape UI.
- AWS Region - choose the region closest to you or your servers (e.g.,
eu-central-1for Frankfurt). Save this exact region code, as you will need it for Stape. - Object Ownership - leave ACLs disabled (recommended).
- Block Public Access settings for this bucket - ensure the box for Block all public access is checked (this is the default and is best for security).
1.4 Click Create bucket.
Step 2. Create an IAM user
2.1 In the top search bar of the AWS Console, type IAM and click on it.
2.2 On the left-hand menu, click Users, then click the Create user button on the right.
2.3 As User name, type something obvious, like stape-logs-exporter, and click Next.
Step 3. Provide the user permissions
3.1 On the Permissions page, select the Attach policies directly option.
3.2 In the search box below, type AmazonS3FullAccess.
3.3 Check the box next to AmazonS3FullAccess when it appears in the list.
| Note: This gives Stape access to your S3 buckets. Since this user is only for Stape, this is the easiest way to ensure the connection works. |
3.4 Click Next, review the setup, and click Create user.
Step 4. Generate the Access keys
4.1 You will be taken back to the list of Users. Click on your newly created user (stape-logs-exporter).
4.2 Click on the Security credentials tab → scroll down to the Access keys section → click Create access key.
4.3 Select a Third-party service as the use case. Check the confirmation box at the bottom and click Next → click Create access key.
4.4 Copy Access key ID and Secret access key.
AWS will now display the Access key ID and Secret access key values. Copy both of these and save them somewhere secure. You will never be able to see the Secret key again after you click Done.
Step 5. Configure the Stape Logs export
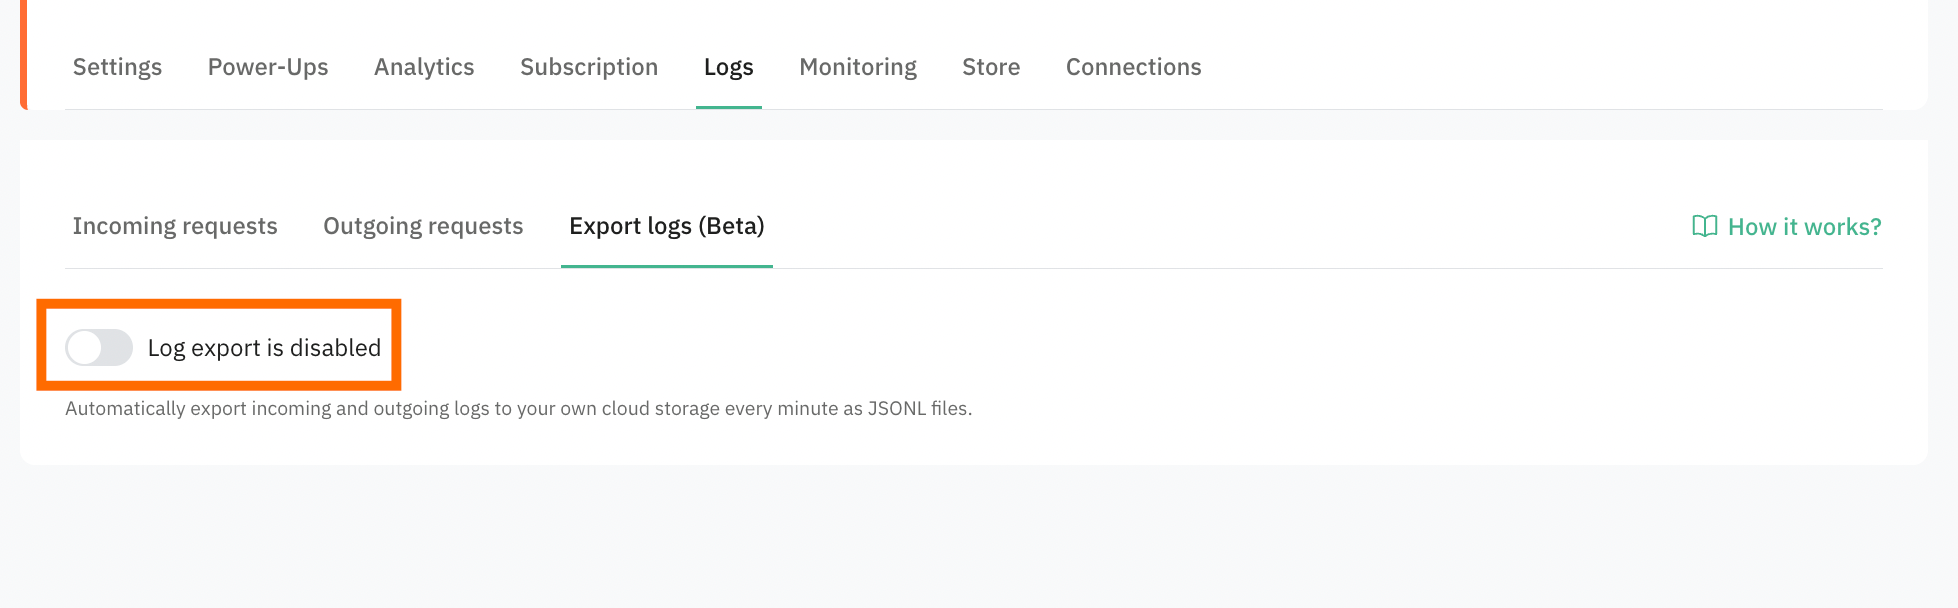
5.1 Open your Stape container → navigate to Logs → Export logs tab → enable Log export.
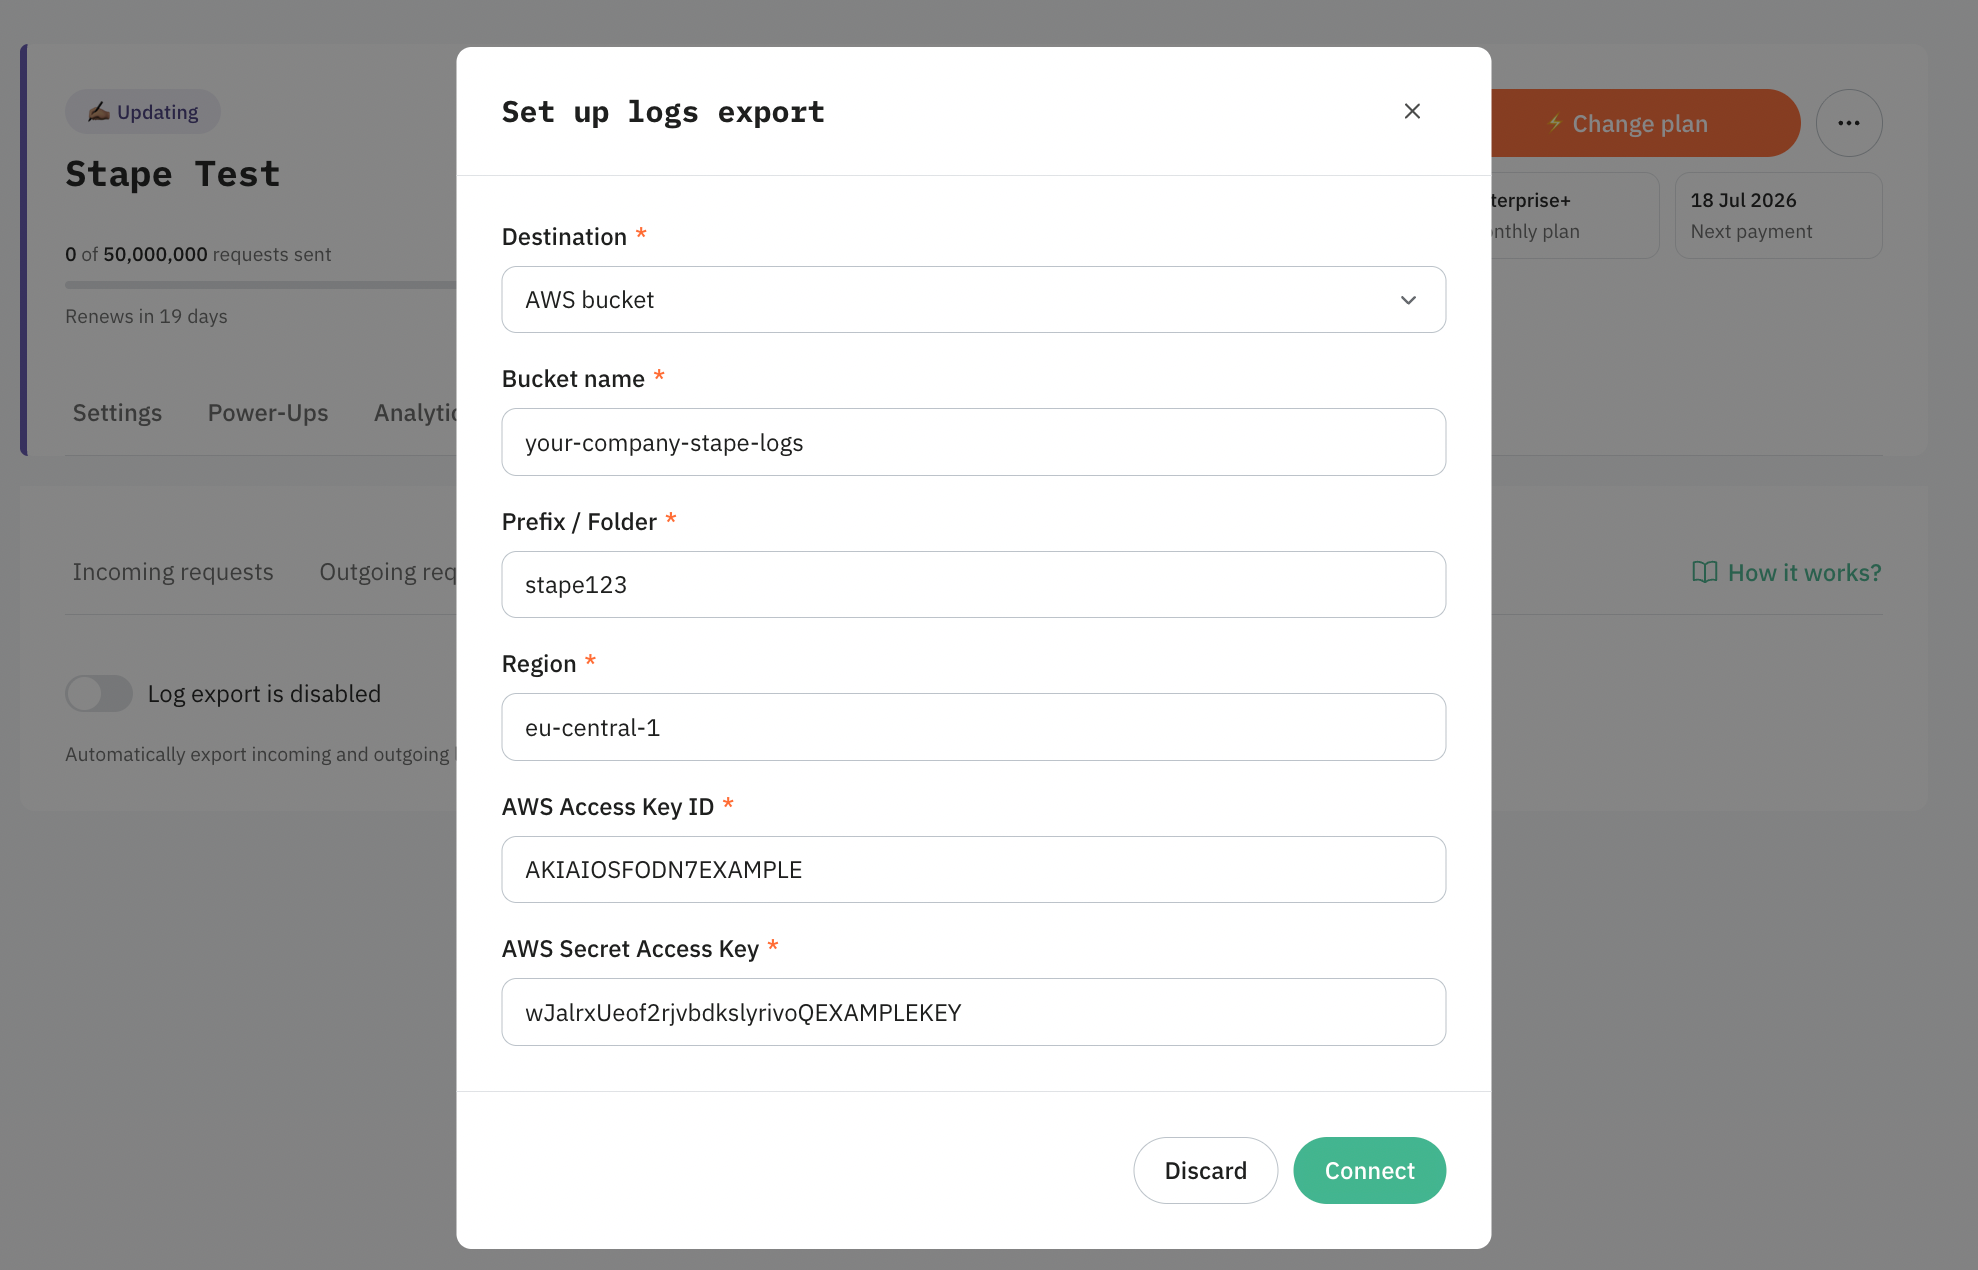
5.2 As Destination, select AWS bucket.
5.3 In the Bucket name field, enter the exact name of the bucket you created in Step 1 (e.g., your-company-stape-logs). Do not add any slashes here.
5.4 In the Prefix / Folder, enter the folder structure where you want the logs to go. Do not start with a slash (no /incoming/); otherwise, you will create a blank folder, and BigQuery will struggle.
Format example: incoming/ or logs/incoming/ |
5.5 In the Region field, enter the exact region of your bucket from Step 1 (e.g., eu-central-1).
5.6 Paste the AWS Access Key ID and Secret Key you generated and copied earlier.
5.7 Click the green Connect button.
Stape will verify the connection. Once successful, your logs will be sent to the AWS S3 bucket.
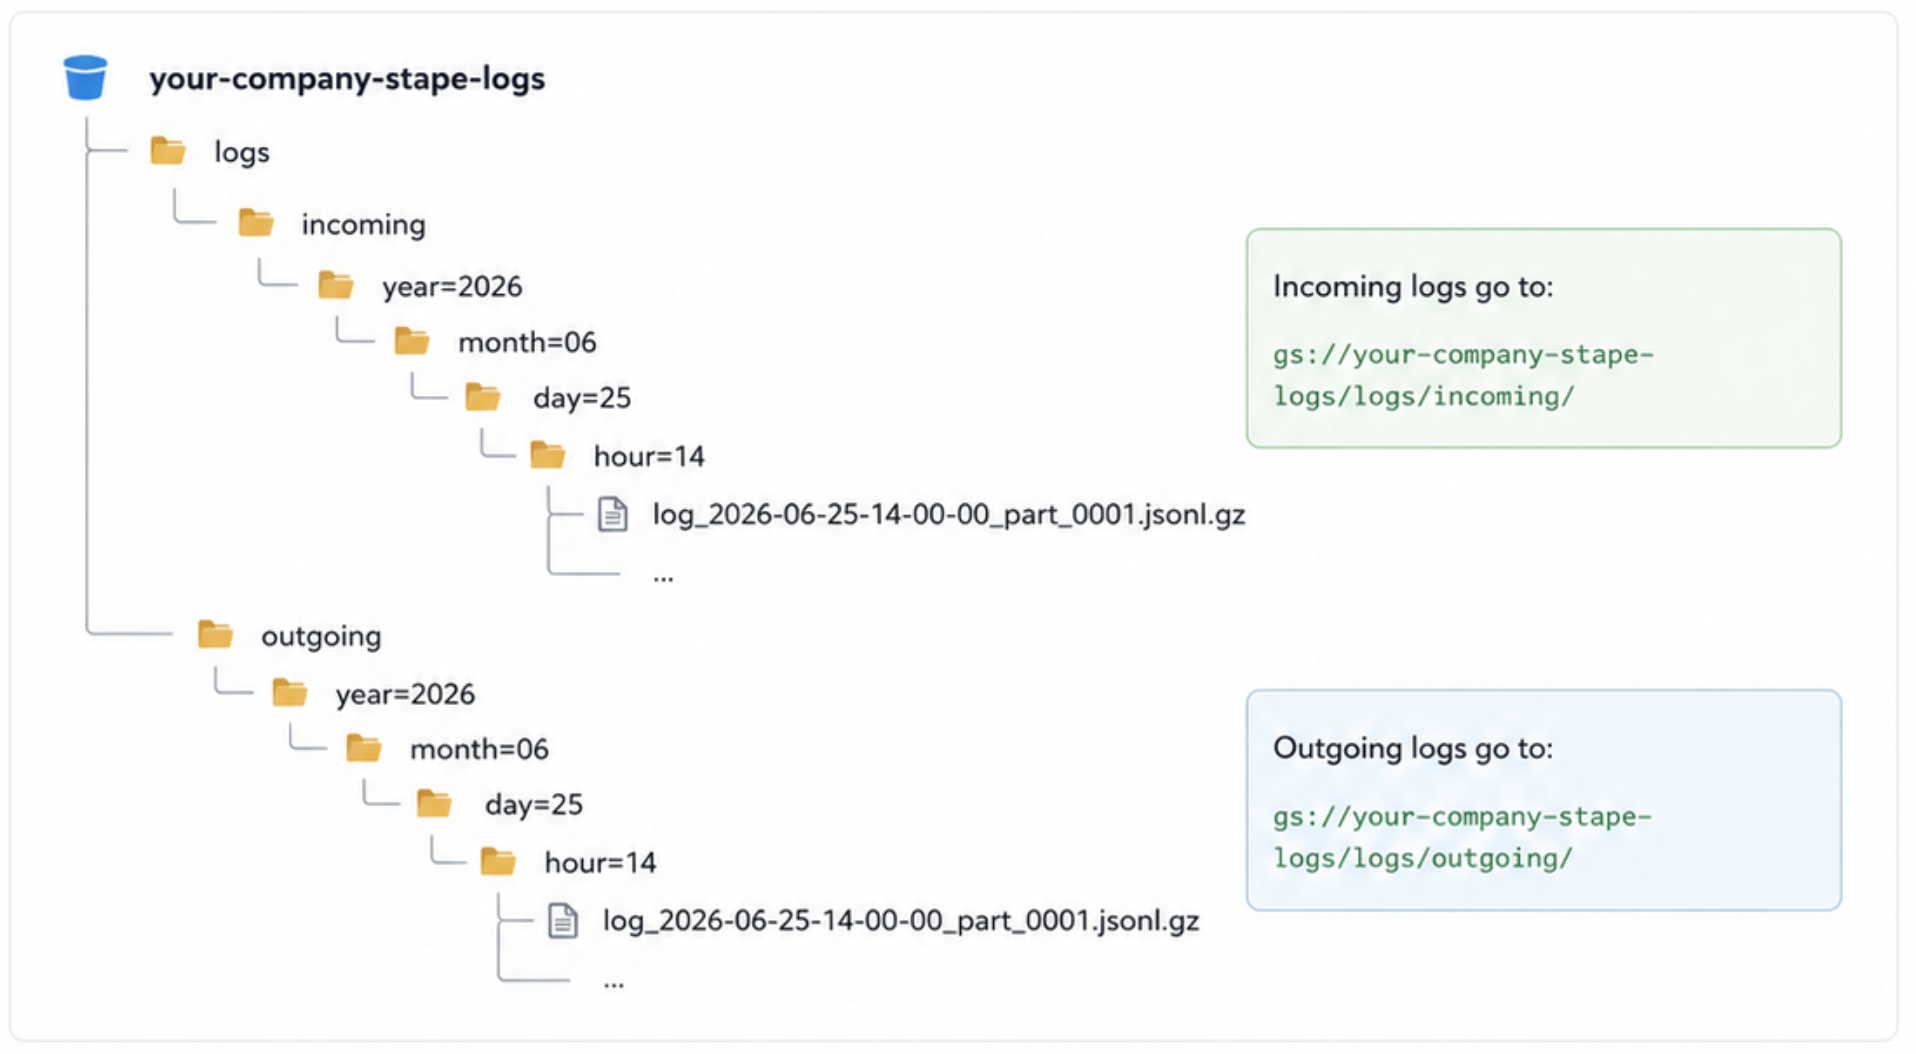
Exported logs structure
How to export logs to BigQuery
BigQuery can query data stored in Amazon S3 using a BigLake connection and an external table. The feature is required to connect both platforms.
As the last step within the configuration, you need to create an External Table in BigQuery to ensure the data updates in real time without manual input. This configuration allows BigQuery to query data from your storage bucket and reflects any new files added by Stape.
Step 1. Set up the AWS IAM Role
Create the Policy
1.1 Log in to your AWS Management Console, search for IAM, and click on it.
1.2 On the left menu, click Policies → click the Create policy button.
1.3 Click the JSON tab and paste the following code:
Note: Be sure to replace your-company-stape-logs with your exact bucket name |
{
    "Version": "2012-10-17",
    "Statement": [
        {
            "Effect": "Allow",
            "Action": [
                "s3:ListBucket"
            ],
            "Resource": [
                "arn:aws:s3:::your-company-stape-logs"
            ]
        },
        {
            "Effect": "Allow",
            "Action": [
                "s3:GetObject"
            ],
            "Resource": [
                "arn:aws:s3:::your-company-stape-logs/*"
            ]
        }
    ]
}
1.4 Click Next until you reach the review page and name the policy BigQuery-S3-Read-Policy and click Create policy.
Create the Role
1.5 In the IAM left menu, → click Roles, → Create role. And specify the following:
- Trusted entity type - select Web identity.
- Identity provider - select Google.
- Audience - type exactly
00000(this is a temporary placeholder we will change later).
1.6 Click Next.
1.7 On the Permissions page, search for the BigQuery-S3-Read-Policy you just made, check the box next to it, and click Next.
1.8 Name the role BigQuery-Omni-Role and click Create role.
1.9 Find your new role in the list, click on it, and copy the ARN (Amazon Resource Name) at the top. It looks like arn:aws:iam::123456789:role/BigQuery-Omni-Role.
Update the IAM Role Session Duration
1.10 Go back to your AWS Management Console, search for IAM, and click on it.
1.11 In the left-hand menu, click Roles → search for and click on the role you created for this connection (e.g., BigQuery-Omni-Role) → on the role's Summary page, click the Edit button.
1.12 In the Maximum session duration section, change the dropdown value from 1 hour to 12 hours → click Save changes.
Step 2: Create the connection
2.1 Open BigQuery in your Google Cloud Console.
2.2 In the Explorer pane on the left, click + Add Data near the search bar and select Connections to external data sources (or search for Amazon S3).
2.3 Select Amazon S3 → Lakehouse as the connection type. Specify the following:
- Connection ID - name it
aws_stape_connection. - Location - select the AWS region that matches your S3 bucket, prefixed with
aws-(e.g., if your S3 bucket is ineu-central-1, selectaws-eu-central-1). - AWS role ID - paste the ARN you copied at the end of Step 1.
2.4 Click Create connection, → click Go to connection.
2.5 In the Connection details pane, find the BigQuery Google identity. Copy this identity.
Step 3: Take Google Identity back to AWS
3.1 Go back to your AWS IAM Console, find your BigQuery-Omni-Role, and click on it.
3.2 Click the Trust relationships tab, → click Edit trust policy.
3.3 Find the line that says "accounts.google.com:aud": "00000" and replace 00000 with the Google identity you just copied from BigQuery.
3.4 Click Update policy.
Step 4: Create the External Table
4.1 In BigQuery, create a new Dataset.
Note: The Data Location must be the AWS region (e.g., aws-eu-central-1). Name it something like aws_stape_logs. |
4.2 Hover over your new dataset, click the three dots, and select Create table. Set it up the following way:
- Create table from - Amazon S3
- Select S3 path -
s3://your-company-stape-logs/test/incoming/* - File format - JSONL (Newline delimited JSON)
- Connection ID - select the
aws_stape_connectionyou made earlier. - Source Data Partitioning - check this box.
- Select Source URI Prefix -
s3://your-company-stape-logs/test/incoming/ - Table name -
aws_incoming_logs - Schema - check Auto detect
4.3 Click Create table.
Was this article helpful?
Comments