Bot Detection power-up
Updated Jul 30, 2026
The Bot Detection power-up checks each incoming request for signs of bot activity. When enabled, the power-up evaluates every incoming request for signs of automated bot activity and scores it on a scale from 0 to 100:
- Score < 50 – highly likely to be a real human user.
- Score 50 to 75 – suspicious traffic. Checked parameters indicate potential bot activity, but don’t fully confirm it. Stape doesn’t block these automatically.
- Score > 75 – confirmed bot traffic.
To identify requests from bots, Stape analyzes the request parameters and compares them to private and public bot databases.
This power-up keeps your analytics data clean by filtering out bot and spam traffic from platforms like GA4 and Google Ads, ensuring your conversion rates and behavioral metrics remain accurate. Also, because Stape billing is based on request volume, identifying and blocking these bots early reduces server-side load and helps optimize your overall request usage.
Bot Detection is available on the Pro subscription plan and higher.
How to set up Bot Detection
1. Log in to your Stape account and select your sGTM container from the dashboard.
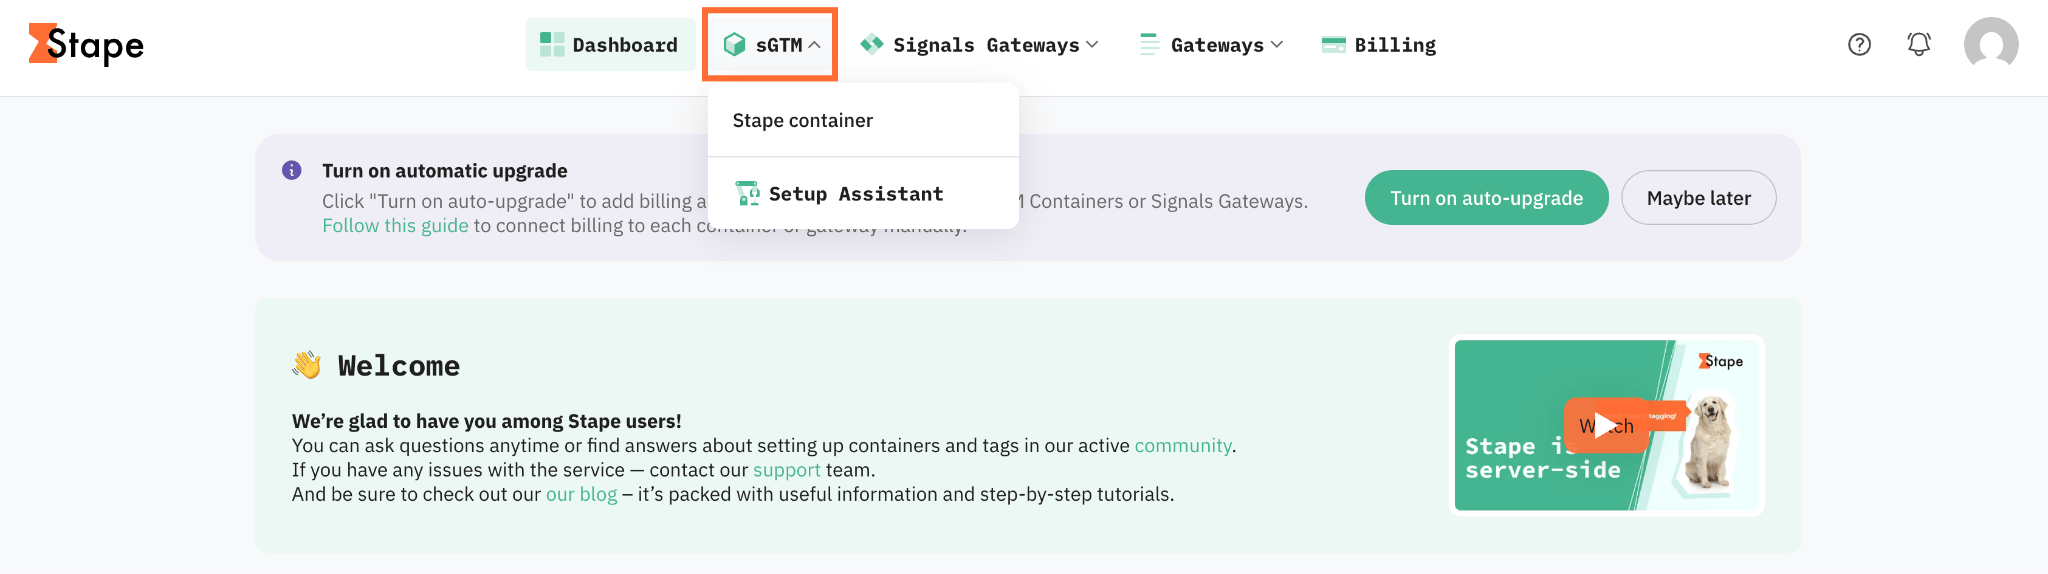
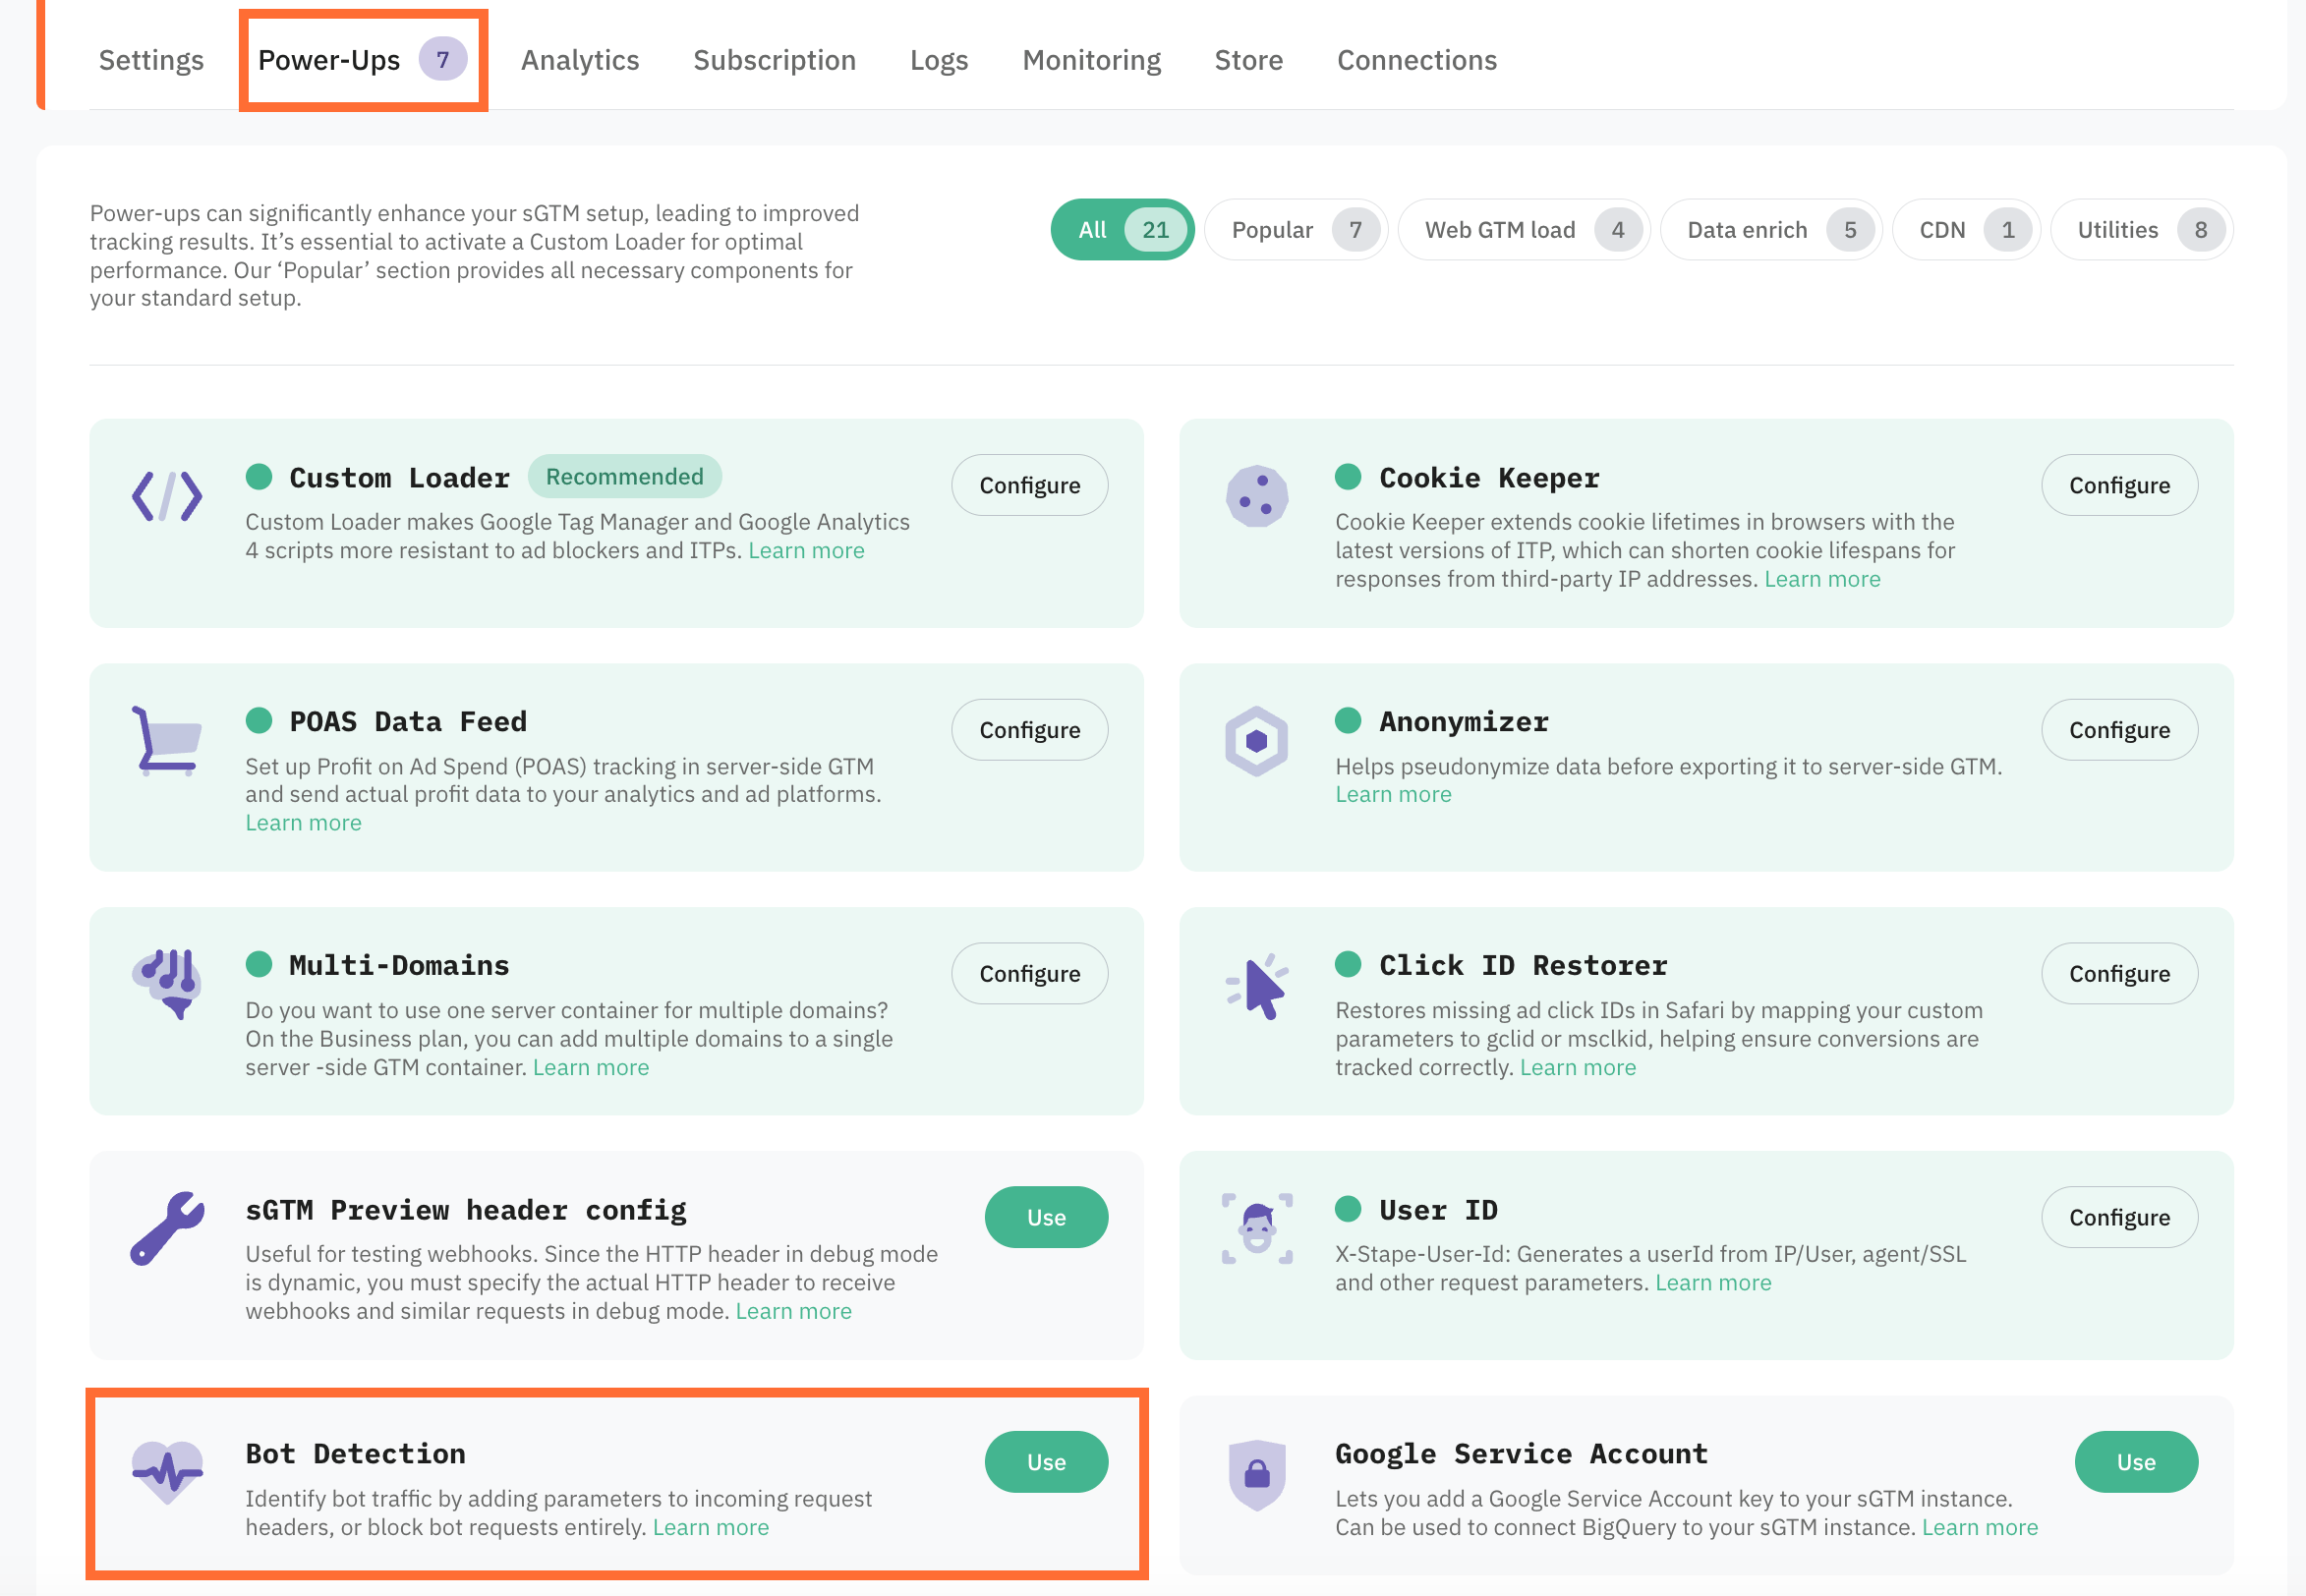
2. Go to Power-ups and click Use next to the Bot Detection panel.
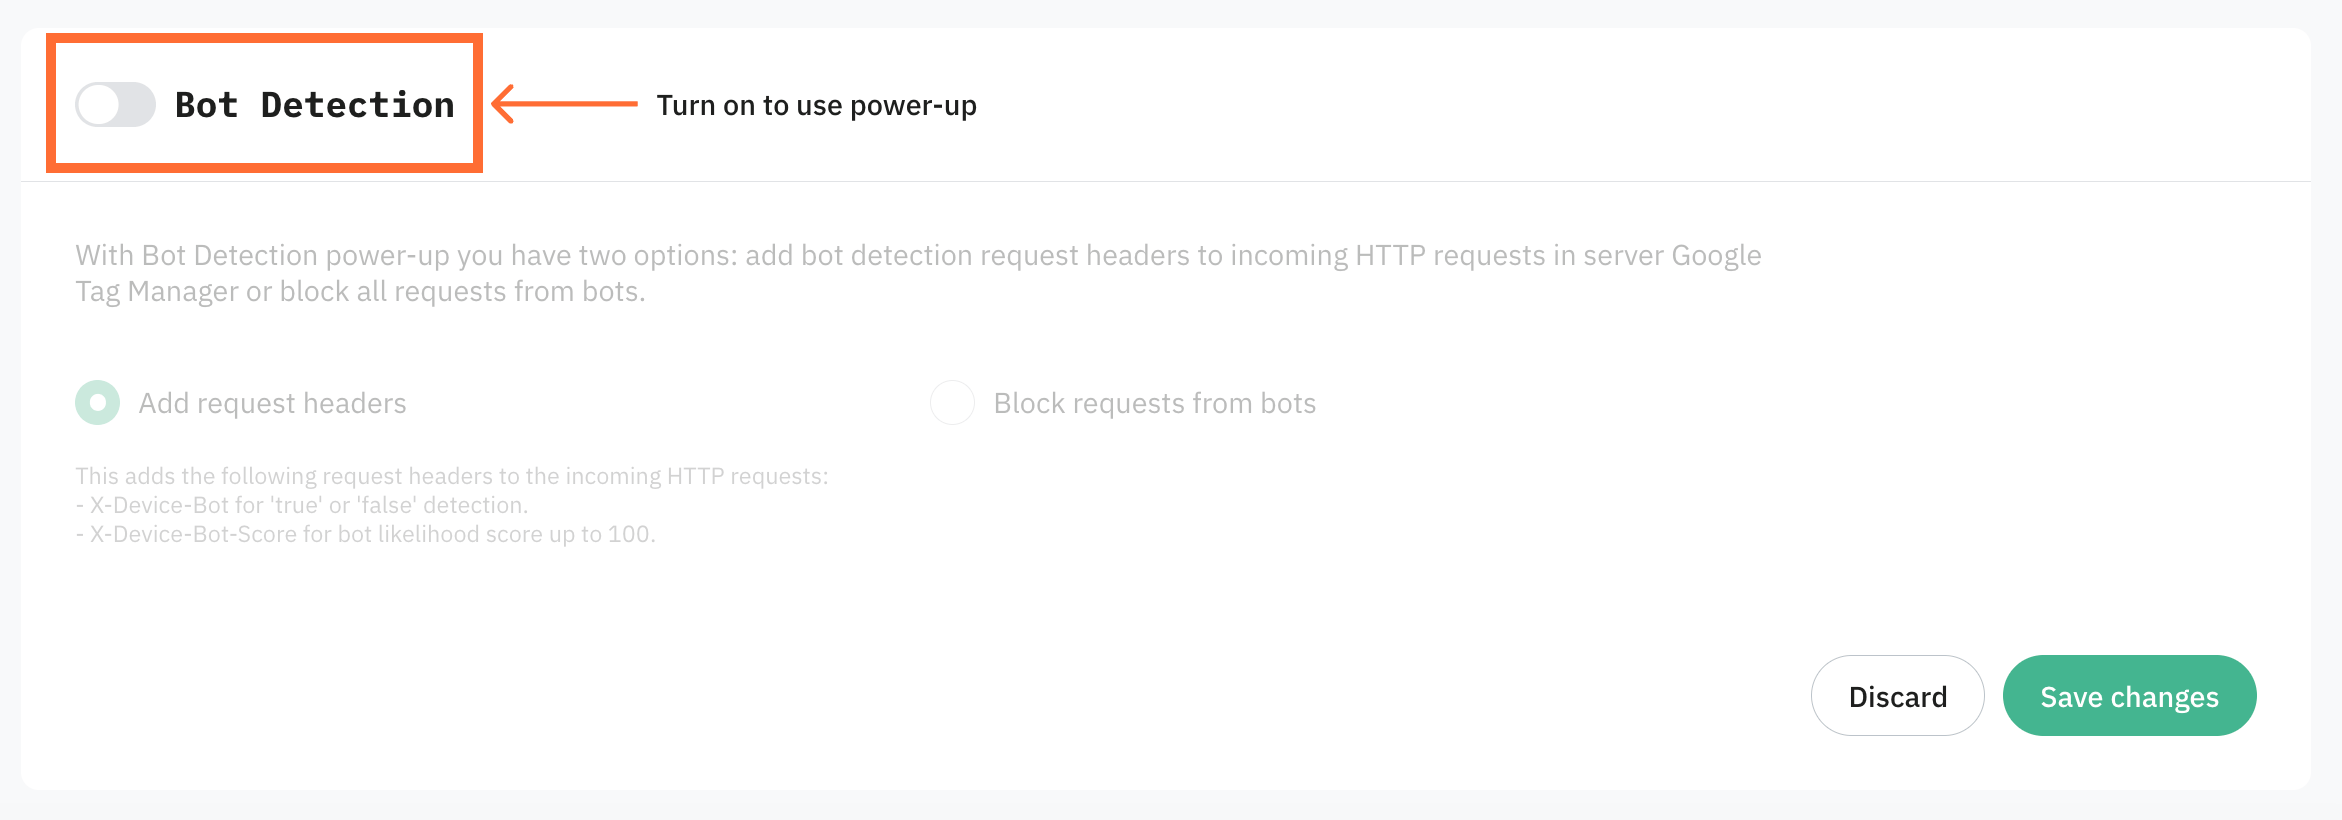
3. Toggle the Bot Detection switch to enable it.
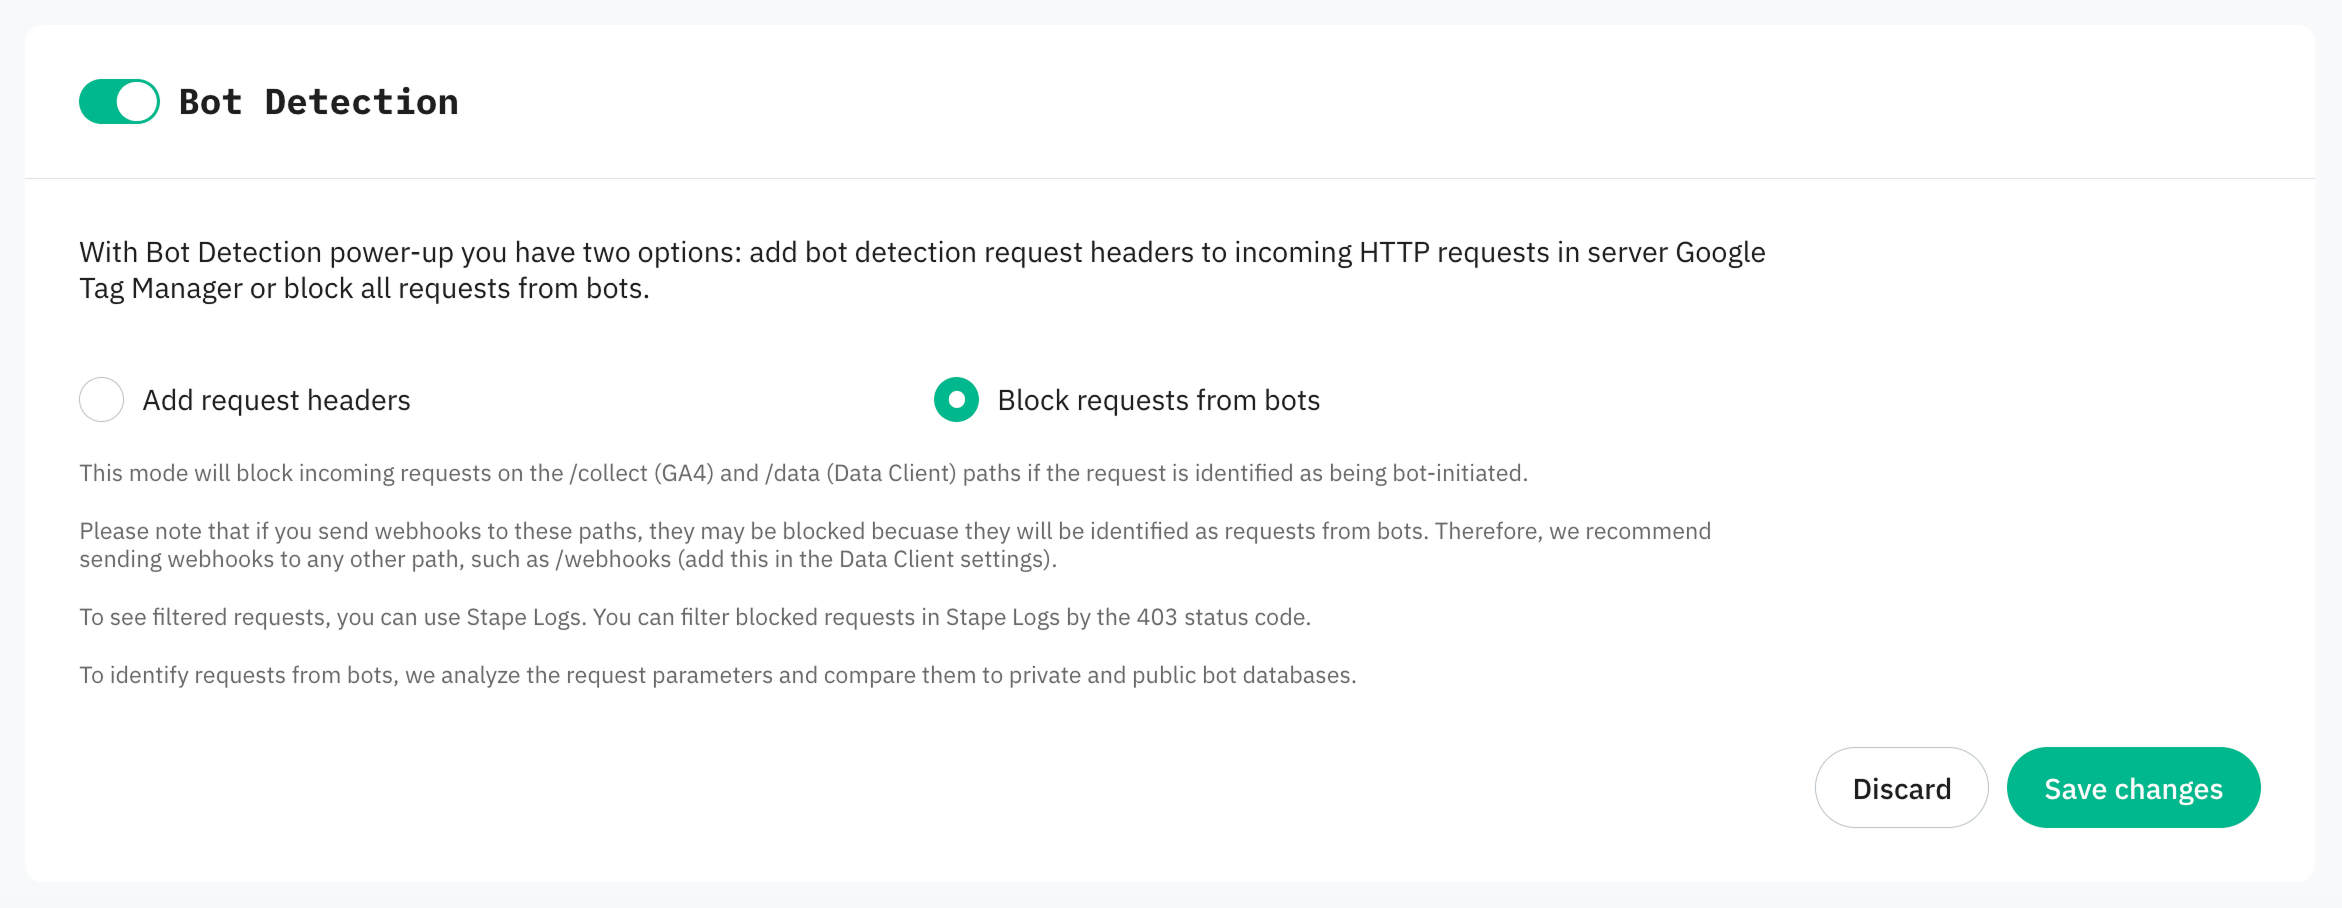
4. Select one of the options:
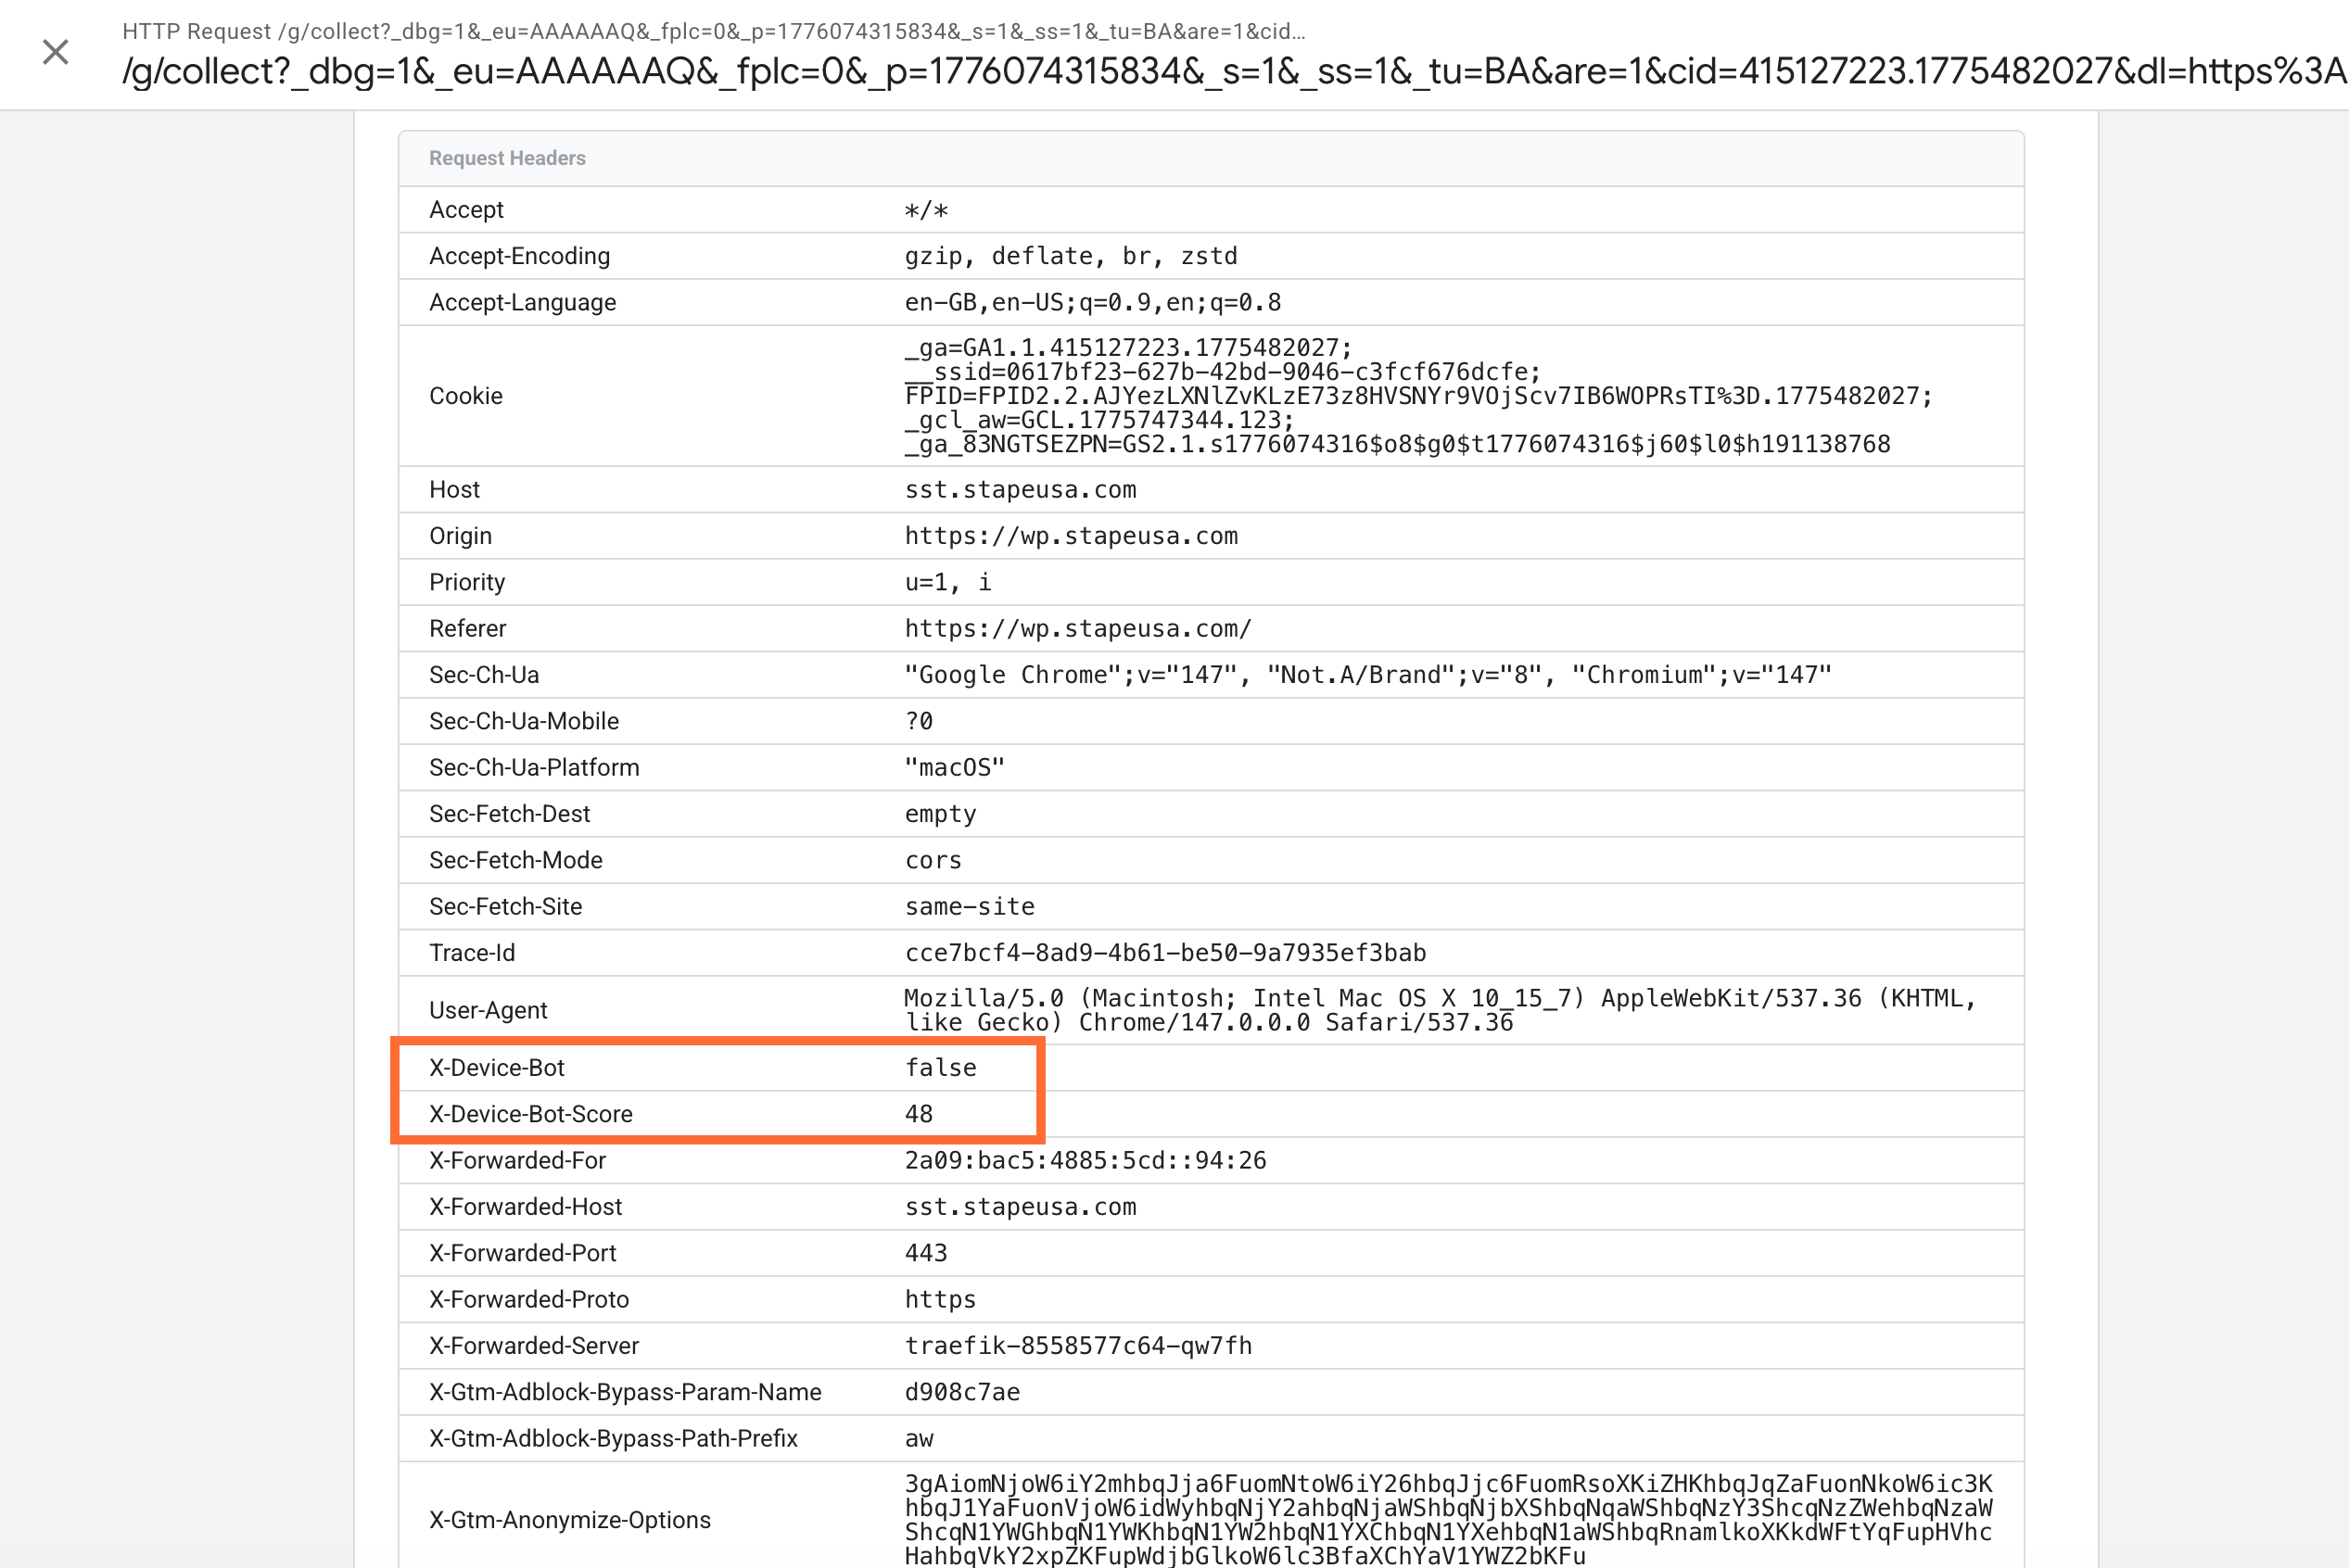
- Add request headers – the power-up adds two HTTP headers to all incoming requests before sending them to your sGTM container:
- X-Device-Bot with values true or false. True means that the request is determined to be automated or suspicious (scoring 50 and above). False means that the request is evaluated as originating from a human visitor. You can extract the value of this header inside your sGTM container and then use this variable to build trigger exceptions or filtering rules. For example, you can block GA4, Google Ads, or Meta tags from firing whenever the value is true, ensuring only clean, human event data is sent to your analytics and marketing tools.
- X-Device-Bot-Score with score from 0 to 100.
- Block requests from bots – the power-up automatically blocks bot requests to
/collect/data
5. Click Save changes.
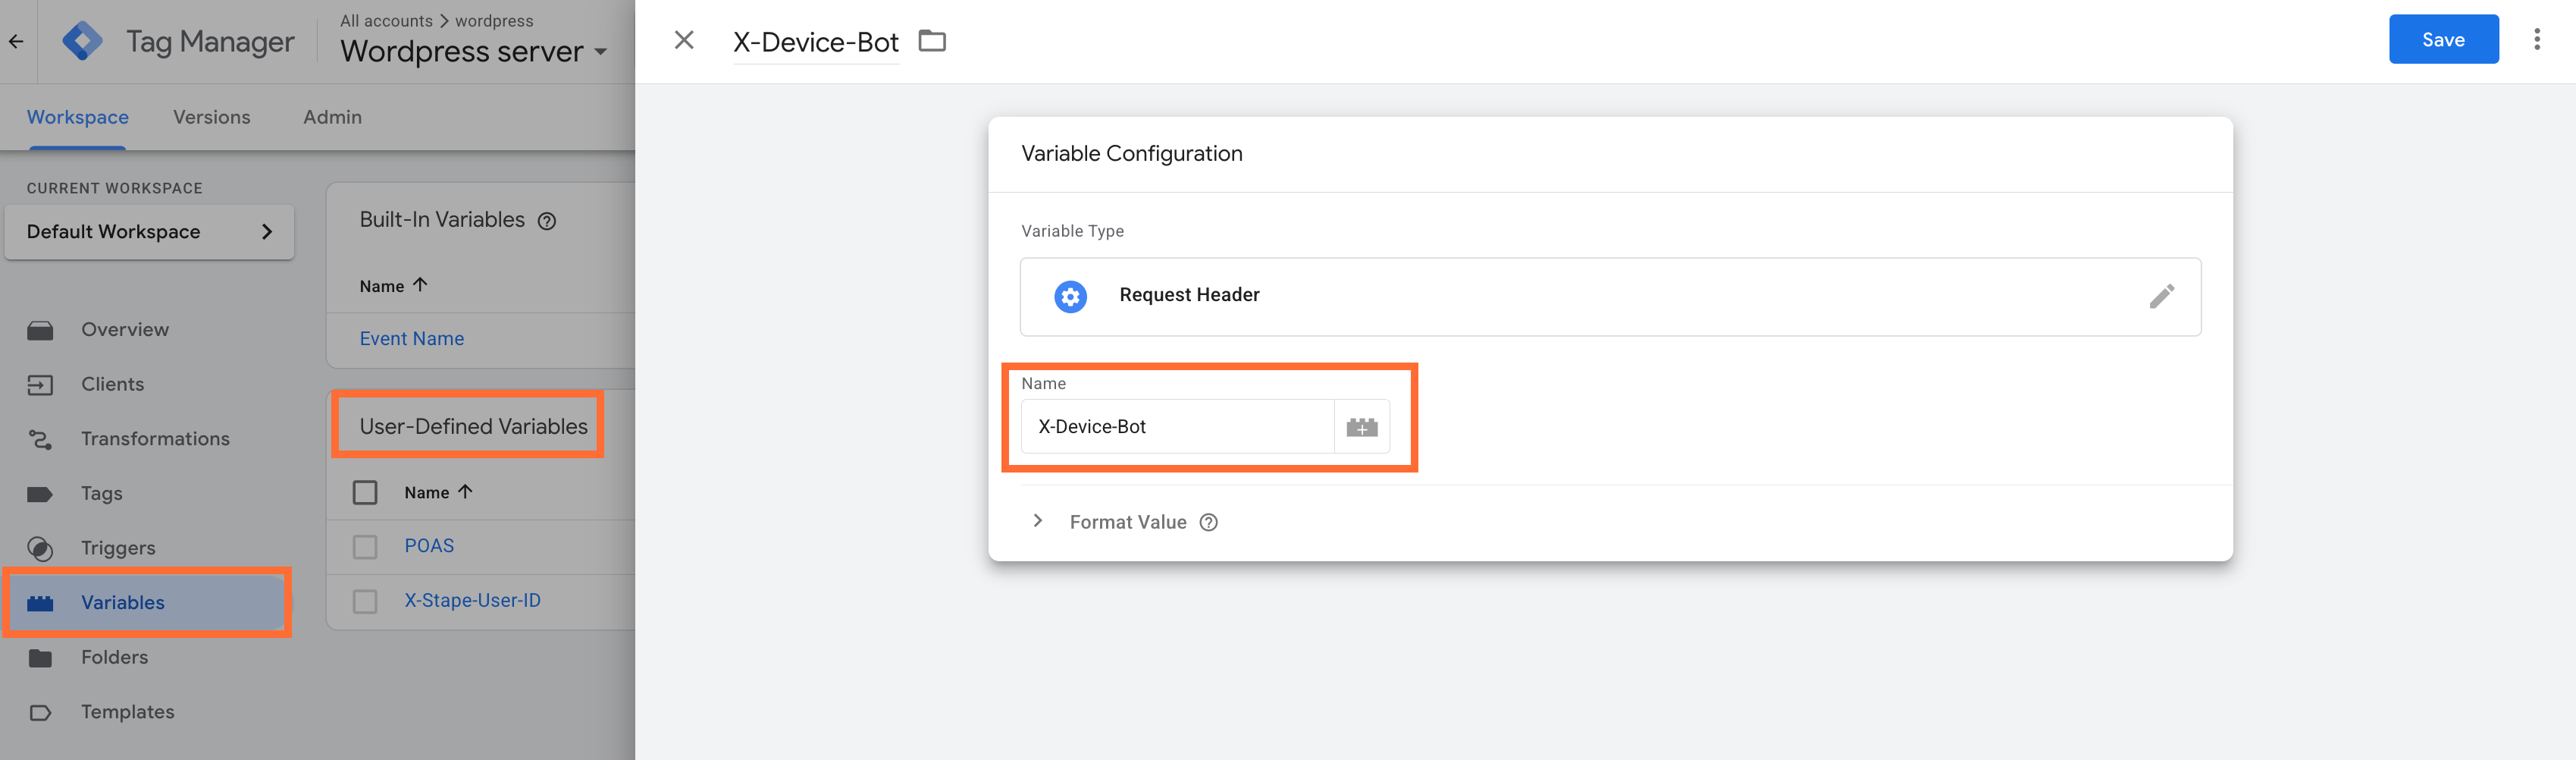
6. Create a User-Defined Variable in the sGTM container with the type Request Header and enter the name X-Device-Bot.
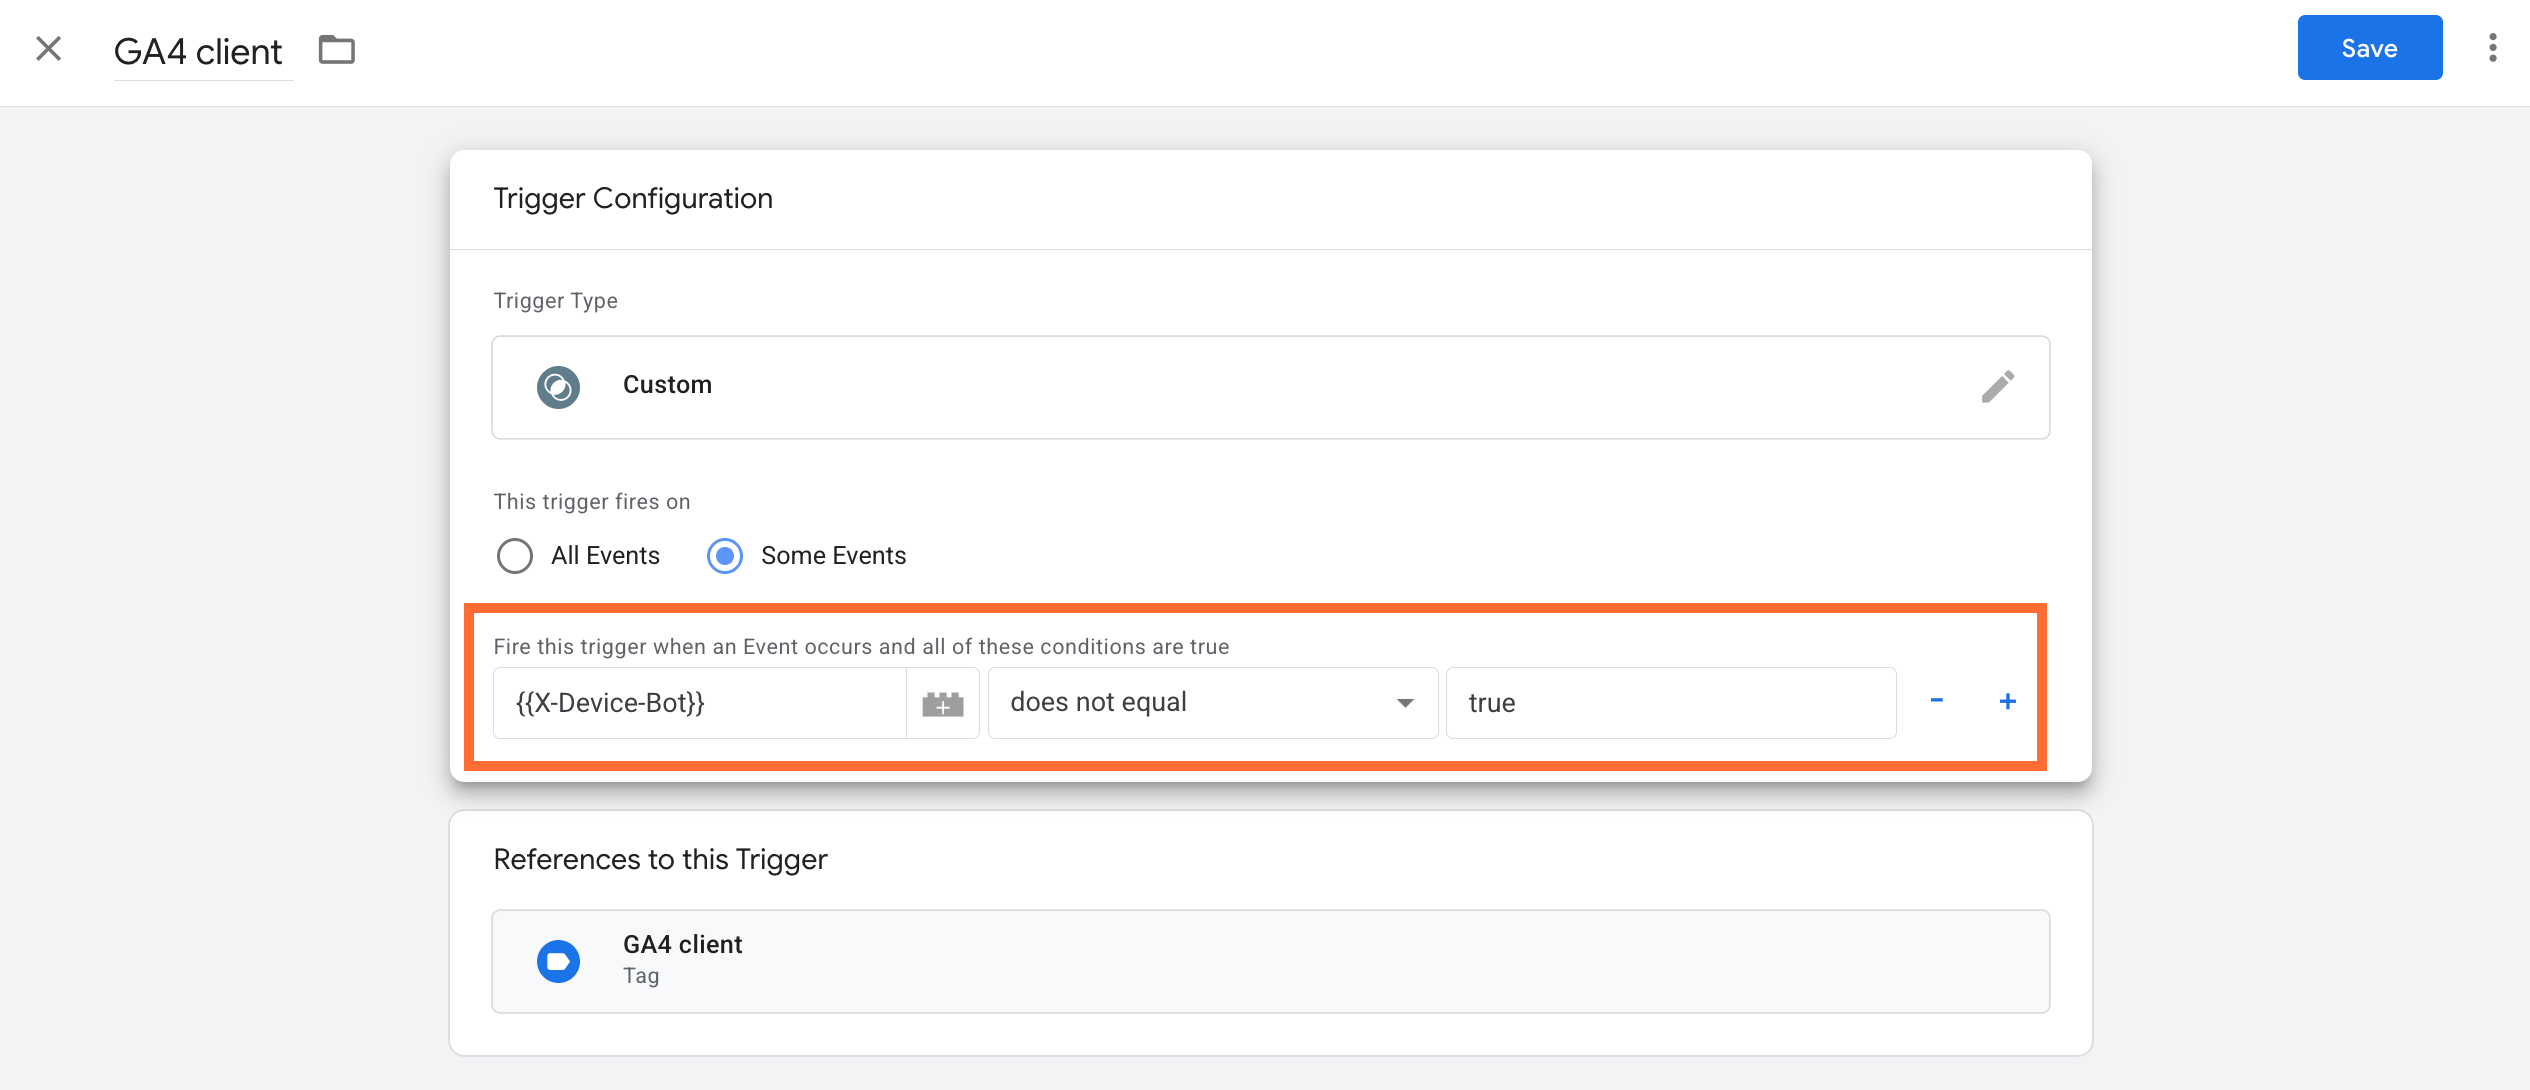
7. Add this variable as an additional condition to your GA4 trigger, or any other trigger where you want to reduce the impact of bot traffic.
How to prevent webhooks from being blocked
To ensure your webhooks continue to work as expected, route them through a dedicated custom path. This bypasses standard container filtering, preventing your automated server requests from being mistakenly flagged as malicious browser traffic.
- Go to Google Tag Manager and open the Data Client.
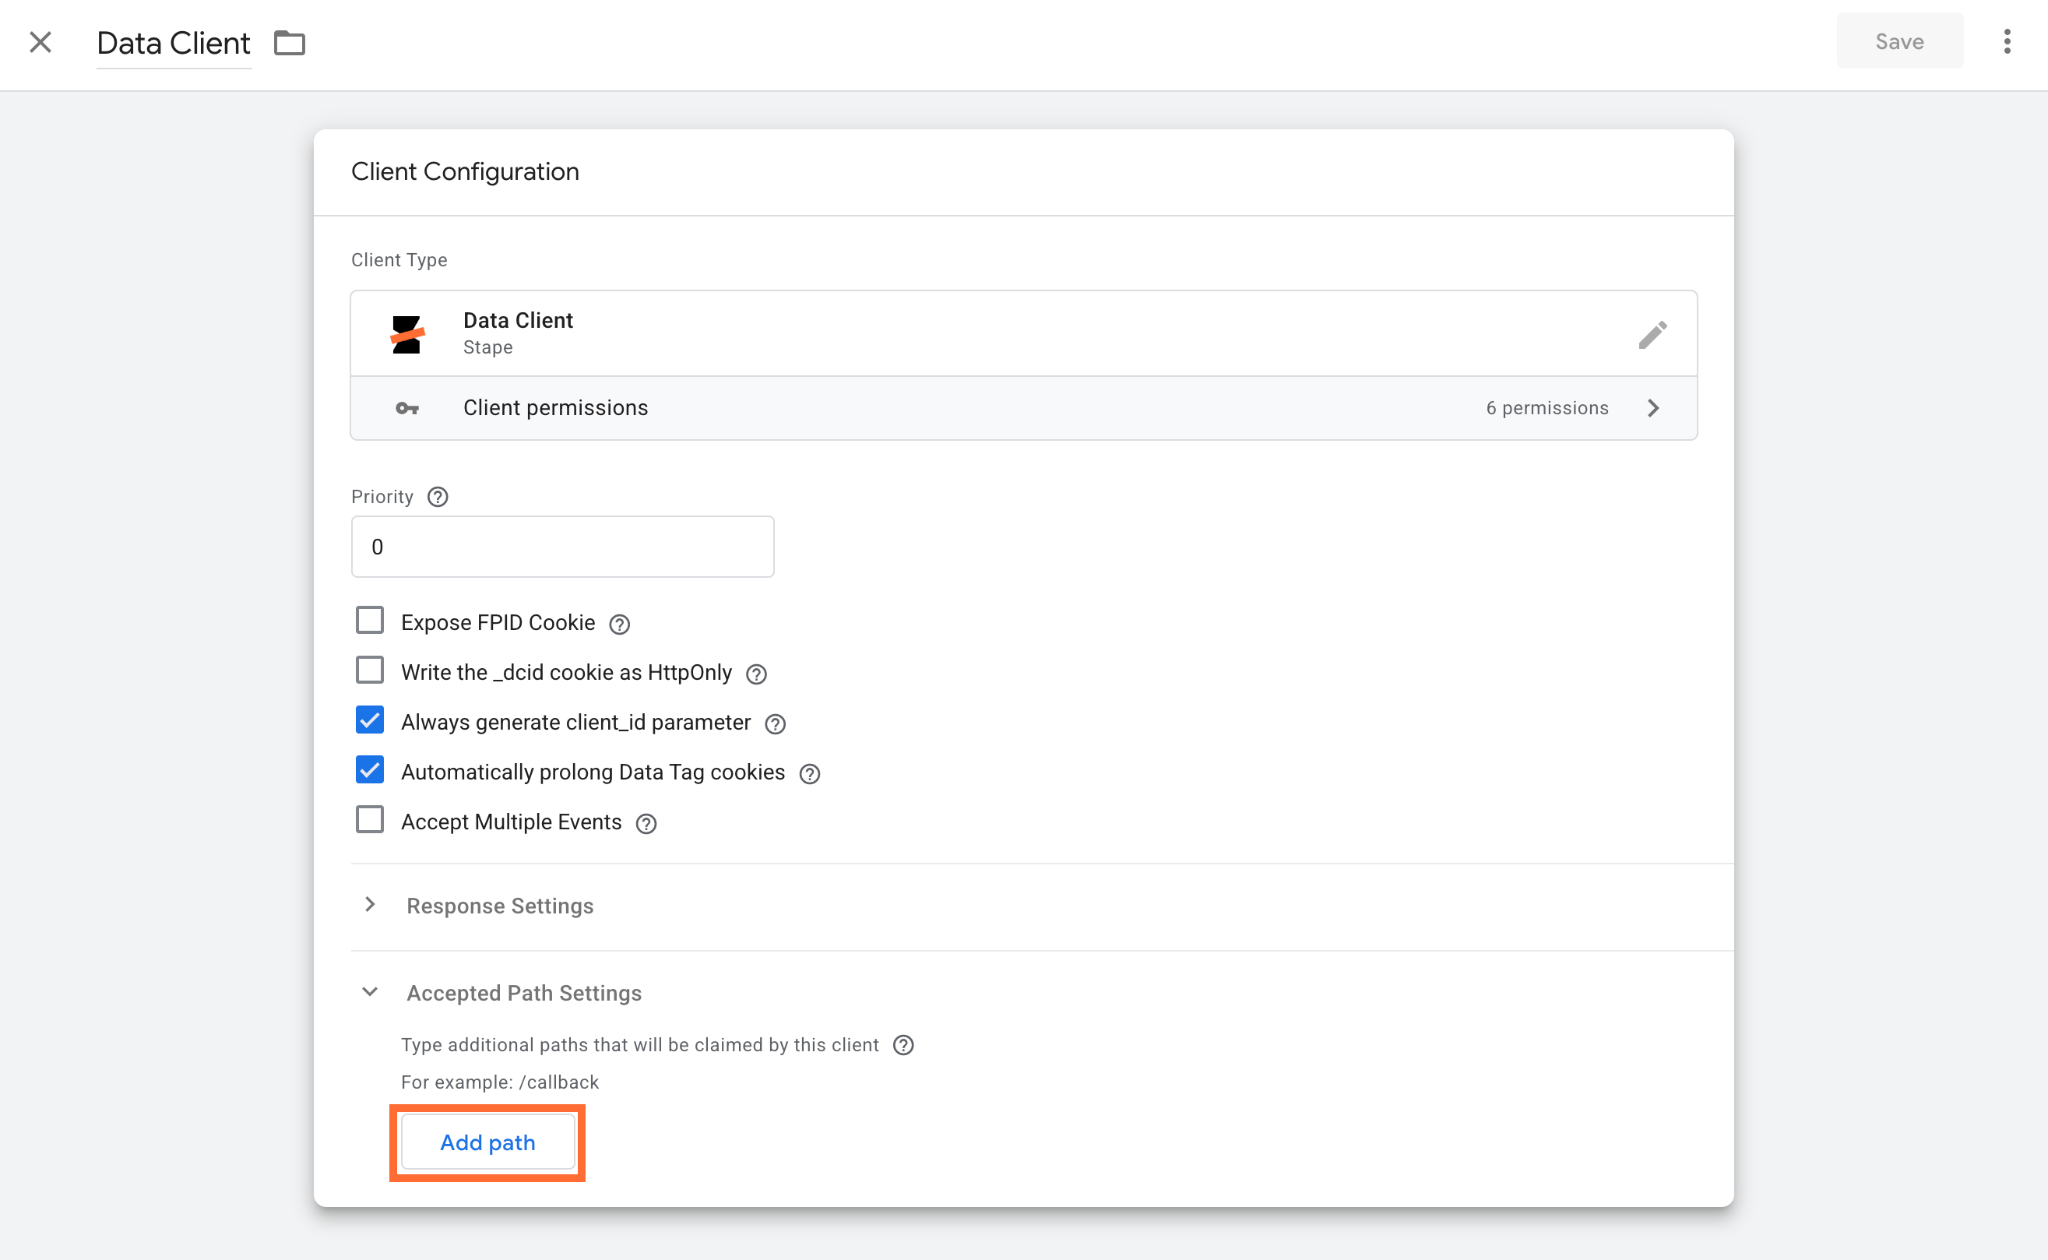
- Open the Accepted Path Settings and click Add path.
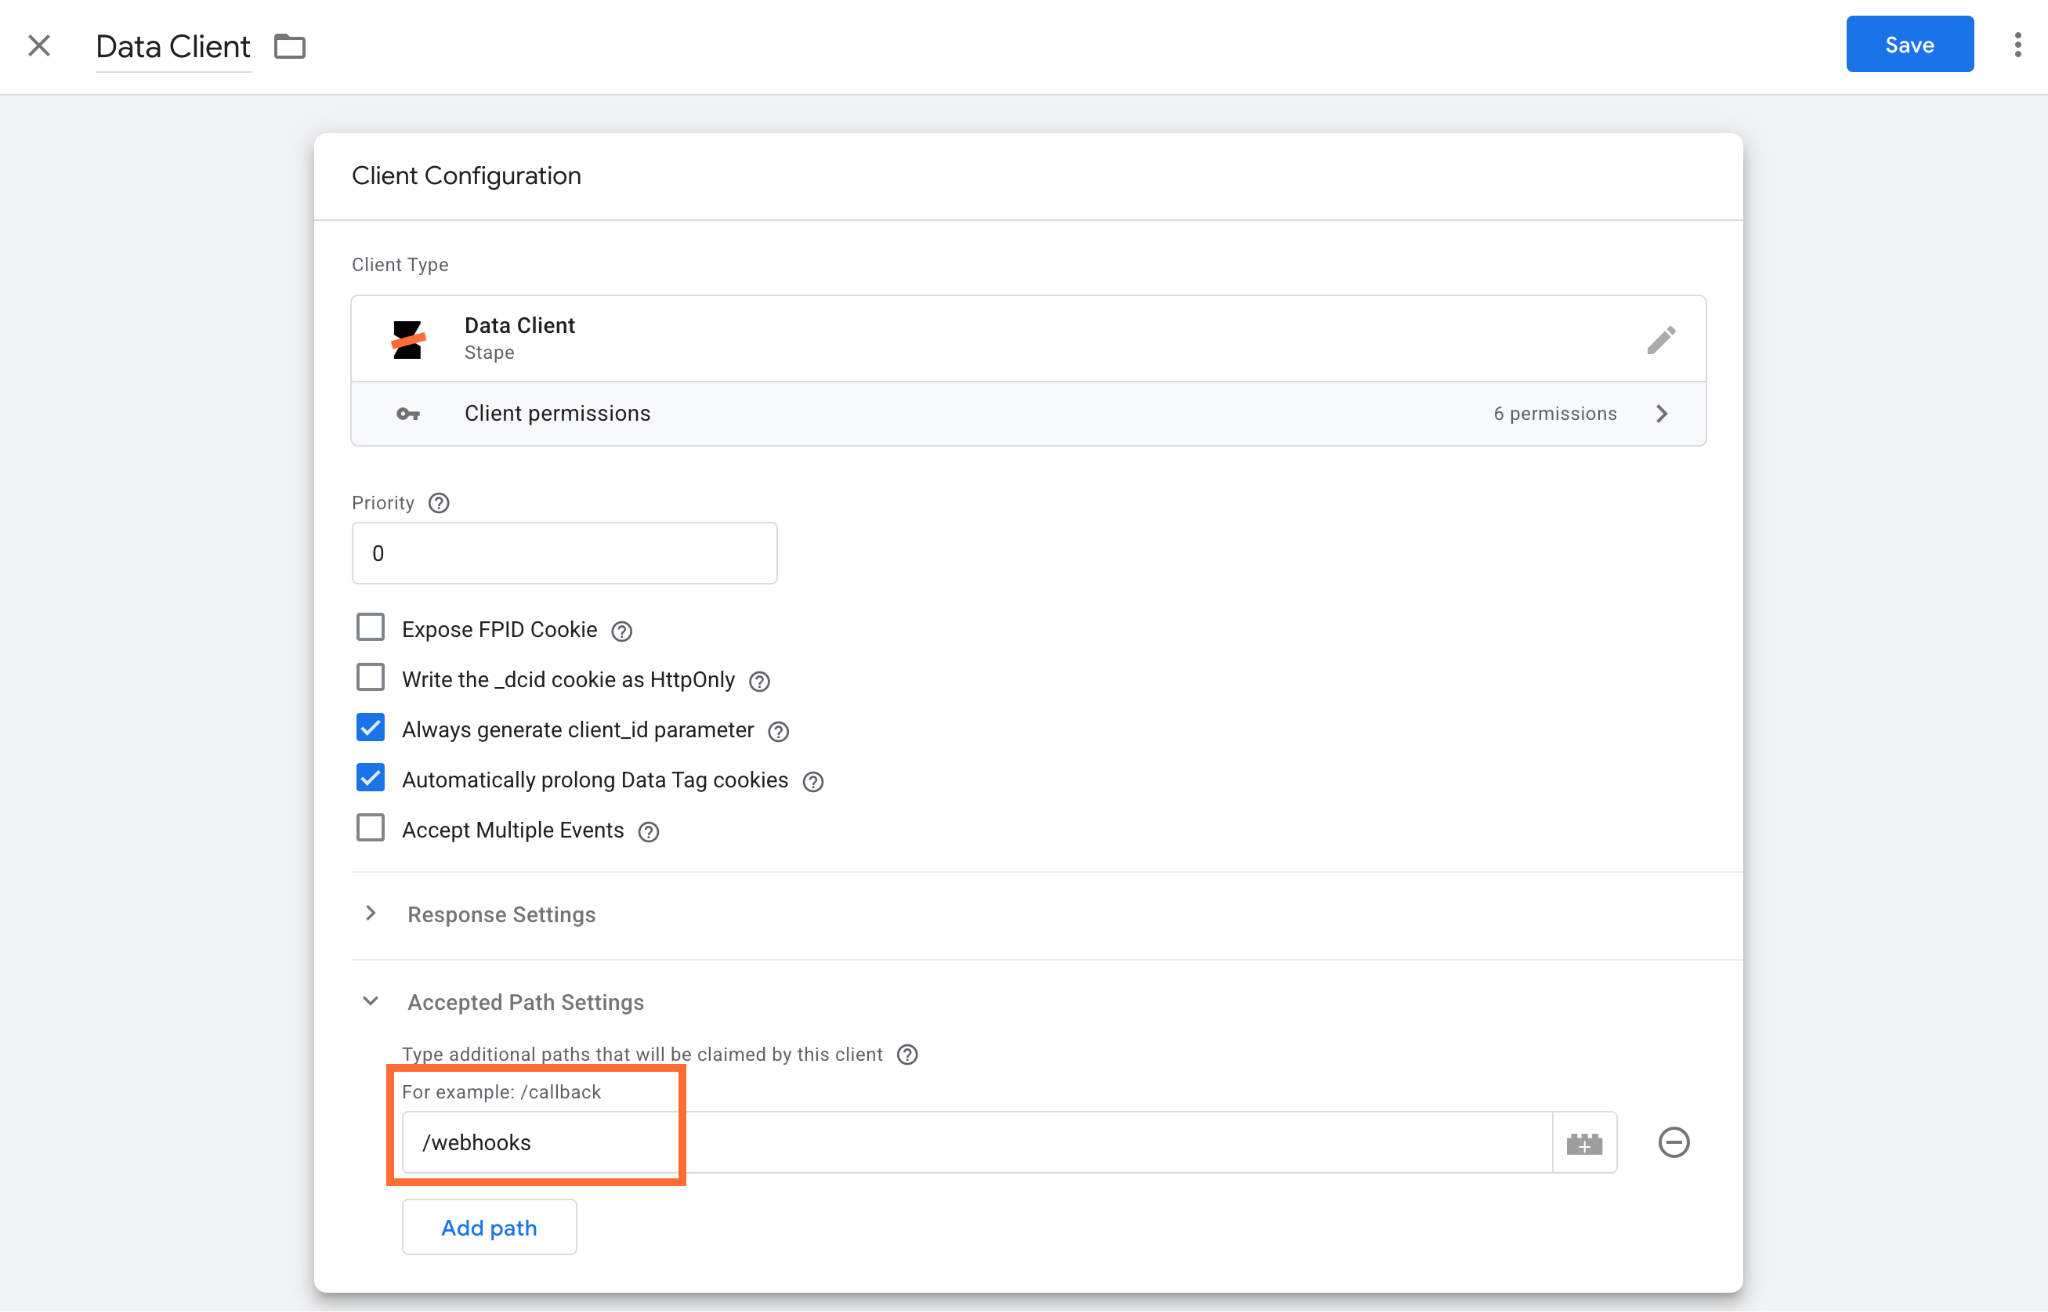
3. Add a specific path, such as /webhooks.
4. Go to the admin/settings of the platform that sends the webhook (for example, Shopify, HubSpot, Wordpress, etc.). Check available CMS and CRM apps.
5. Update the webhook destination URL to direct traffic to your custom path instead of the default root. For example, change it to https://sgtm.yourdomain.com/webhooks. Below is an example for Wordpress:

Testing
Add request headers option:
1. Open the sGTM container preview.
2. Go to the Request tab → click Incoming HTTP Request.
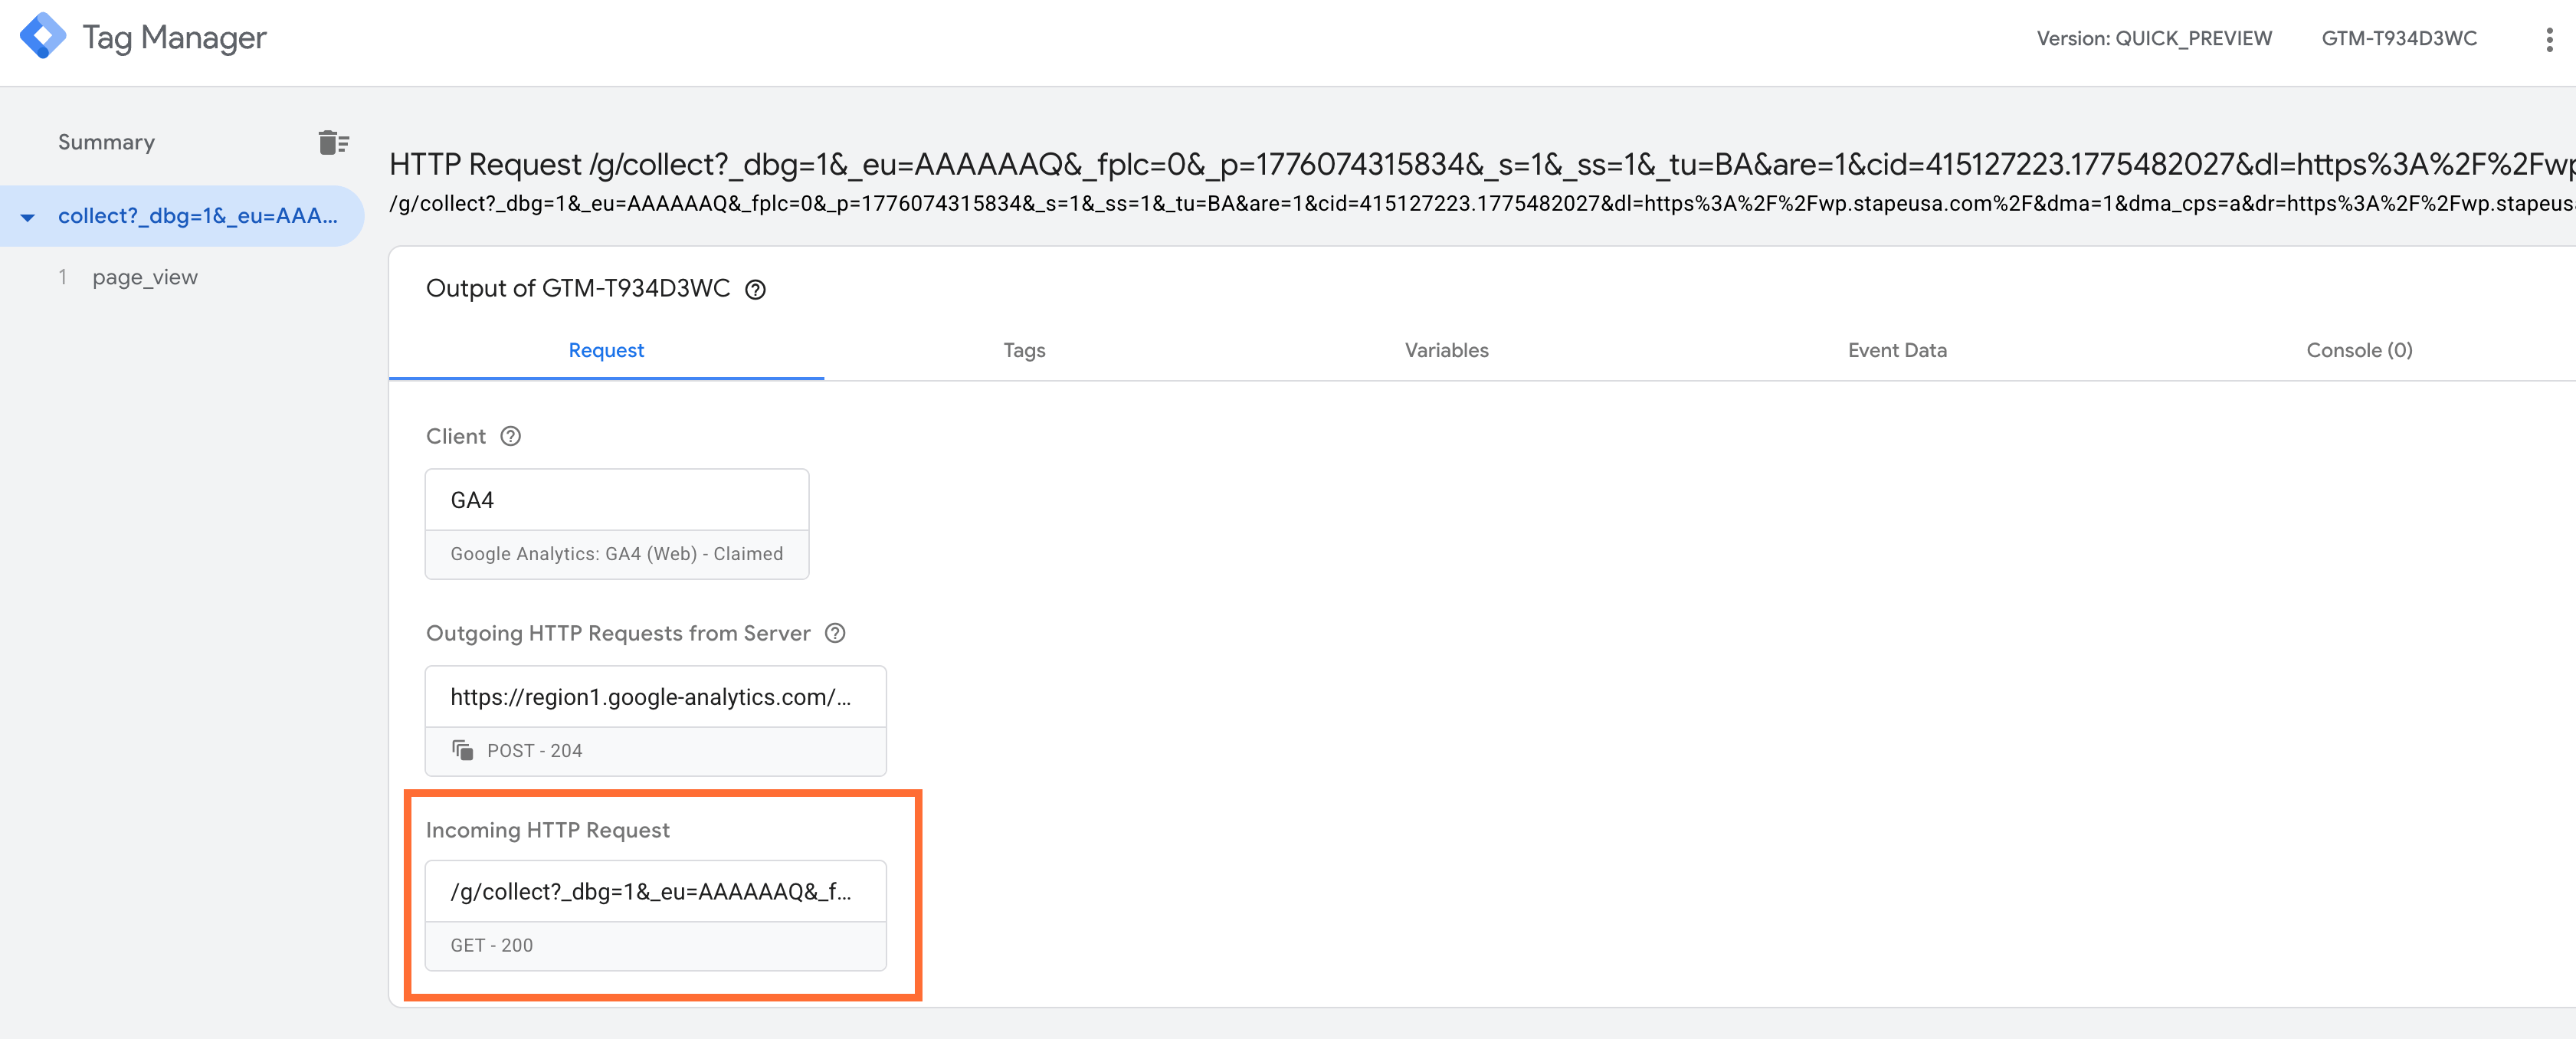
3. If X-Device-Bot headers are present in the Request Headers section, the power-up is working correctly.
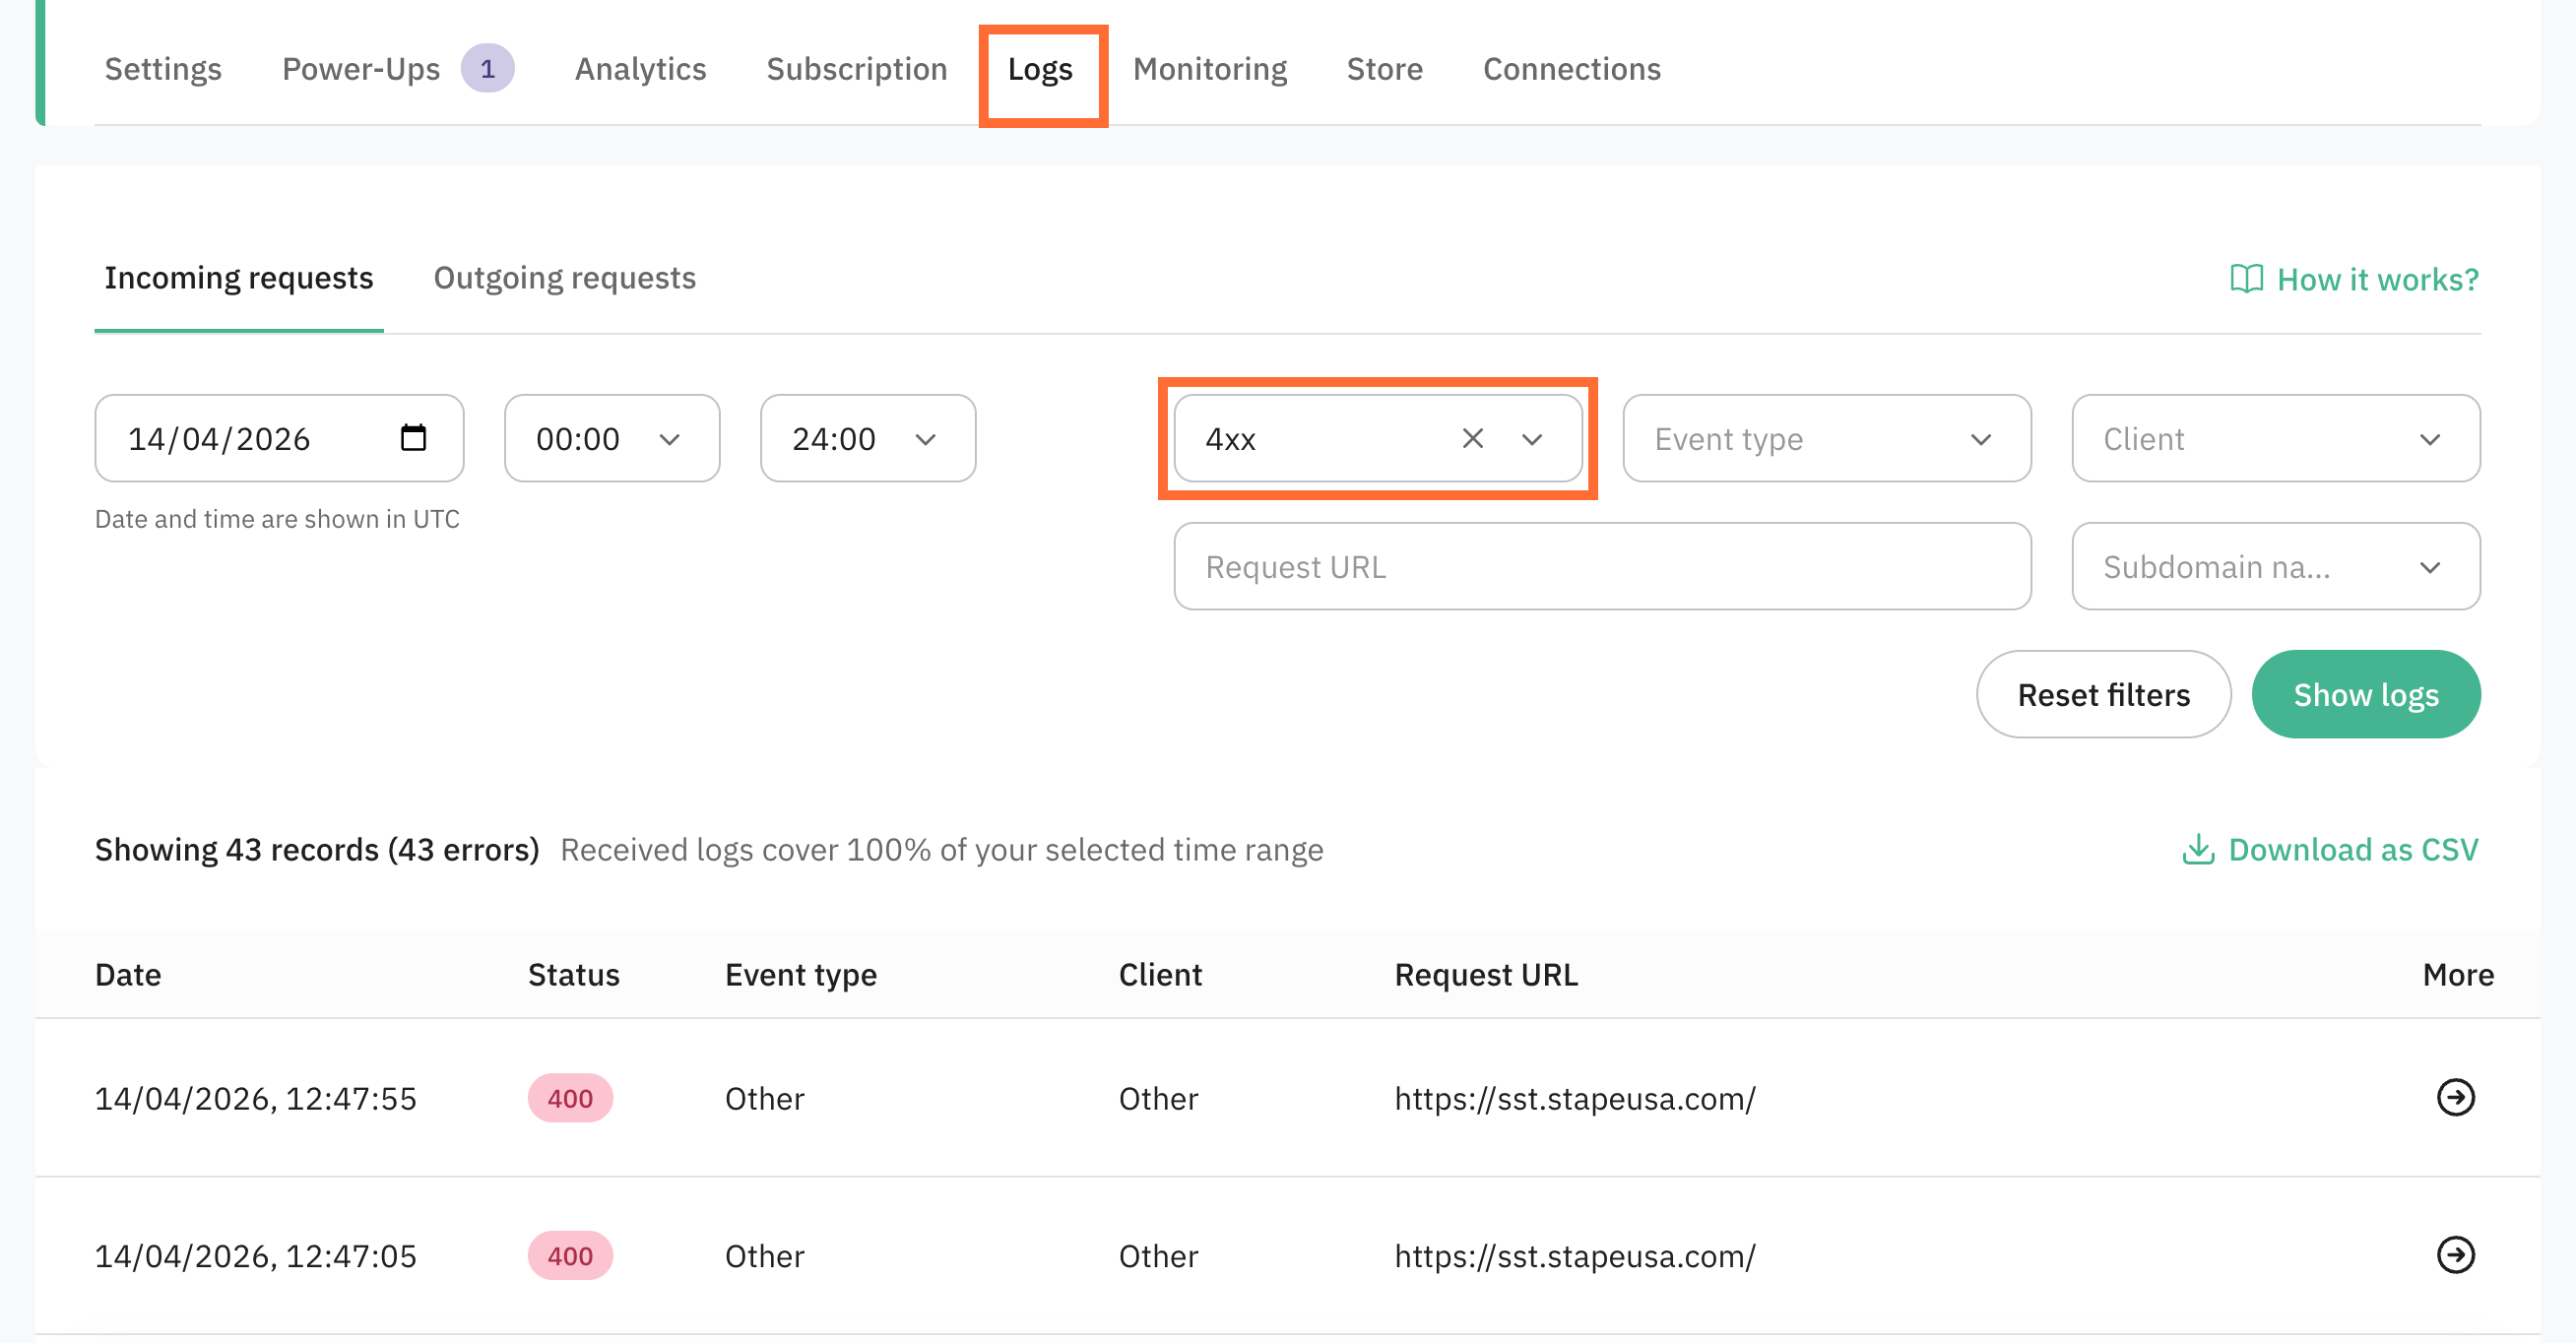
Block requests from bots option
Use the Stape Logs feature and filter by the 403 status code to see which requests were blocked.
Use case
A sample scenario is an eCommerce store running paid search campaigns that show healthy traffic volume but consistently underperform on ROAS. Session counts are high, bounce rates look normal, but revenue isn’t growing in proportion. The issue is that a significant share of recorded sessions comes from bots, which inflates traffic metrics and dilutes engagement rates.
You can identify this problem and fix it this way:
- In GA4, compare your session volume against your orders for the same period. If your conversion rate is significantly lower than your industry benchmark, and your average session duration looks unusually short across a large share of sessions, bot traffic is likely polluting your data.
- Enable the Bot Detection power-up and create a Request Header variable in sGTM with the Header Name
X-Device-Bot. Add this variable as an exception condition on your GA4 triggers so that events from requests whereX-Device-Botis true aren’t forwarded to GA4 or your ad platforms. - Monitor your key metrics over the following 2-4 weeks and compare them against the baseline period.
If bot traffic was previously distorting your data, you should see your conversion rate increase, and average session quality improve.
Use case with bot detection on Cloudflare
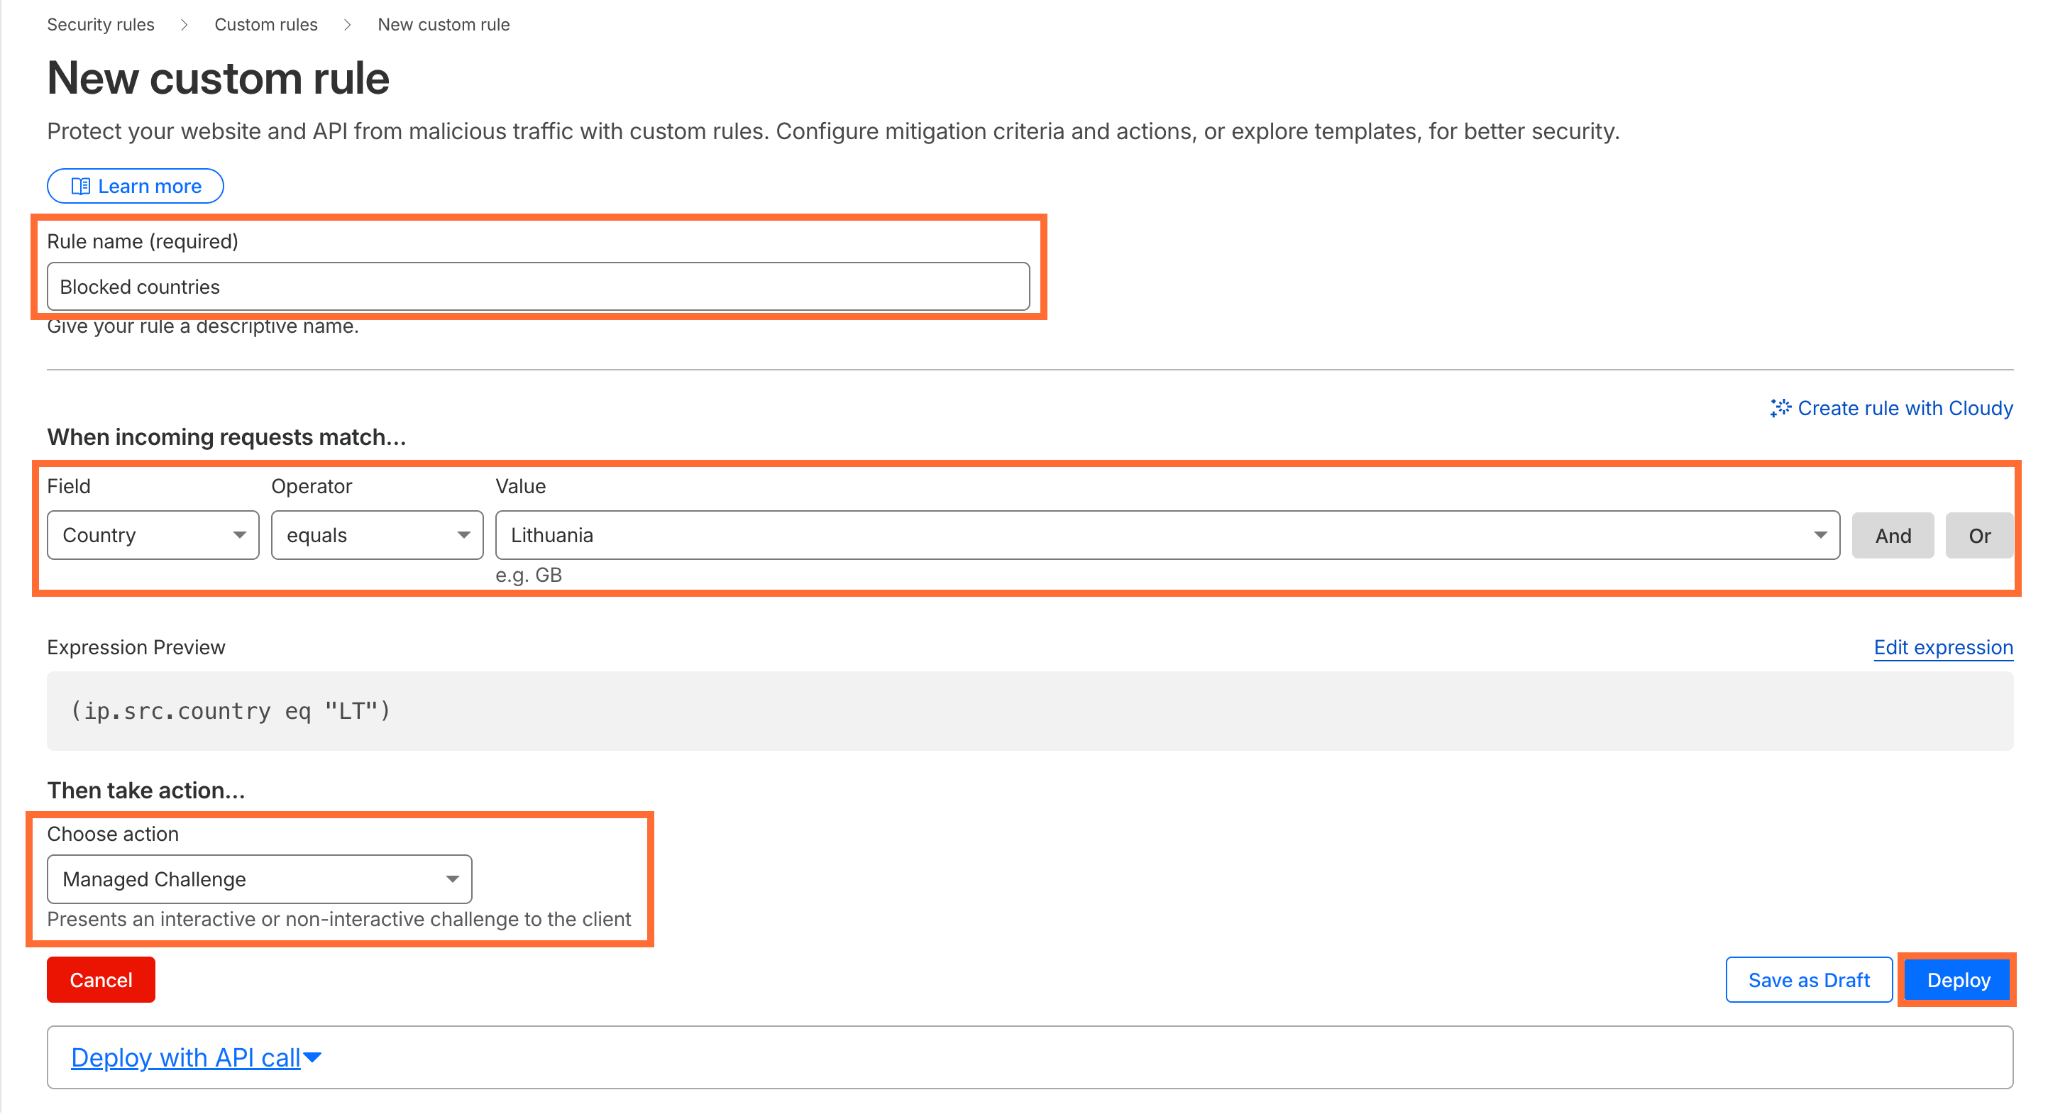
If most bot traffic originates from a specific country and you have no real visitors there, you can configure Cloudflare to challenge requests from that country.
1. In your Cloudflare account, go to your domain → Security → Security rules → click Create rule → select Custom rules.
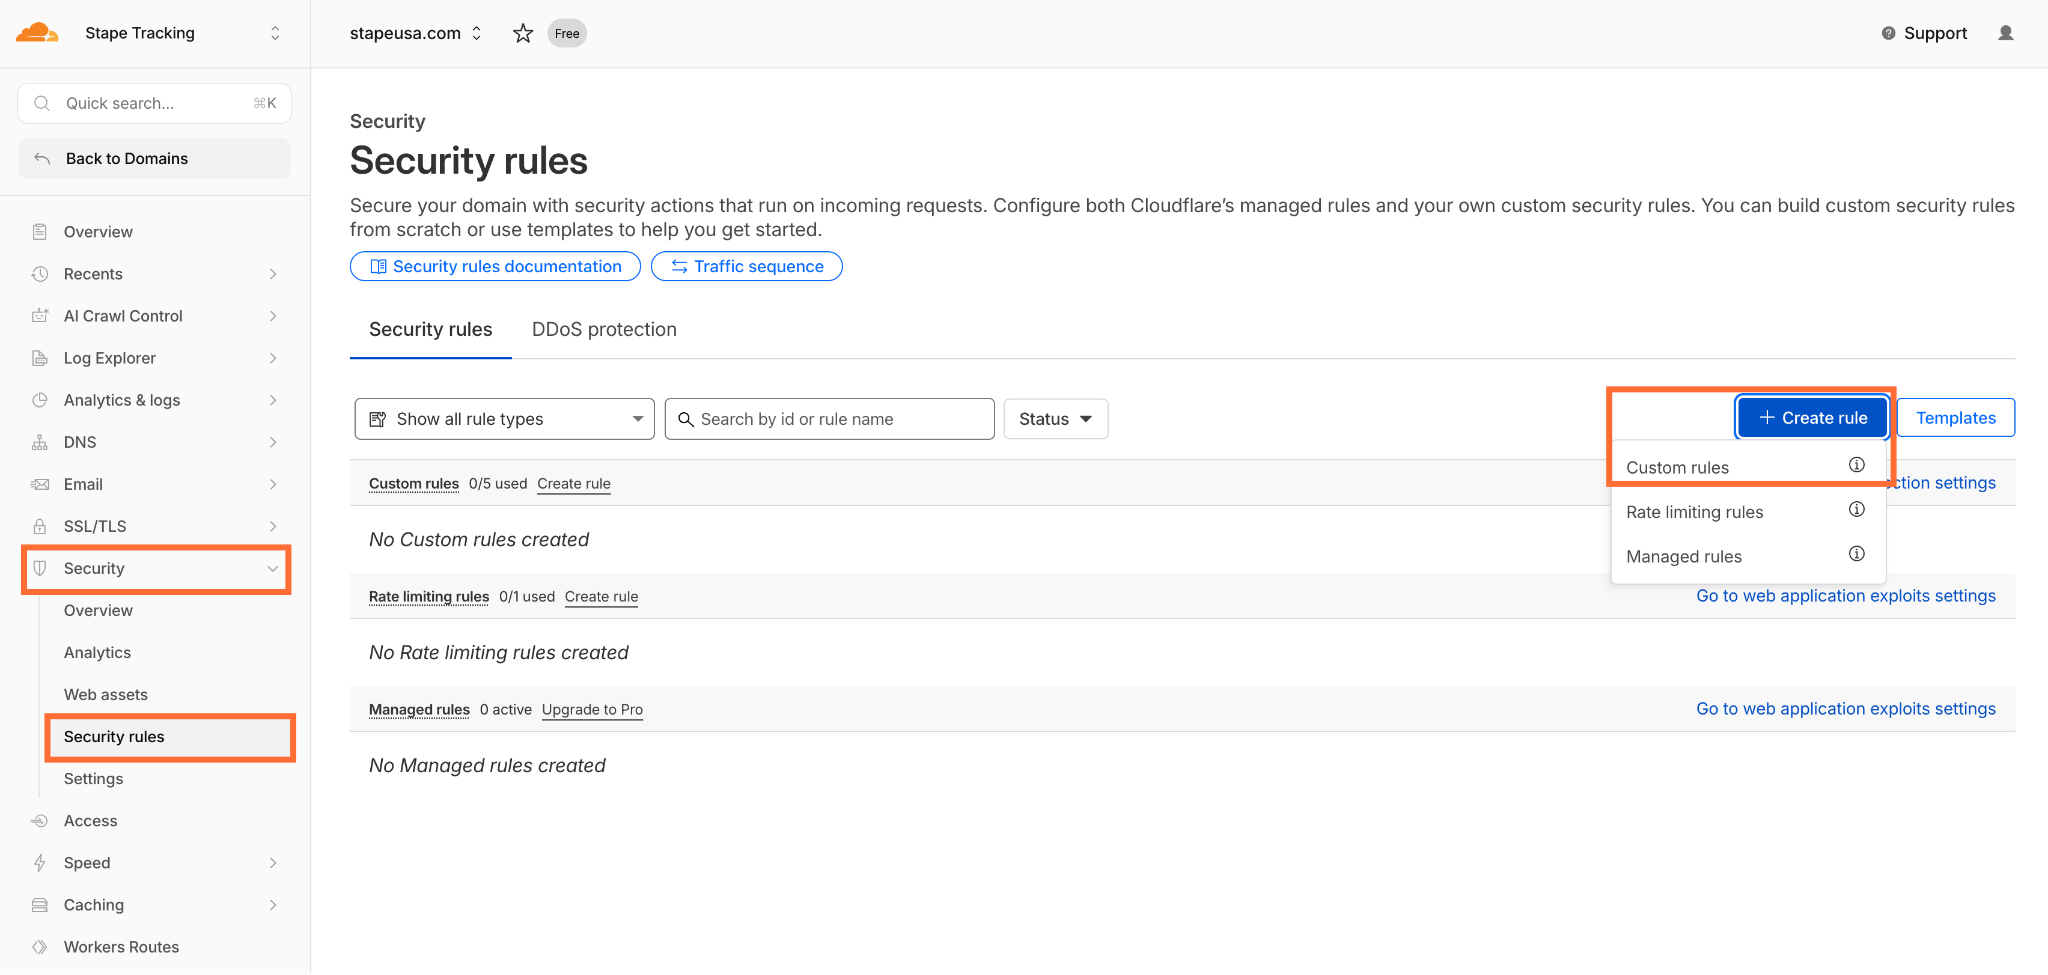
2. Configure the rule:
- Rule name - enter a descriptive name.
- Field -
Country. - Operator -
equals. - Value - select the country your bot traffic originates from.
- Choose action -
Managed challenge.
3. Click Deploy.
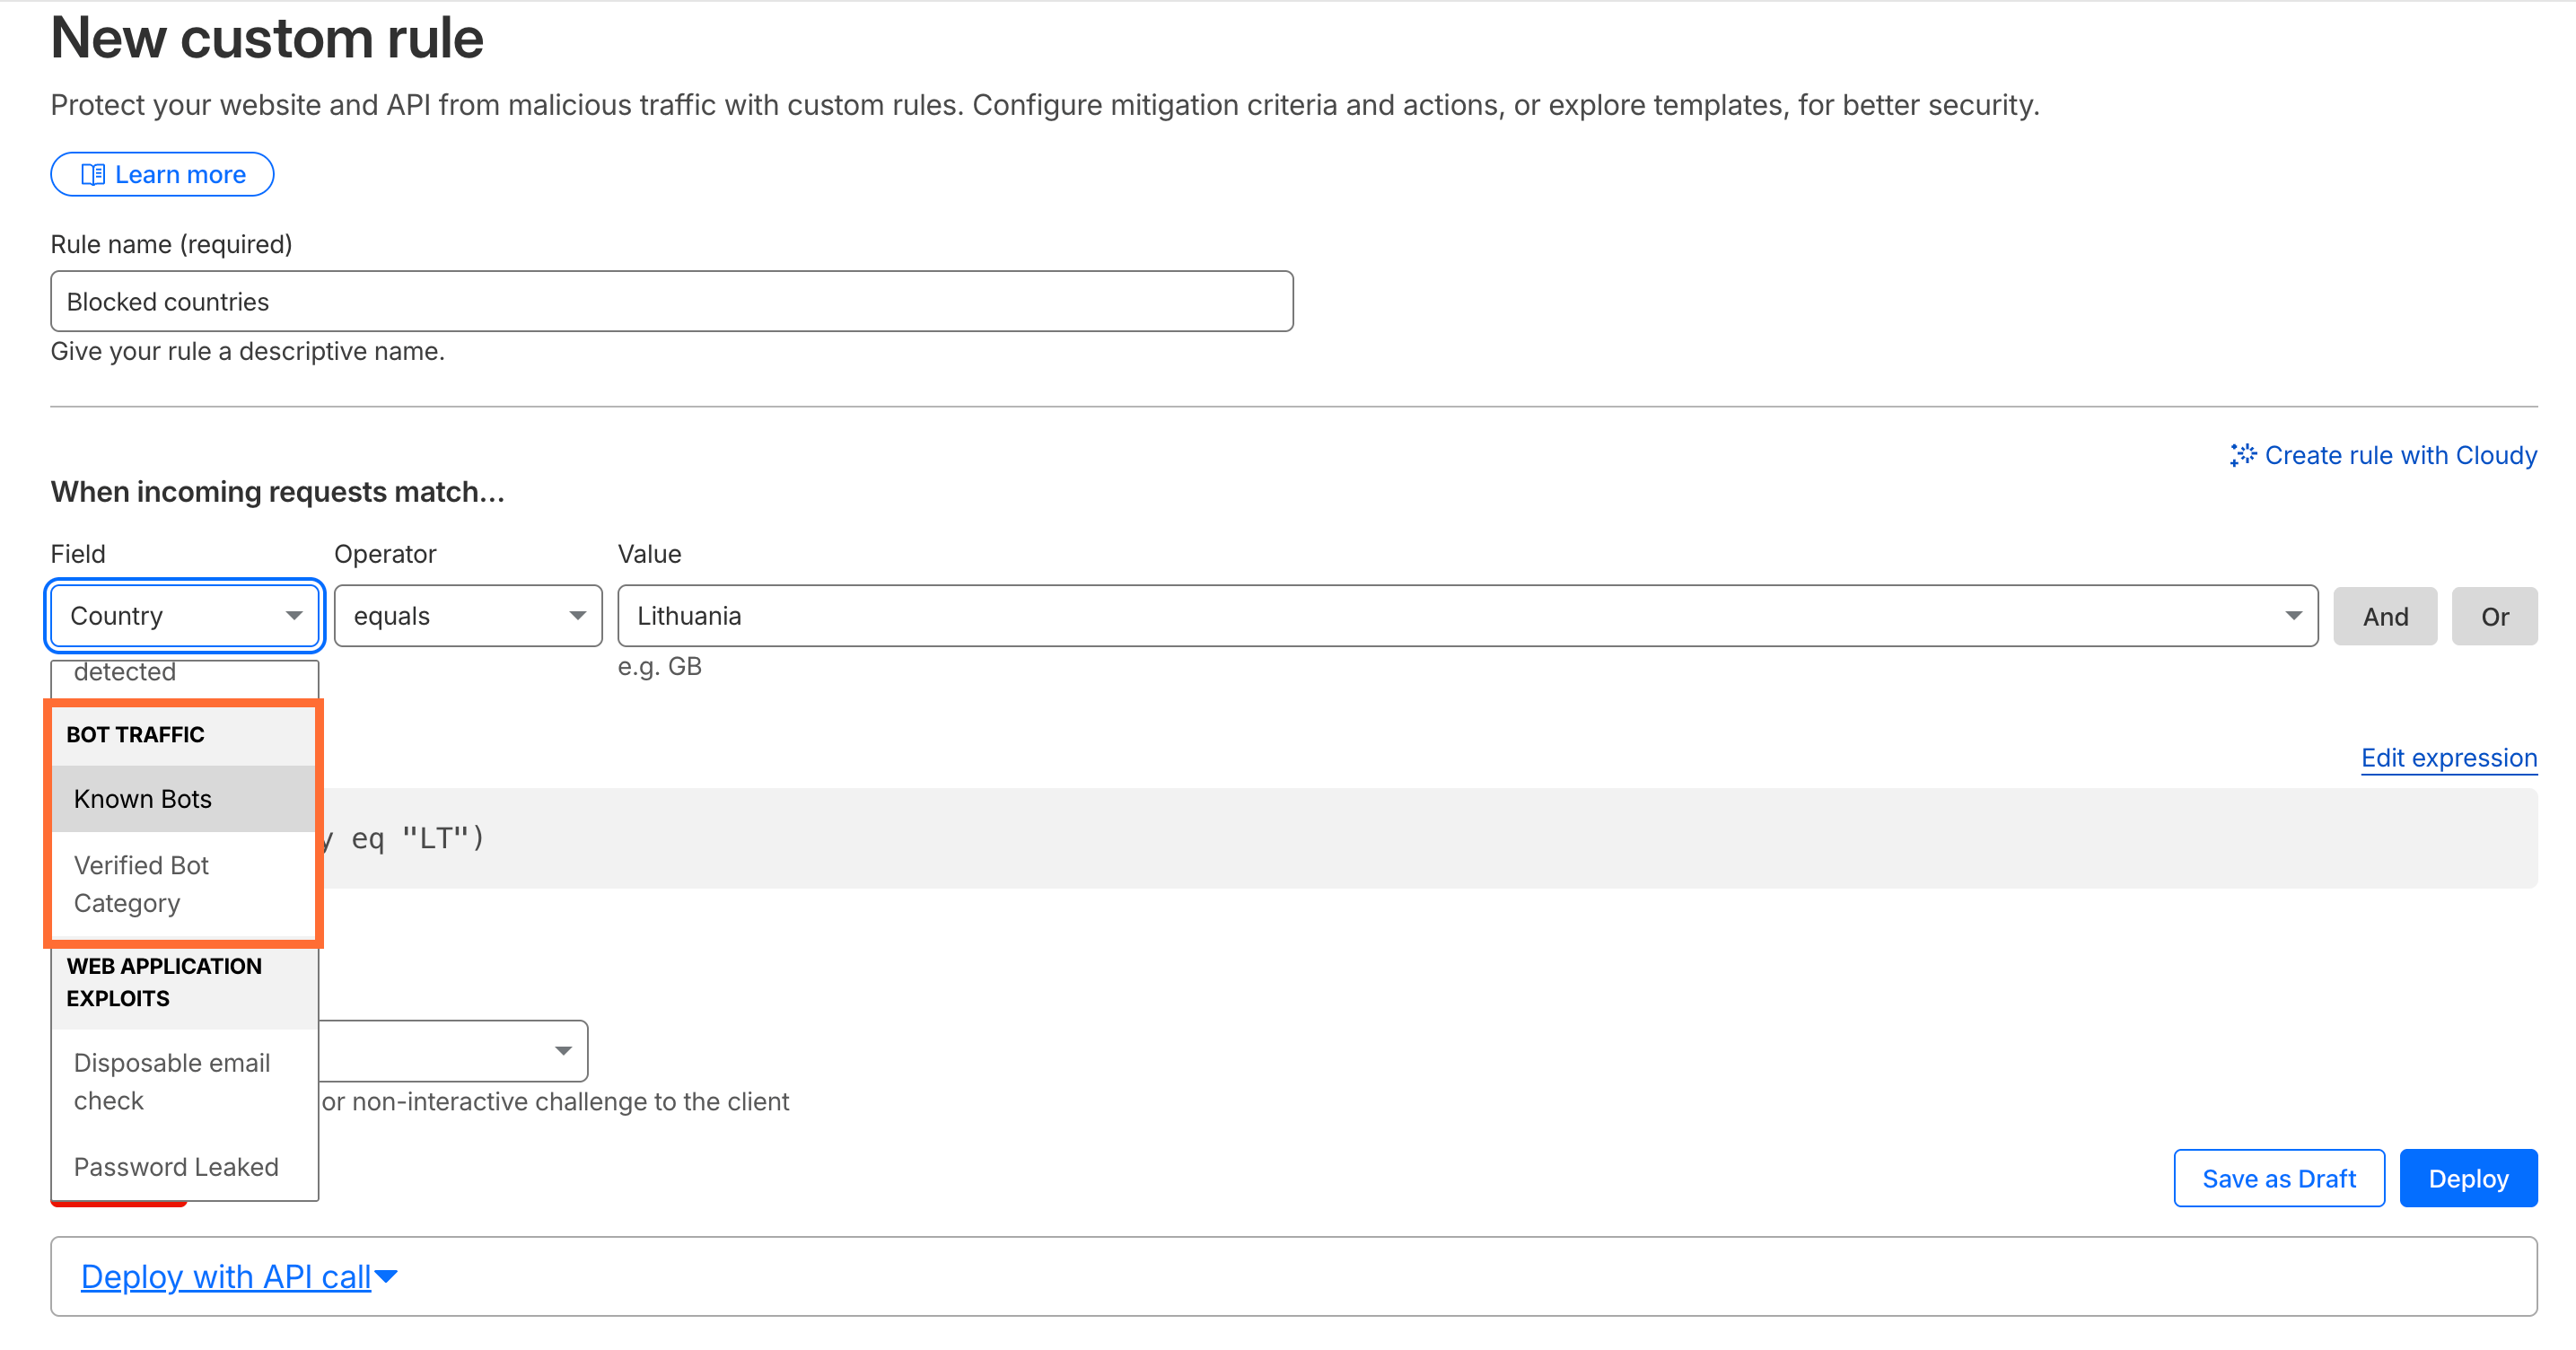
Other Cloudflare options for blocking bot traffic include:
- Known bots - excludes traffic from Cloudflare's maintained bot list
- Verified bot category - excludes traffic by bot category
Use case with blocking spam referrals on the trigger level
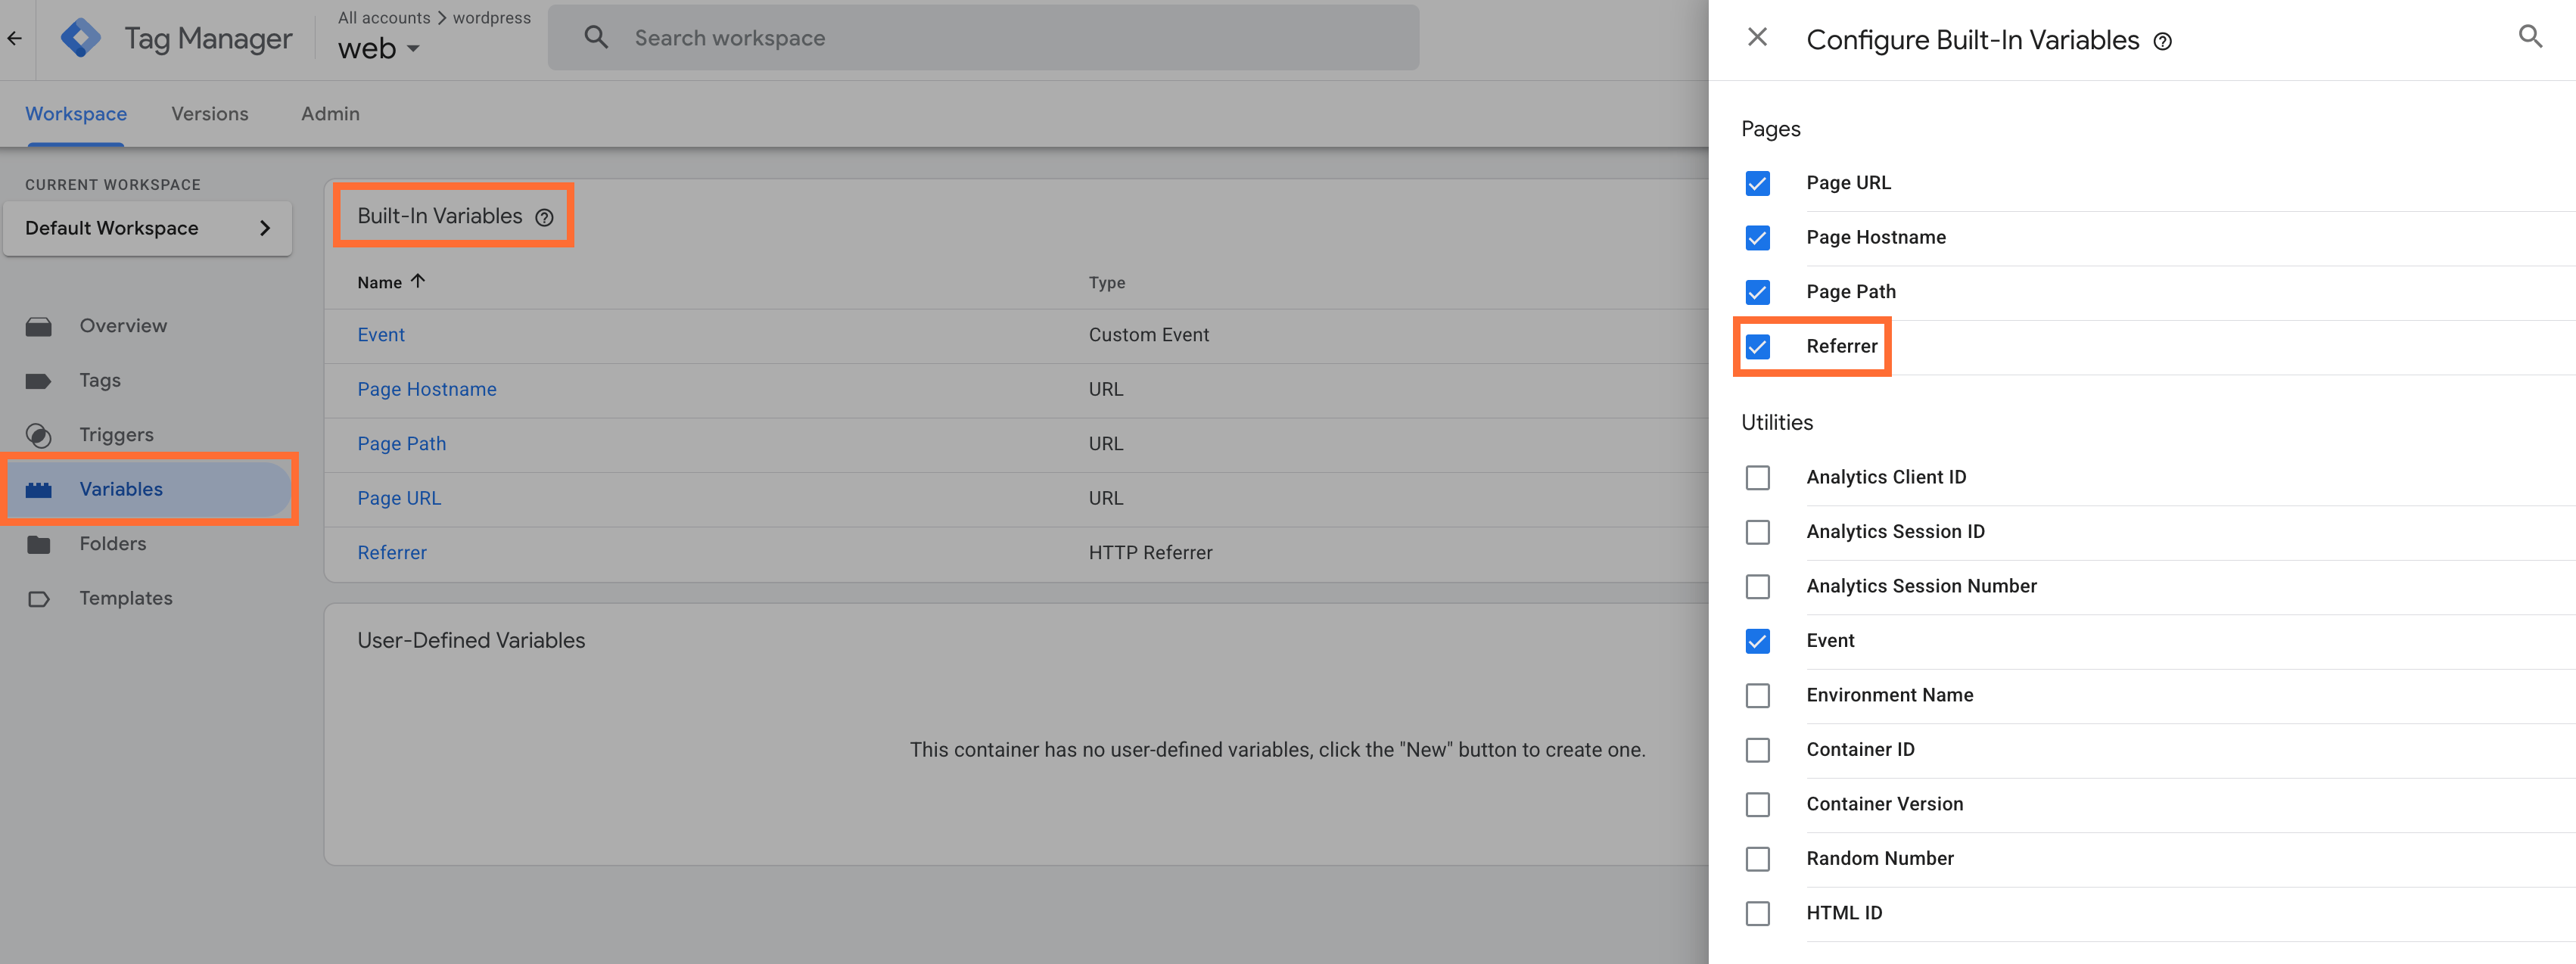
If your bot traffic arrives through known spam domains, you can add an exception trigger to your GA4 tags in web GTM to prevent those sessions from being tracked.
1. In your web GTM container, go to Variables → under Built-In Variables click Configure and enable the Referrer variable.
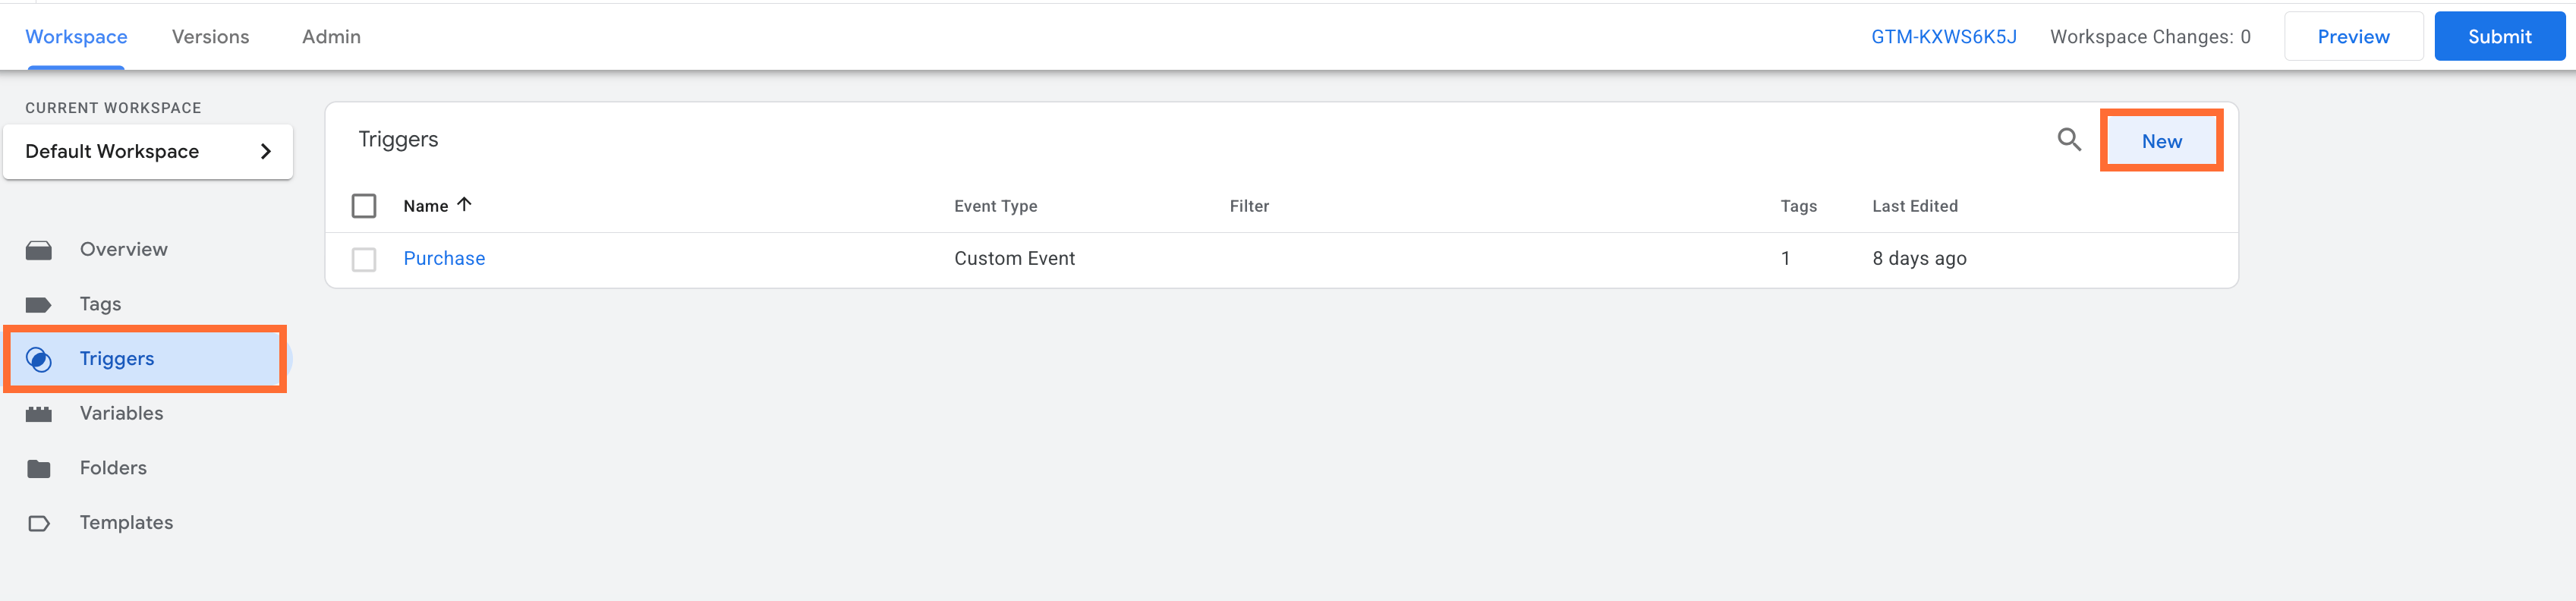
2. Go to Triggers and click New.
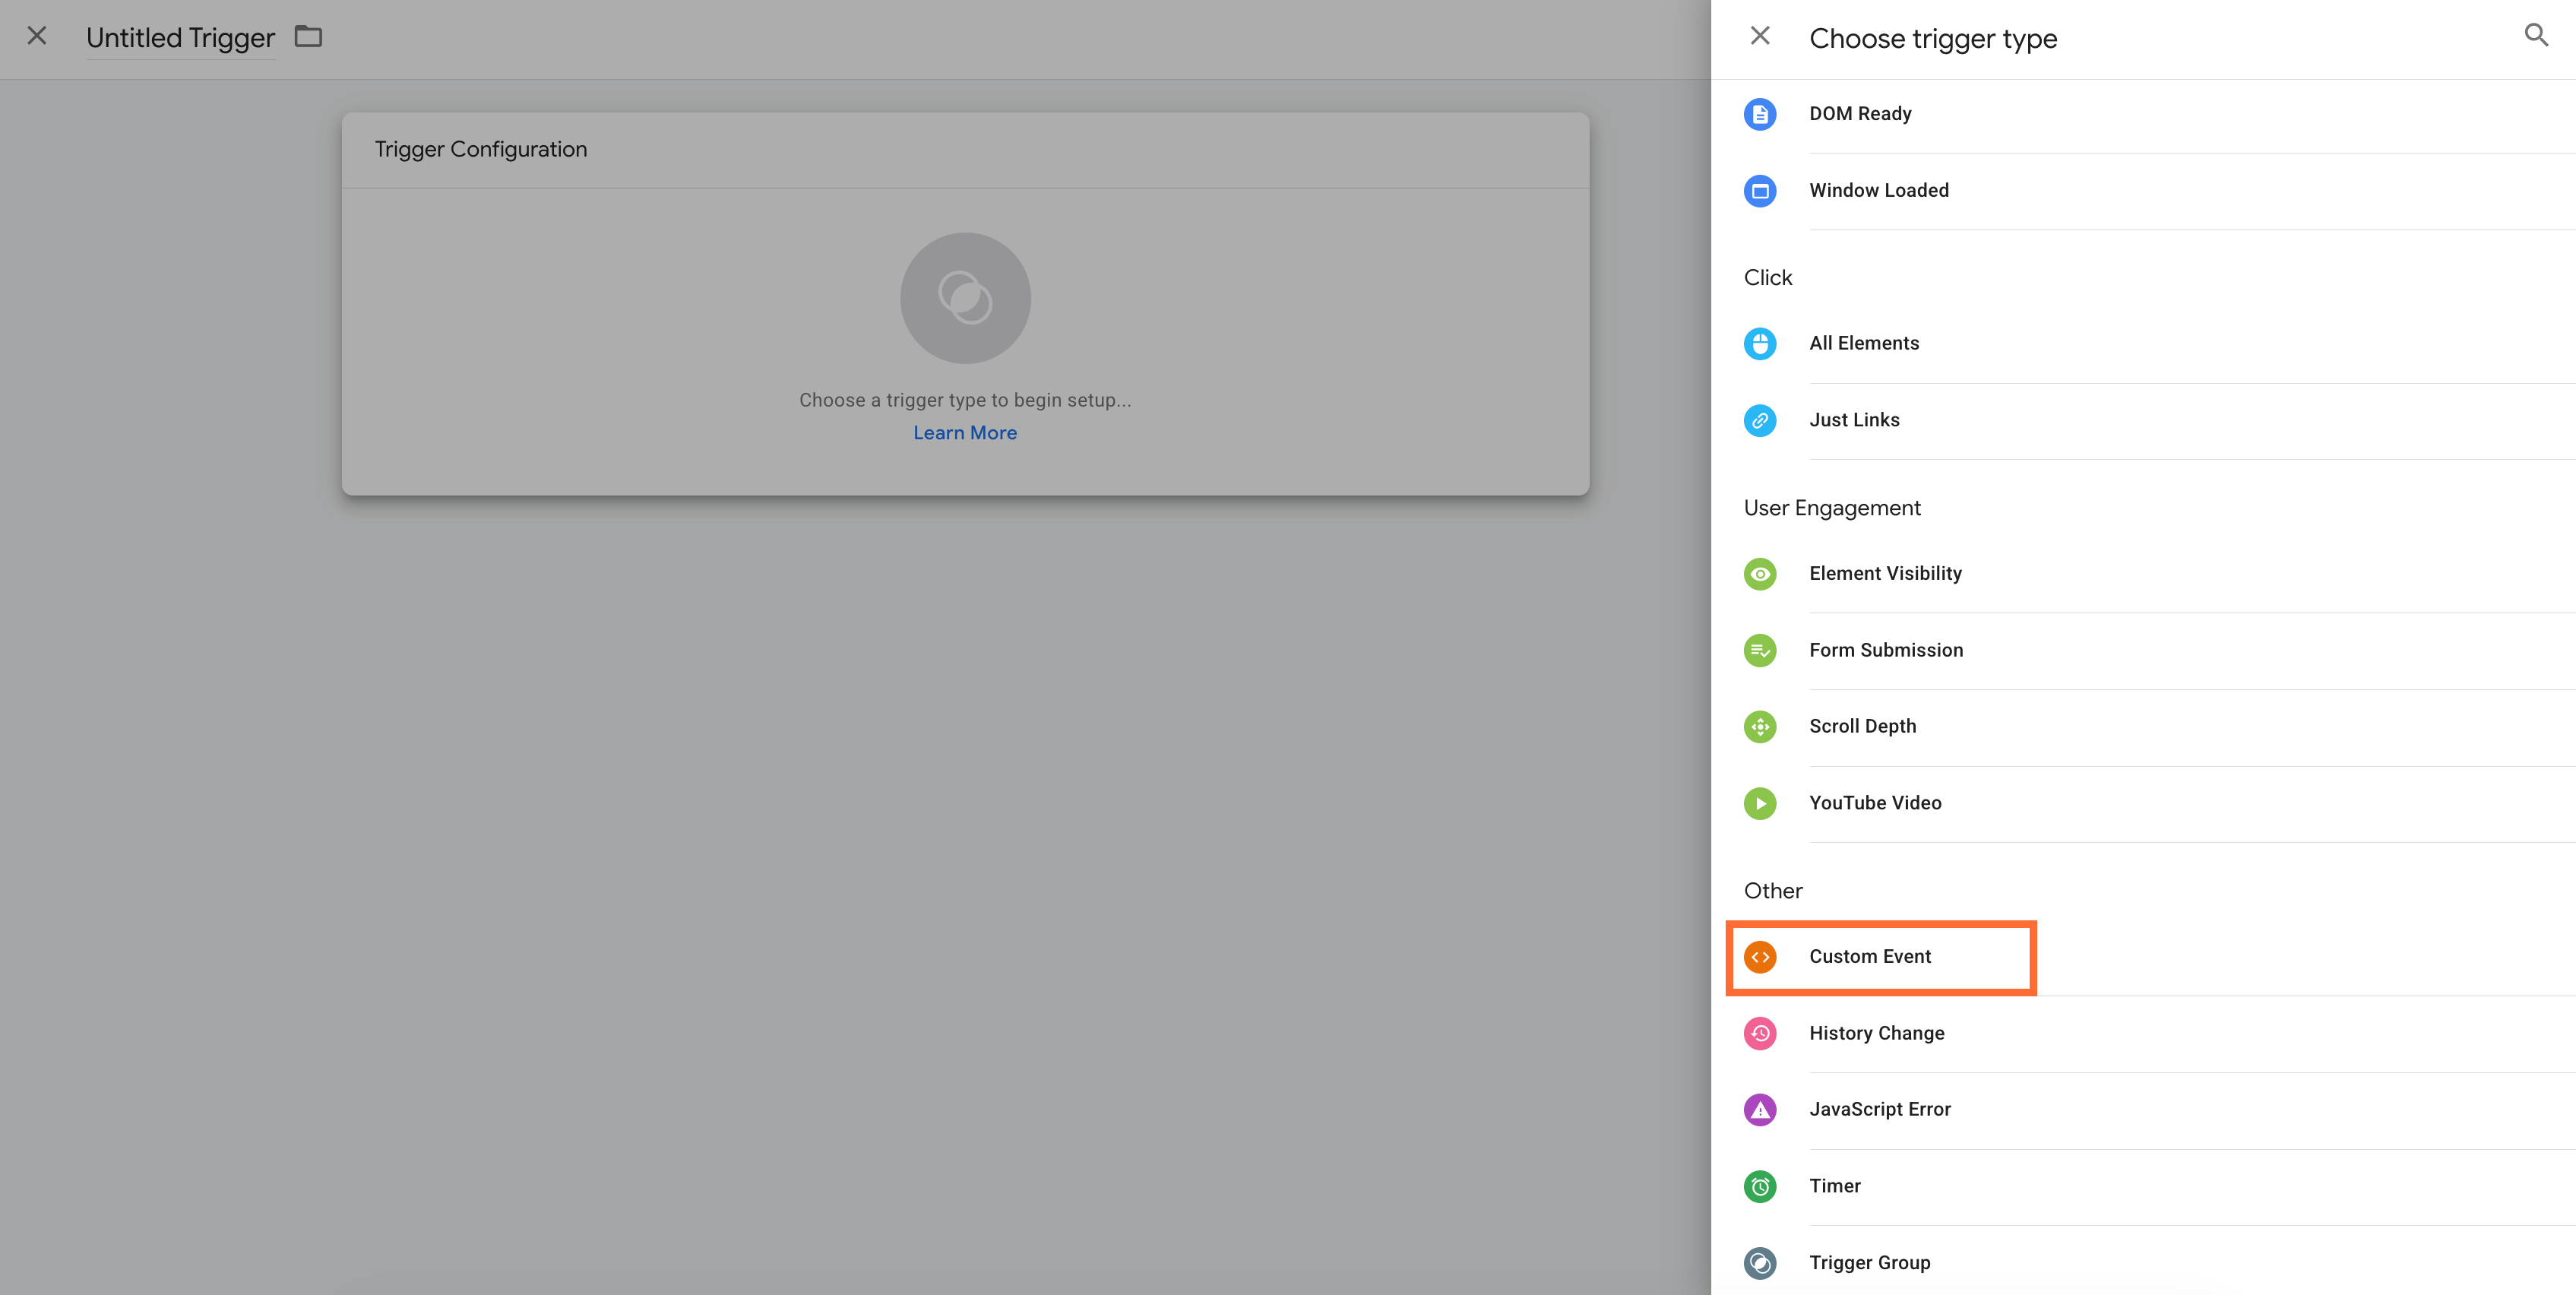
3. Choose Custom Event as a trigger type.
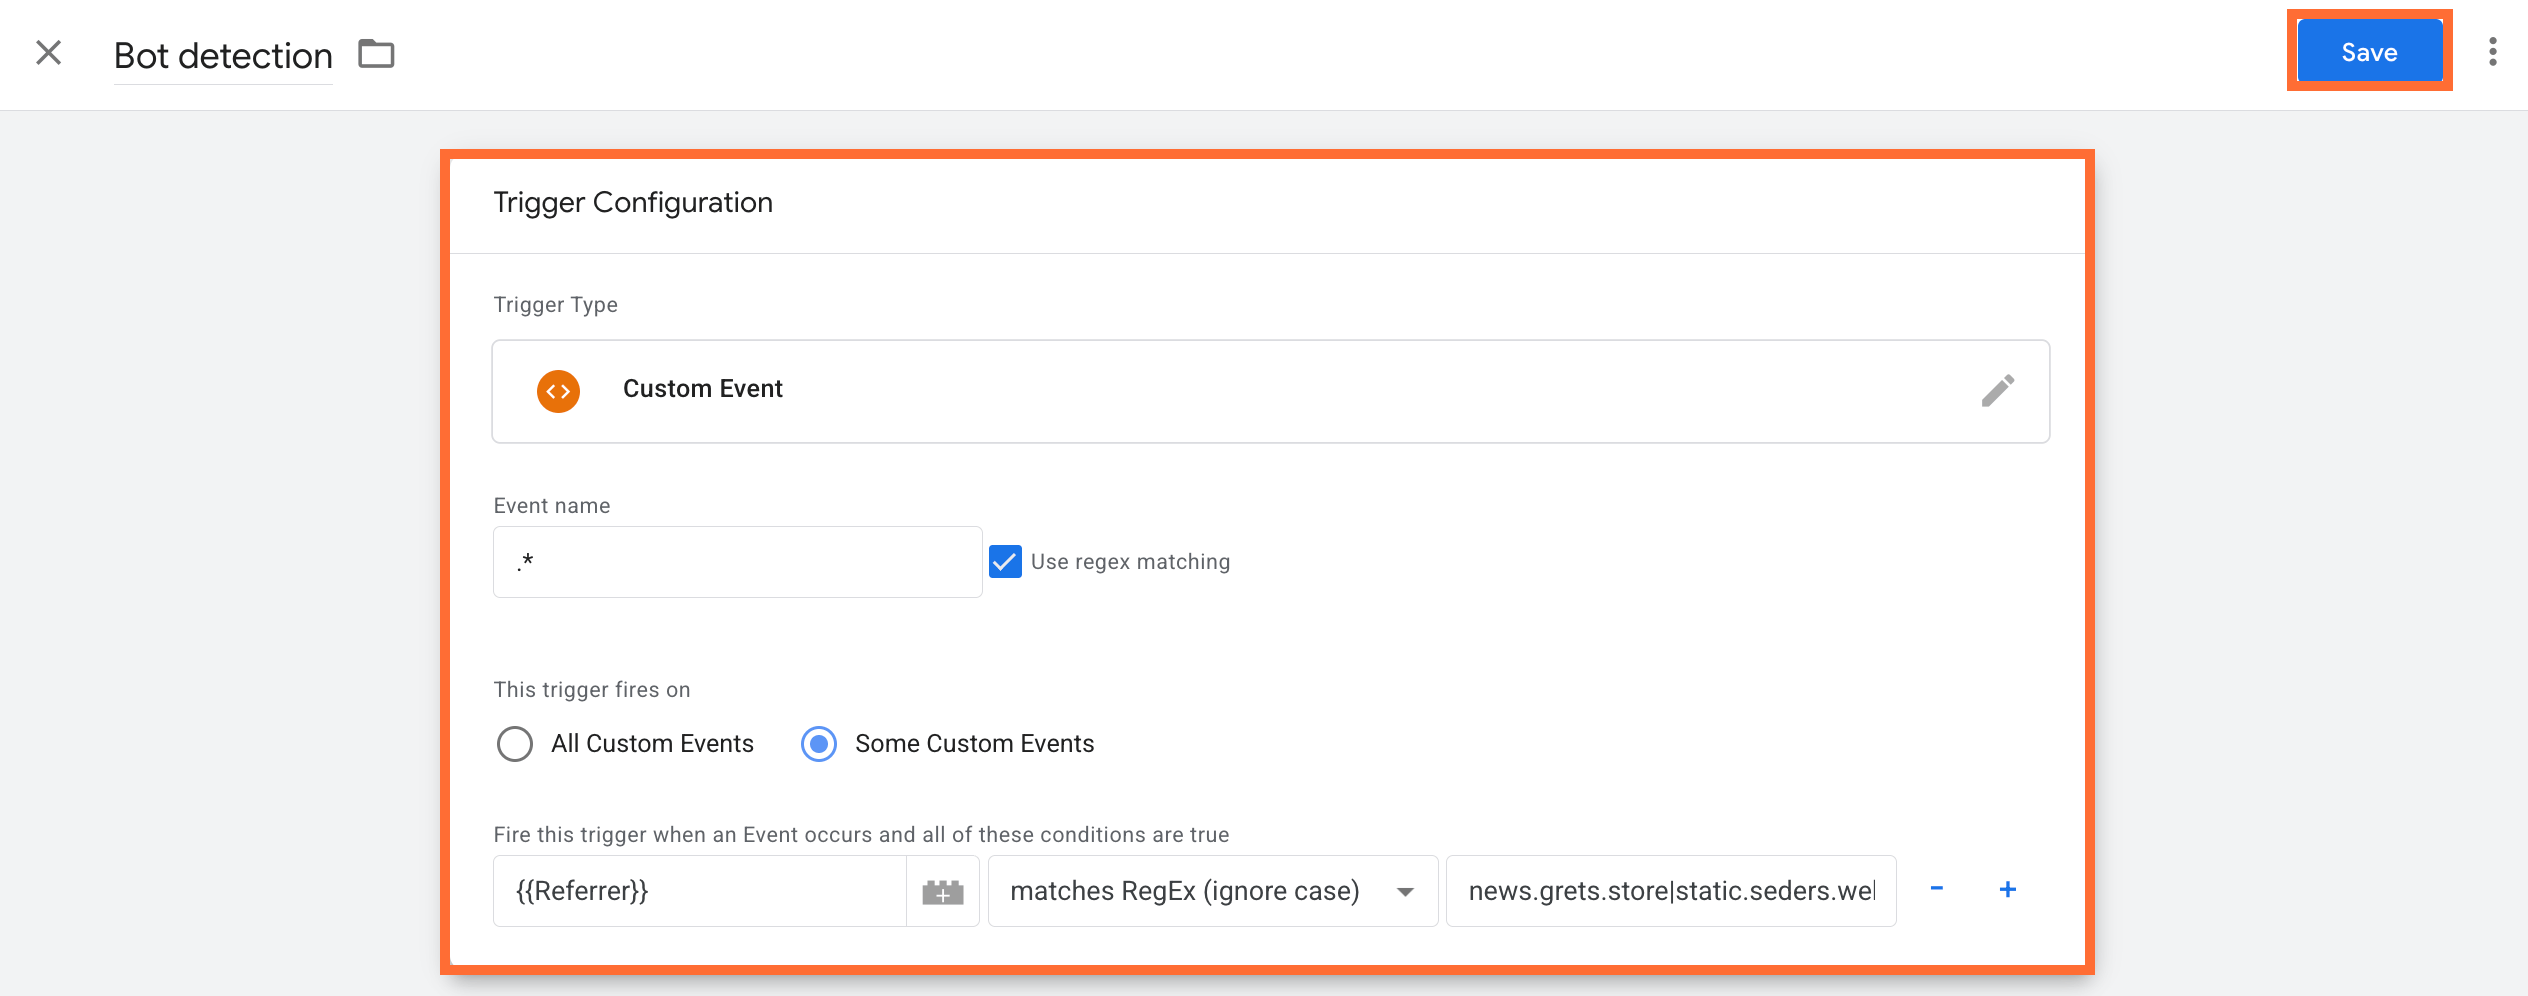
4. Set the following settings:
- Event name - .*
- Check Use regex matching
- Under This trigger fires on, select Some Custom Events
- Add the condition:
{{Referrer}}-matches RegEx (ignore case). Then enter your spam domains, separated by | without spaces (e.g.news.grets.store|static.seders.website|another.domain).
Click Save.
5. Go to your GA4 tag → under Triggering, click Add Exception → select the trigger you just created. Click Save.
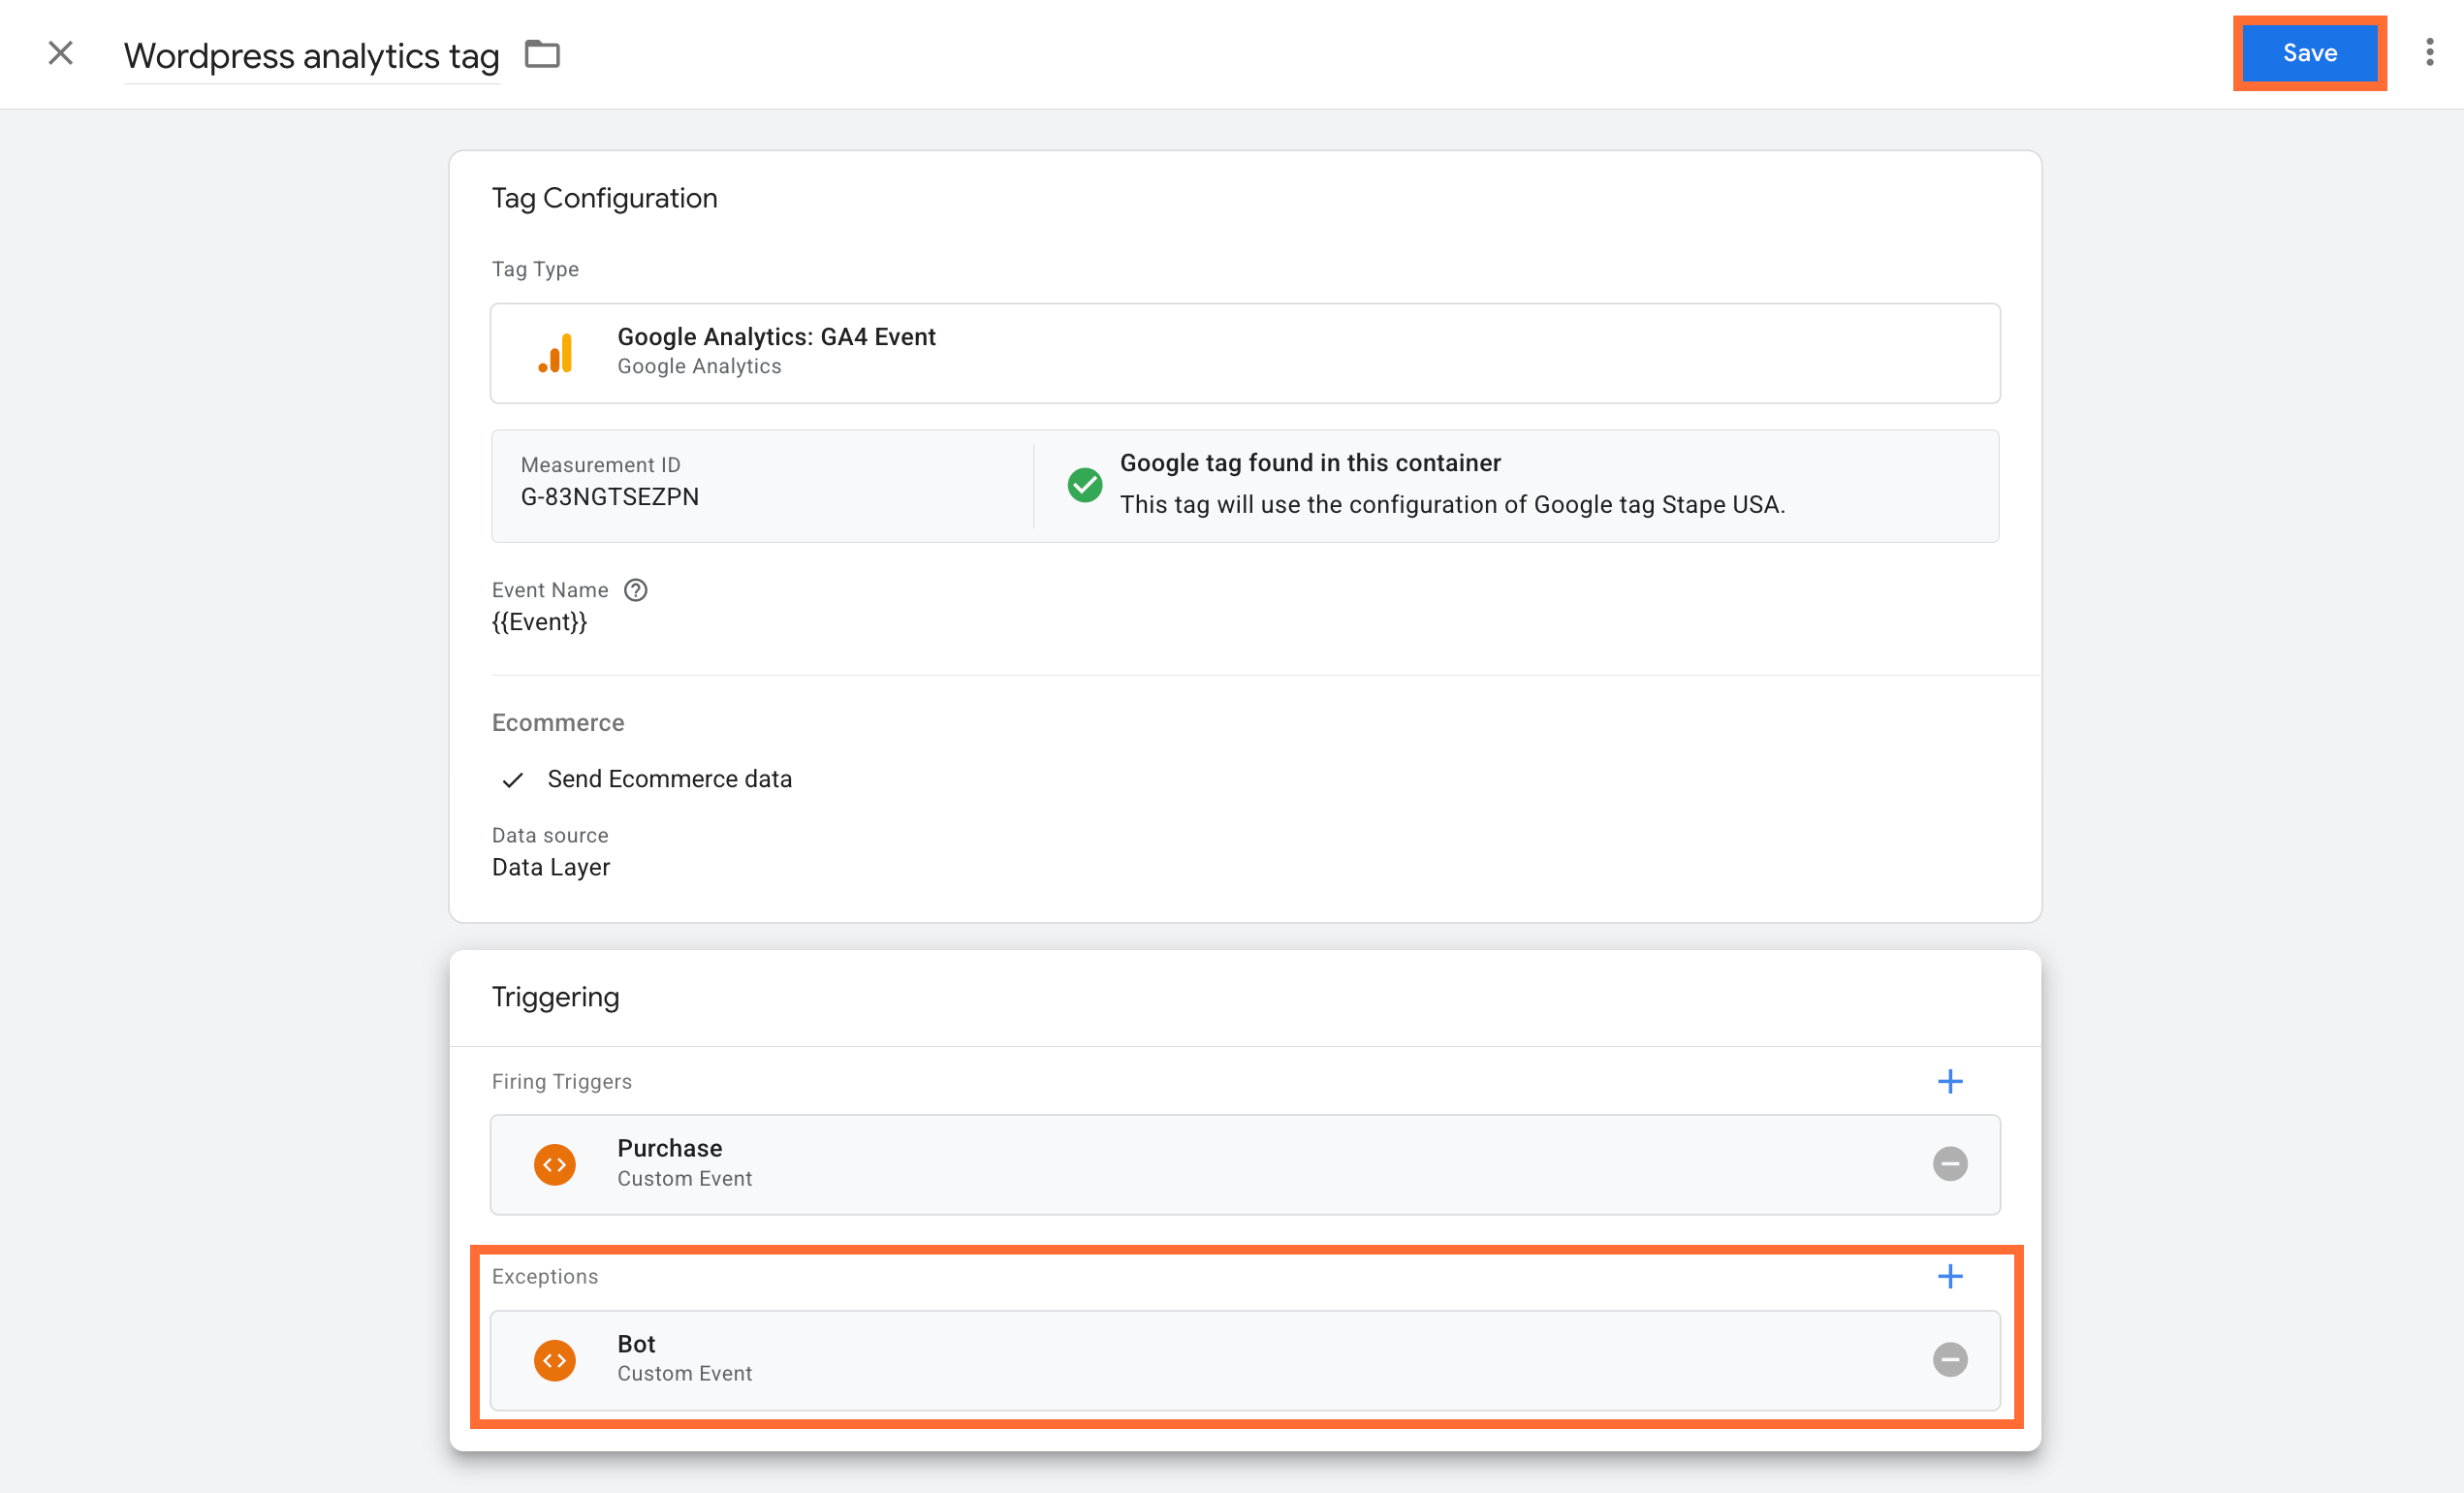
Publish your container. The exception trigger will prevent the GA4 tag from firing whenever the referrer matches one of the listed domains.
Use case: keeping bot conversions out of ad bidding
Bot traffic doesn't just skew reports – it also gets forwarded to Google Ads and Meta as real conversions, which those platforms then use as training data for bidding algorithms. Unlike a missing conversion, a bot conversion is a labelling error: it teaches the algorithm that a traffic pattern which will never buy is worth pursuing, degrading Smart Bidding, Performance Max, and remarketing audiences over time.
A layered setup addresses this at multiple points:
- Measure first. Run Bot Detection in reporting mode (headers added, blocking off) for 1–2 weeks to size the problem before changing anything, using the
X-Device-Bot-Scorevariable in a GA4 event parameter and custom dimension. - Filter per tag. Create a trigger exception using the bot score on your Google Ads and Meta CAPI tags specifically, while leaving GA4 unaffected – this keeps bots visible in reporting while keeping them out of bidding data.
- Escalate to blocking. Once the scoring is trusted, enable Block requests from bots so flagged requests are rejected before reaching sGTM entirely, which also reduces request volume on the
/collectand/datapaths.
For a full walkthrough covering edge-level (Cloudflare), form-level, and offline conversion filtering as well, see the article: A practical guide to bot-proofing your ad bidding.
Was this article helpful?
Comments